
Lets go through the process of turning on an override and giving someone permission to get past that Override Back Office > Settings >, Overrides >
Change “No Sale” to “On”
You may need to restart the front end to have the new Override apply

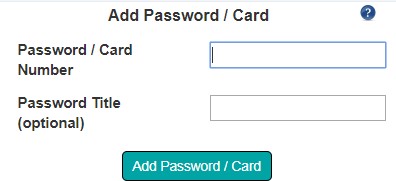 Enter your Passcode in to the “Password / Card Number” box. Then enter a Name for the password (Optional) this would be something like “Front End” or “Card”
Advantages:
Disadvantages
 >
>  > Select an employee >
  >
>  > Then swipe the card
Advantages
Disadvantages
 >
> > Select an employee > >
 > scan your fingerprint 4 times
 Disadvantages
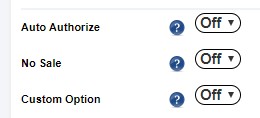
 > set
> set  to “On”
You will need to do this for each till you would like to enable this feature Once enabled, you will be able to pick from a list of employees instead of entering your Passcode Advantages
to “On”
You will need to do this for each till you would like to enable this feature Once enabled, you will be able to pick from a list of employees instead of entering your Passcode Advantages
| Override | Where it Applies | Employee / Job Privilege |
|---|---|---|
| No Sale | Prevents you from pressing control panel > no sale button | No Sale - All Tills No Sale Assigned Tills |
| Custom Option | Order Functions > Custom Modifier. Override will appear if the modifier has a price or not | Custom Option |
| Custom Option W/Price | Order Functions > Custom Modifier. Override will only appear if the modifier has a price | Custom option with price |
| Custom Item | Order Functions > Custom Item | Custom Item |
| Custom Item w/price | Order Functions > Custom Item. Override will only appear if the Item has a price | Custom Item w/price |
| Remove Items | Remove Item | |
| Change Times | ? | |
| Void Transactions | Control Panel > View Transactions > Highlight Transaction > View Transaction > Void Transaction | Voids |
| Refund | Control Panel > Issue Refund | Refunds |
| Approve delivery Address | ? | |
| Cancel takeout | Pending Orders > Takeout > Select the order > Cancel | Cancel takeout |
| Cancel Delivery | Pending Orders > Delivery > Select the order > Cancel Order | Cancel Delivery |
| Cancel Drive Thru | Pending Orders > Drive Thru > Select the order > Cancel | Cancel Drive Thru |
| Fail Delivery | Pending Orders > Deliveries > Out Delivery Orders > Delivery Failed | Fail Delivery |
| View Transactions | Control Panel > View Transactions | View Transactions |
| Add Gratuity | Tickets Screen > GRAT | Gratuity |
| Price Edit | Select item on > Edit Price | Edit Price |
| Edit Customer Database | Control Panel > Customer Database | Edit Customer Database |
| Pay In / Pay Out | Control Panel > Pay In & Pay Out | Pay In / Pay Out |
| Depleted Items | Shows when attempting to sell an item that has counter enabled and has reached zero | Add Depleted Items |
| Credit Reprint | ? | Credit Reprint |
| End of Day | Control Panel > End of Day | End of Day |
| Batch | Control Panel > Batch / Settle | Credit Batch |
| Add Fingerprint | Control Panel > Add Fingerprint | Add Fingerprint |
| Menu | Control Panel > Menu Management | Edit Menu |
| Comps | Select an item in the receipt box > Comp Item(s) | Comps |
| Exit | The x on the logon screen | Exit POS |
| Ignore Printer Error | Appears when attempting to ignore a printer error | Ignore Printer Error |
| Transfer tables | Manage Tickets > Trans | Transfer All Tables Transfer Own Tables |
| Non Default Job | If enabled this adds a message saying “This is not a default job code, please see a manager” when clocking in as a job code that is not set as your default | N/A |
| Drinks Per Guest | If settings > POS > Drinks per guest is enabled then this override will appear when the drinks are less than the number of guests | Drinks Per Guest |
| Tip Amount Override | Override to add a tip above a percentage of the total order. This percentage is set in the Tip Amount field | Tip Amount Override |
| Tip Amount | Is the percentage above the total order amount that an override will be required if Tip Amount Override is enabled | N/A |
| Check Payment | Used when you pay off a transaction using a check | Accept Check |
| Scale Manual Entry | ?? | Scale Manual Entry |
| Scale Item Removal | ? | ? |
| Skip Credit Authorization | ? | ? |
| Add to Account | Pay Screen > Add to Account | Accounts |
| Service Fees | Order Screen > Order Functions > Add Service Fees | Service Fees |
| Table Access | Appears when you try and access a table you are not assigned to | Access All Tables |
| Consolidate Items | Order Screen > Consolidate Items | Consolidate Items |
| Open Till | Control Panel > Open Till | Ltd Till Open |
| Combine Bar Tab | Pending Orders > Bar Tabs screen > Combine | Combine Bar Tabs |
| Bar Tab | Determines if the password of the person receiving the Bar Tab is required when transferring a Bar Tab | N/A |
| Skip Break | Allows an employee to skip a break when the employee break system is enabled | - |
| Employee Privileges | Not all privileges have associated overrides. If this is the case then the override setting will be shown as "NA" | N/A |
Employee Privilege |
Where it applies |
Override |
| Abandon Offline Credit Transactions | ??? | - |
| Access All Tables | Appears when you try and access a table you are not assigned to | Table Access |
| Accounts | Pay Screen > Add to Account | Add To Account |
| Activate Gift Cards | ? Activate Gift Cards Tool tip says “Determines whether the employee can perform an override on activating a gift card without a sell” I assume this should say SALE instead of sell. But I also can’t get the override to show up. There is no corresponding override as far as I can tell and I don’t know how to activate a gifrcard without a sale |
- |
| Add Depleted items | Shows when attempting to sell an item that has counter enabled and has reached zero | Depleted item |
| Add Fingerprint | Control Panel > Add Fingerprint | Add Fingerprint |
| Add Tips | Does Not require Override. If disabled then there will be no transactions shown when adding tips | N/A |
| Add VIP Points | The override is always enabled. There is NO OVERRIDE setting to disable it. Order Functions > VIP/Loyalty >Swipe card > Add Points | N/A |
| Assign Transaction | Assign Transaction If this is turned on then when paying for a table that is not yours, you are asked if you want to have the funds assigned to you or to the person that is assigned to the table. NO OVERRIDE. | N/A |
| Backup System | ?? There does not seem to be a way to do this as there is in the tool tip | - |
| Bank Reports | ? | - |
| Cancel Delivery | Pending Orders > Delivery > Select the order > Cancel Order | Cancel Delivery |
| Cancel Drive Thru | Pending Orders > Drive Thru > Select the order > Cancel | Cancel Drive Thru |
| Cancel Takeout | Pending Orders > Takeout > Select the order > Cancel | Cancel Takeout |
| Cash Draw | Determines if the cash draw will open for the employee. NO OVERRIDE. | N/A |
| Clock Overrides | Front end > Time Clock > Mgr Override In / Mgr Override Out. There is NO OVERRIDE. setting for this | N/A |
| Clocked Out General Access | Determines if you are allowed general access to the till without having to be clocked in | N/A |
| Clocked Out Overrides | Determines if you are allowed to perform overrides without being clocked in | N/A |
| Close Banks With Open Sales | Determines if you are allowed to close a Bank without first closing out all of the sales for the employee associated with that Bank | N/A |
| Combine Bar Tabs | Pending Orders > Bar Tabs screen > Combine | Combine Bar Tab |
| Complete Delivery | Pending Orders > Deliveries > Out Delivery orders > Complete Delivery | N/A |
| Comps | Select an item in the receipt box > Comp Item(s) | Comps |
| Consolidate Items | Order Screen > Consolidate Items | Consolidate Items |
| Credit Batch | Control Panel > Batch / Settle | Batch |
| Custom Item | Order Functions > Custom Item | Custom Item |
| Custom Item w/ Price | Order Functions > Custom Item. Override will only appear if the Item has a price | Custom Item w/ Price |
| Custom Option | Order Functions > Custom Modifier. Override will appear if the modifier has a price or not | Custom Option |
| Custom Option W/Price | Order Functions > Custom Modifier. Override will only appear if the modifier has a price | Custom Option W/Price |
| Database Settings | ? | - |
| Delivery Address | ? | - |
| Drinks Per Guest | Back Office > POS > Drinks per guest - when enabled then this override will appear when the drinks are less than the number of guests | Guest |
| Edit Customer Database | Control Panel > Customer Database | Edit Customer Database |
| Edit Employees | ? | - |
| Edit Employee Privileges | ? | - |
| Edit Menu | Control Panel > Menu Management | Menu |
| Edit Price | Select item on > Edit Price | Price Edit |
| Edit Times | ? | - |
| Edit Wait Times | Allows you to edit the wait times for delivery and takeout that show on the logon screen. NO OVERRIDE. | N/A |
| Employee control Panel | Control Panel > Employee Control Panel. NO OVERRIDE. | N/A |
| End of Day | Control Panel > End of Day | End of Day |
| Exit POS | The x on the logon screen | Exit |
| Fail Delivery | Pending Orders > Deliveries > Out Delivery Orders > Delivery Failed | Fail Delivery |
| Full menu Editing | If “No” then it limits “Edit Menu” to Setting item counters and availability for the employee | N/A |
| Gratuity | Manage Tickets Screen > GRAT | Add Gratuity |
| Ignore Printer Error | Appears when attempting to ignore a printer error | Ignore Printer Error |
| Kitchen Tickets | Control Panel > Kitchen Tickets | N/A |
| Labor Reports | Control Panel > Reports > Employee Reports | N/A |
| Ltd Bank Close | Control Panel > Till and Bank Manager > Select bank > Close Bank | N/A |
| Ltd Bank Open | Determines if you are allowed to open a bank. This will happen when you try and pay for something without having a till open | N/A |
| Ltd Till /bank Info | Replaces the financial figures on the bank that shows under Control Panel > Till and Bank Manager with # as to obscure them form the employee | N/A |
| Mgr Till/Bank Info | Determines if the Manager can | - |

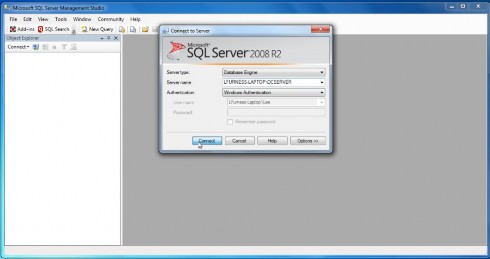


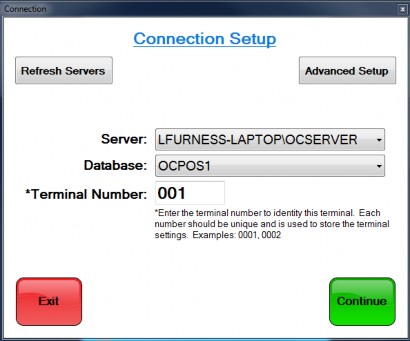 “Server” is a list of all machines on the local network with SQL installed
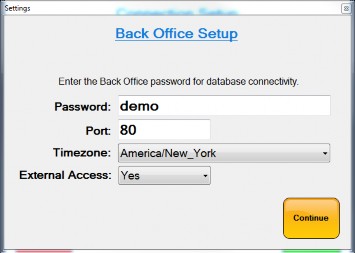 “Password” This is the MSSQL password that the back-office software will use to connect to the database. It can be any password.
 “Server” The name of the server you wish to connect to in the format Computername\sql instance which by Default is OCSERVER
 Click on the button and you will be taken to the following screen
Menu Counter Sets allow you to create a new temporary Product and relate that product to multiple Menu Items. Each of these Items will show the same availability. When one gets sold then the count for all of them will be depleted
For example, you may want to keep track of a special bottle of vodka which is used in several cocktails. You would create a Menu Counter Set for the Vodka and assign that set to each Menu Item that contains it. That way you can keep track and know exactly when the Vodka has run out. As soon as the Vodka has gone, you will no longer be able to sell any of the cocktails that used it

Now when you look at the Menu Item Button on the front end you will see that they all have the same counter number. If you sell 1 of them, they will all be reduced by 1
The I.A.N Will show a separate line for each Menu Item. If you change the value of 1 of the Items it will affect the others


Once enabled, the quantity available will show on the button provided the following is true
Each time you press the button to sell the item one will be removed from the quantity available. If the Menu Item is related to a Menu Counter Set then one will be removed from the quantity of every Item in that set.
The figure updates when the button is loaded, this means you have to leave the category and go back into it to see the updated quantity. If someone on another till logs on after you have pressed the button then they will see the updated counter amount.
The counter in the database goes down as soon as you hit the button. If someone tries to sell the Item when the counter is at zero they will be met with the following Message
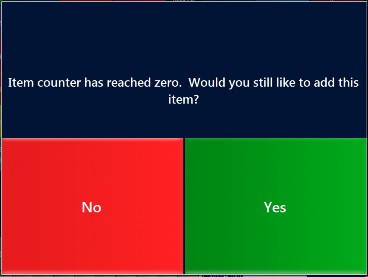
It is a flexible system so you are able to sell the Item anyway.
As this is a simple feature, removing the item after it has been rang through will not increase the counter. If you want to increase the counter you will need to do it through Menu Management by editing the counter for the Item or through the I.A.N
 Coursing is when you tell the kitchen that the customer is going to eat a certain dish at a certain time.

 “Name” - Is the name of the status
 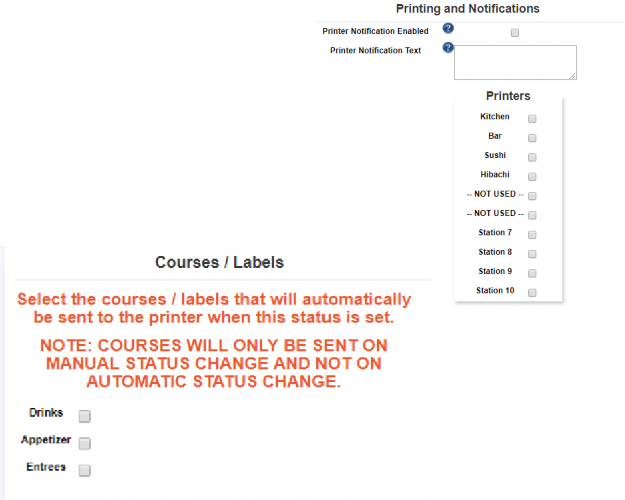 “Printer Notification Enabled” If ticked the notification in the “Printer Notification Text” box will print to the printers you select under the “Printers” list when this status is selected
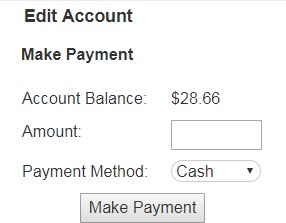
 Customer account payments allow you to charge the value of the check to a new or existing customer account to be invoiced at a later date. Very useful for corporate clients. Or VIP guests
They can also be used as an alternative to deposits for events
You can create an account from the front end or from the Back Office, however credit limits can only be applied from the back office. From the front end the only way to create an account is to sell something to that new account. If you want to add accounts without charging a sale to them then you will need to do this through the back office.


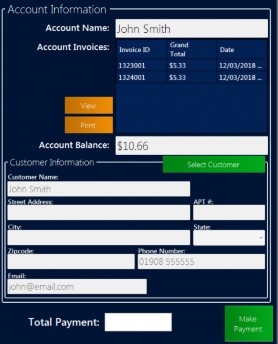
Account Name The name of the account
Account Description Something to help describe who the account is for or what the account is supposed to be used for
Credit Limit (Optional) The maximum amount of money that can be charged to this account in total.

From the Front End
From the Back Office
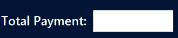
At some point you will want to send out an invoice and get paid for the money that has been spent on account. You can pay part or all of the balance and this can be done from the front end or the back office
From the Back Office
From the Front End

There are 2 reports specific to Accounts on the Back Office
Account Transaction report looks like this
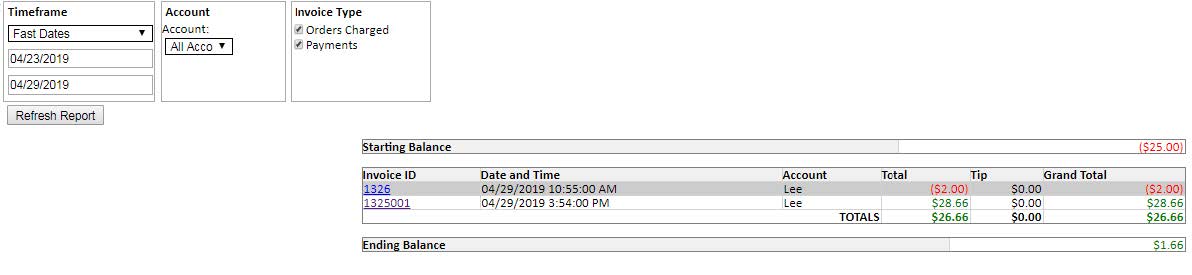
You can filter by a specific account, orders charged, or payments made off the balance of the account
Starting Balance The balance as it was at the start of the date range
Invoice ID The ID of the invoice that was charged to account or paid off an account
Date and Time The date and time the invoice was paid
Account The name of the account
Total How much the transaction was for
Tip Any tip that was added
Grand Total Total + Tip
Green is payments charged to account Red is payments paid off the balance of an account
Accounts List looks like this

Account Name Self explanitory
Account Desc An account description. This is pulled from Back Office > CRM > Editing the account and setting the “Account Description”
Starting Balance The balance of the account at the start of the date range
Charged How much has been charged to the account
Paid The total amount paid off the balance of the account
Ending Balance – Charged minus Paid
Totals will show you a sum of the column.
Red is payments charged to account
Green is payments paid off the balance of an account
Payments charged to account also show in the Operations Report and the End of Day Report under “On Account”
When the balance of an account is paid, the money is not counted as a sale. That means that if you sell a beer for $5.00 and charge it to account it will show as a sale. Now you settle the account to cash. The sales will still show as $5.00 as you still only sold $5.00 worth of products.
Here is an example from the operations report. In the sales summary on the left I sold one beer and $5.33 was settled to On Account. One beer was then sold for $5.33 and settled to credit. The screen shot on the right I made a payment off the balance of the account in the amount of $5.33 cash.
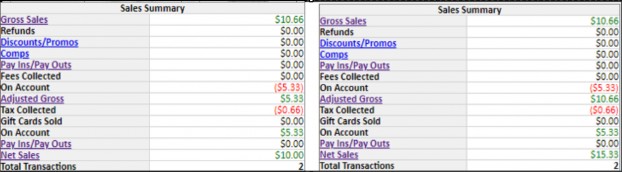
"Adjusted Gross” and “Net Sales” are increased by the amount paid off to the "On Account", account. This is the only place where you will see payments paid (or paid off) towards the balance of an On Account, account affecting sales.
Below is the same operations report comparing the sales by order method section before and after a payment, paying off the balance of the "On Account," account
The “Expected Deposit Total” and the “Actual Deposit Total” has increased by the cash settlement

Under the Till and Banks Section the Cash Reading has gone up by the settlement amount
“Expected Deposit” and “Adjusted Gross” goes up by the settlement amount. The “Payments to Account” shows in red as it is taking the balance from the account instead of adding to the account

This is an integration with Datacap allowing us to use Datacap to manage a central repository of giftcards to be created or redeemed at multiple locations
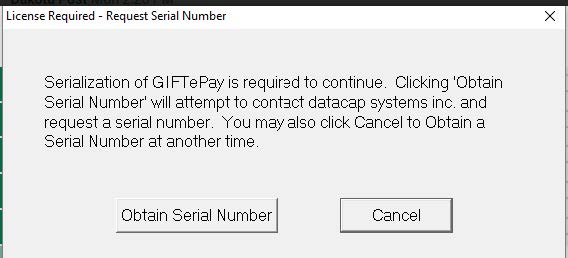
The way we use the gift cards is to sell a custom gift card card which communicates with Datacap and stores it on their cloud. That gift card can then be used as payment at multiple locations.
The deposit is taken from the Till.
 >
> 

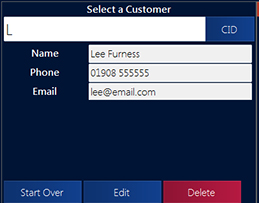
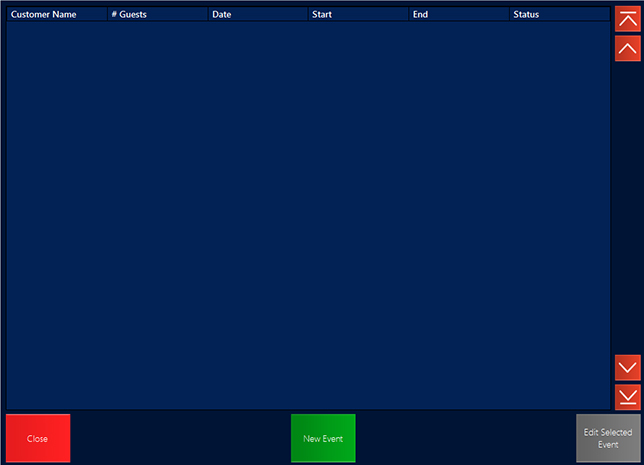
Events are stored against customers. You either have to search for an existing customer using the search box, or type in details into the fields below it to create a new customer
This takes you to the “Event Information” screen.

Fill in the details of the event the deposit is for. Add the Date of the booking, the time the booking is set for and when it is due to end. Add the number of guests and any notes you want to enter
Press “Save” when done
The next stage is to add the deposit
After pressing save you will get the following screen this is where you see a list of deposits or add a new deposit
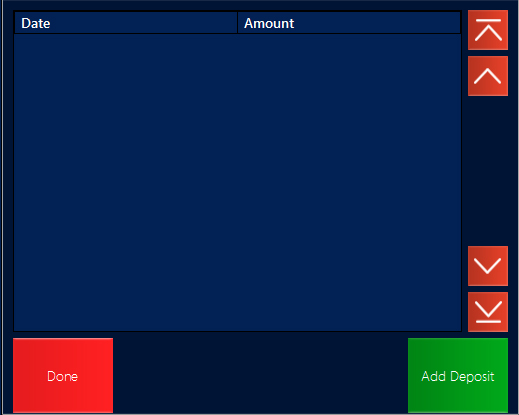
Press “Add Deposit”, then type in the amount that is being paid
Press Done and this will take you to the screen where you settle the check. Settle the check as normal
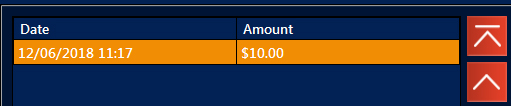
You will then return to the Add Deposit screen where you will see the new deposit against the event
You are able to check on a deposit at any time.
>
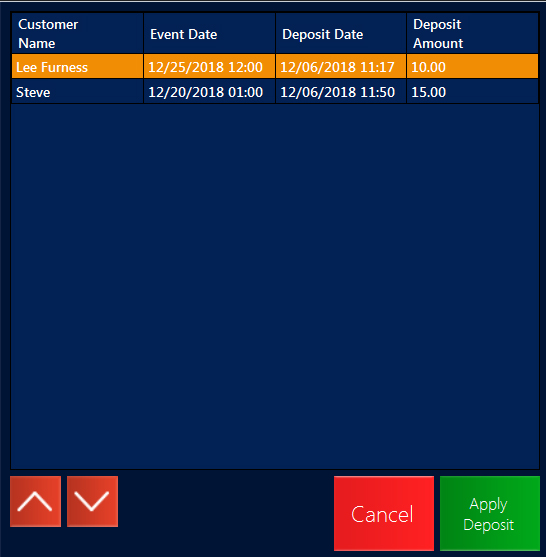
This is a list of every event you have

You can then view or edit the details
You are able to check on a deposit at any time.You can have more than 1 deposit against an event. To see a list of the deposits, click on “Deposits”
Notice the status
These are set manually. After the deposit is redeemed it is a good idea to mark the event as complete.
You can also add another deposit in the same way as before. You may want to do this if you have a deposits per person like you would with a Christmas Dinner
You are able to check on a deposit at any time.
When the event is complete you will need to settle the check and redeem the deposit.
 >
> 
 The amount will now be deducted from the amount due.
Go to Back Office > Data Mining > Sales Reports > Redeemed Deposit Report
The report shows you the details of the deposits taken. If you click on the Invoice ID of any deposit, the full details of the check that the deposit was used for is displayed as it opens the Transaction Detail Report

Operations report
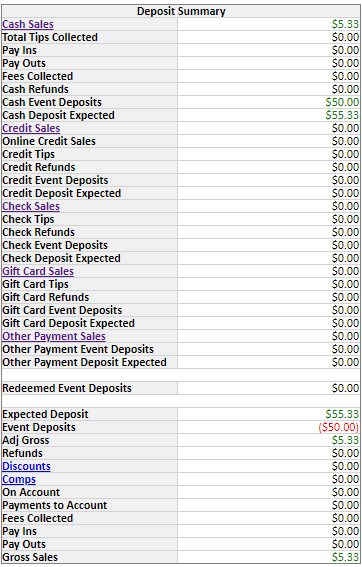
The Deposits show under a few different sections of the Operations Report for these examples I have $50 of Event deposits taken.
The deposit summary is all about how much money you should have to deposit into the bank. However, there is also a section for event deposits under each payment type
Cash Event Deposits
Credit Event Deposits
Check Event Deposits
Gift Card Event Deposits
Other Payment Event Deposits
Figures shown against these fields represent the money taken for a deposit. They will not show against sales yet as nothing has been sold
The expected deposit will also show the Event deposit amount as if you have taken $50 for an event, you need to be aware that it should be there and should be banked
Once the deposit is redeemed it will show in the
“Redeemed Event Deposit” field
You can also see the Event Deposits against the Expected and Actual Deposit totals
Lastly the “Tills And Banks” section will also show the Event deposits. This is because we physically took money, so that money is in the till, so it is in the till and bank report

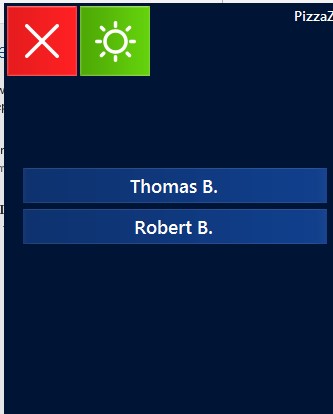
Quick Sign in is a way to sign in to the till by selecting from a list of already clocked in employees. It is not secure but it is fast
To set this up you need to do the following
You will now see a list with the employees name. Each employee that signs in will be added to the list (provided that they are clocked in with a job code that has quick sign in enabled)
This section of the system allows you to add, edit or delete categories straight from the POS without having to go to the back office. There are security settings that allow you to restrict access to this area
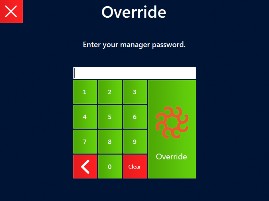
To restrict access to the Menu, edit or you need to turn on the override for that area and then set the employee or the job that the employee is using to deny them access to get past the override.

Setting the Override makes the system ask for a passcode when you press the button related to that override. In this case it will ask for a passcode when you press control panel > Menu Management
Setting the employee privilege “Edit Menu” to “No” means that when you are asked for the passcode that employee’s passcode will not allow them to get past the override. At this point they could ask a manager to enter their code
Setting an override will make it ask everyone for their passcode. This could get tedious for someone who does have access and accesses an area frequently. To avoid this, you can turn on “Auto Authorize”
“Menu Categories” are groups that contain “Menu Items”, the buttons used to actually sell an item. You can display up to sixteen categories at one time and you can switch between three sets using the “Menu categories” button on the front end.
The orange button at the bottom of the screen allows you to move a category.

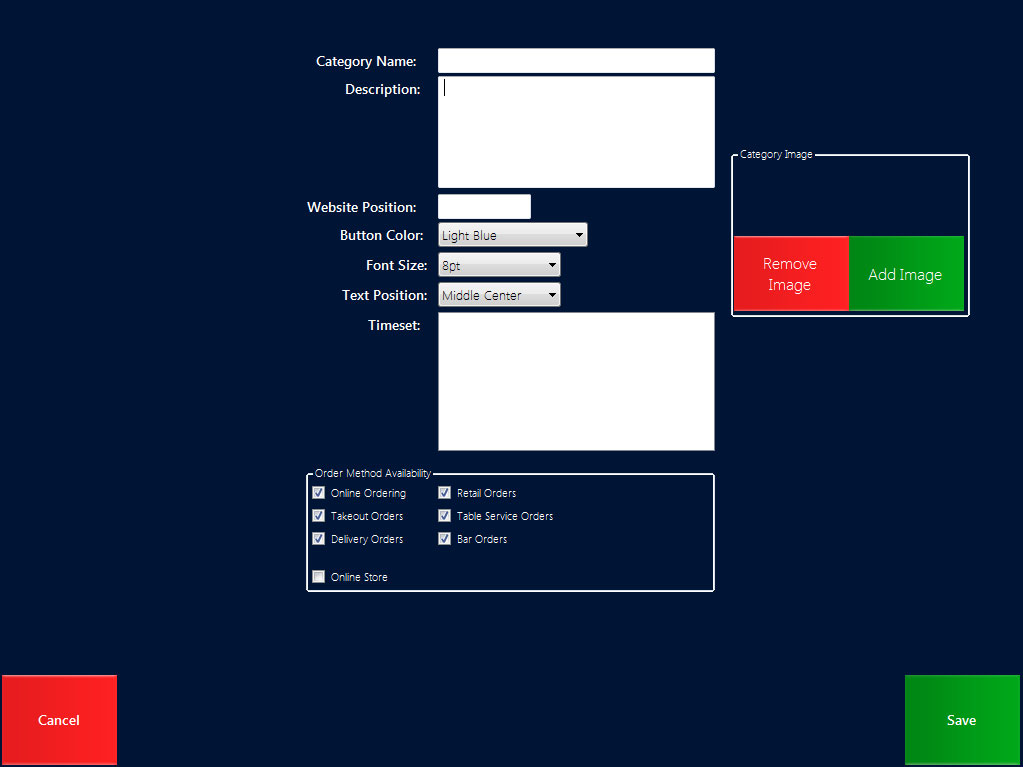
“Category Name” is what will appear on the button
“Description” will only show here. It is not available anywhere else
“Website Position” is no longer used
“Button Color” - The Color of the button graphic for the POS
“Font size” - size of the text on the button
“Text position” - location of the text on the button
“Timeset” Timesets are objects that represent groups of time. They are created from Backoffice > Menu > Timesets
Once created they can be applied to multiple areas of the system
When applied to a “Menu Category” that Category will only available during the times defined in the “Timeset”
“Order Method Availability” – Determines if the category will show when using a particular order method. If it is ticked then it is available.
If Unavailable it will show as a blank square
Front end reports means report From the till
For this report to populate the API information must be filled out in http://localhost/OCPOS/api.php
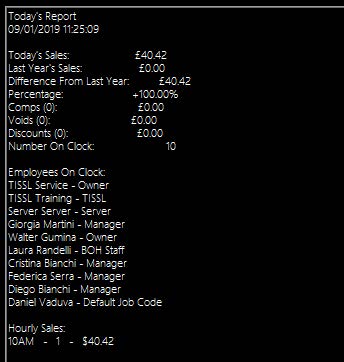
Today’s Sales lists the Sum of all sales for the day
Last years Sales
Difference From Last year
Percentage
Comps
Voids
Discounts
Number on Clock
Employees on Clock
Hourly Sales
Quick report has the same information as the End of Day report. However, it can be printed before the tills and banks are closed so it is a very comprehensive report
See End of Day Report
This report is exactly the same as the report that prints when you close the Till but is the
***Unofficial Copy*** Please See Till Report
Allows you to choose a cashier to run a Till report on. The information is exactly the same as the Closed till report but will run before closing the till and can be filtered to only show sales from particular employees. Also the ***Unofficial Copy***
See closed Till Report
This report is the same as the report that prints when you close the bank which is called the Server Bank Report but it is the ***Unofficial Copy*** and can be printed before the bank is closed
See Server Bank Report
This report prints when you close the Bank. If you do not close the bank then the report will print when performing an End of Day. It is for an individual’s Bank. The server name will print on the top of the report
Prints when you close the Till. If you do not close the till then it will print when performing an End Of Day
This report runs when you process an end of day. It is a comprehensive report of the day’s activities. There are other reports that are printed at the same time as the end of day report. These can be turned on or off in the settings. They will be listed separately
Custom Payment Types will be listed here along with the gratuity
For example:
Uber Eats
Uber Eats Gratuity
Shows all hours that had sales with the number of sales and the amount taken (Including Tax)
Shows all report categories that have sales with the sum of the sales for each category This will be the sale price of the items (likely not Including Tax)
The job categories will be listed here with the hours worked, labor cost and category percentage
This report will list each invoice that was paid to account and any payments paid off the balance of an account
A list of all comps, who comped the item, how much the comp was for and the reason chosen when comping the item
If an override is required, then the person mentioned here will be the person who authorized the override
Lists all pay in and pay outs with the name of the person who performed the pay out, the date and time it happened, the amount it was for and any notes if they were entered, If an override is required, then the person mentioned here will be the person who authorized the override.
Lists the following for all pay in/ out events
Date and time
The employee that initiated the pay in / out
The amount Pay out will be in parenthesis (14.50) where as paid in will not 14.50
Pay Out (14.50)
Pay In 14.50
The reason for the pay out / in given.
? faulty report. Call logged
? Faulty report call logged
If an override is required then the person doing the override is considered a manager. These managers will be listed with the amount of removals and the total sale price for those items
This will list all of the employees that requested the post submit removal along with the amount of removals and the total sale price for those items
Each Employee will be listed here along with the amount of removals and the total sale price for those items
A list of all Employees that have performed discounts will be shown with the amount of times a discount was applied and the sum of how much those discounts were worth
? Don’t know what these are - OC needs to clarify
This report can be accessed from the control panel. It will show all transactions that have been put through any terminal since the last End of Day was performed. You can see transactions prior to the last
The employee permission to view this report is called “View Transactions”
End of Day by using the  button
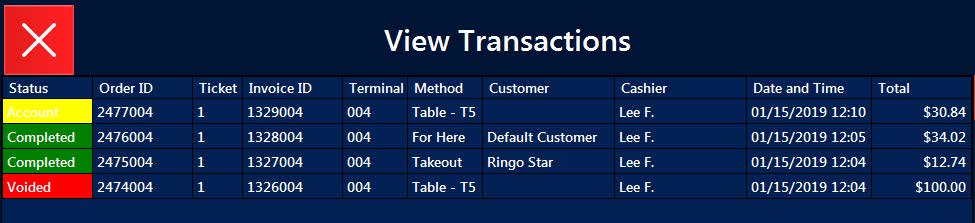
The amounts shown here are the actual amounts taken so will include tax if any has been applied
Status Currently this can be either Account which means it has been paid using an account. Completed means it has been paid for with one of the usual payment methods. Voided means that the payment has been voided from the control panel and the sale has been canceled
Order ID The Order ID is what is sent to the kitchen to link the printouts together. It also links the invoices. If you split the order into 2 tickets, then the invoice number will be different for each ticket, but the order number will be the same you can see that they were part of the same order
Ticket Self explanatory
Invoice ID The ID attached to the invoice. Each ticket is a different invoice so if you split the ticket into 2 tickets the order number will be the same, but the invoice number will be different
Terminal The terminal that settled the transaction
Method The order method used
Customer Customer name if available
Date and Time Date and time the transaction was settled
Total How much the transaction was settled for
With View  click on and you will see the following screen
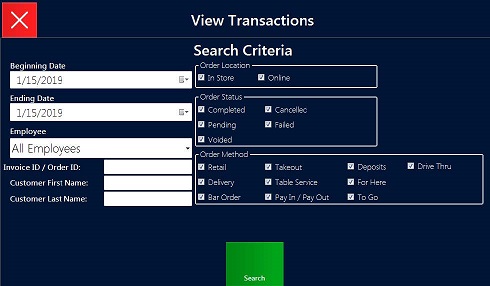
You can use the various search criteria here to narrow the search for a specific transaction
You get to this from  >
> ![]() > Highlight the transaction and click on
> Highlight the transaction and click on ![]()
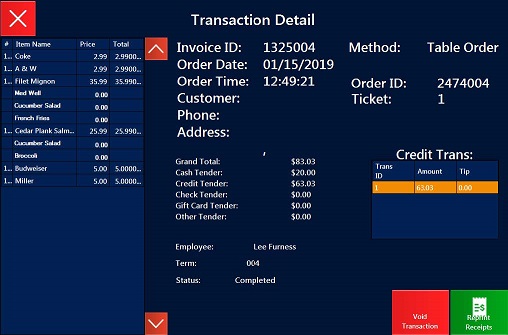
This report shows all off the details from the transaction report and adds a list of the items that were ordered and how exactly the transaction was paid.
From here you can void the transaction or reprint a receipt if the customer lost theirs
This is a great report. It shows every ticket that has been sent to an order printer and allows you to reprint it The employee privilege for this is called Kitchen Tickets
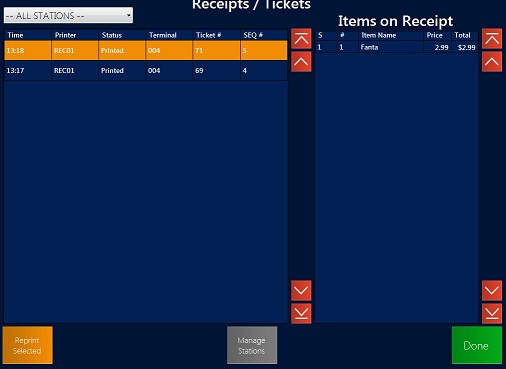
Time When the ticket was printed
Printer The name of the printer the ticket was sent to. This is the printers friendly name. The name that is used when setting up the printer in the print server. (little blue icon in the system tray) It is a good idea to call it something that easily identifies it. In this case it is called REC01 as it is the receipt printer for Till 1 but if that is also the coffee dispense you may want to call it coffee instead
Status Tells you if the print was successful or not
Terminal Which terminal sent the order
Ticket # This is refered to on the actual ticket stub as REF#
Seq # This number prints out on every ticket in the kitchen. It increases by one every time ticket is printed. The idea is that if you get a ticket printer with Seq#4 then the next one is 6 you know you are missing number 5. In which case you go to this report. Find the printer in question (you can filter by printer on the drop down menu) find Seq#5 and reprint it. You may also want to reprint the ticket if it is lost or damaged
Items on Receipt A list of all items on the ticket with quantities and Prices
Reprint Selected Will reprint the selected ticket
Manage Stations Will present you with a list of the 10 printer stations. You can enable or disable each station from this location. This will stop any orders being printed to that station from any till
This report will show you open and closed orders by employee since the last End of Day The employee privilege for this override is called Employee Control Panel
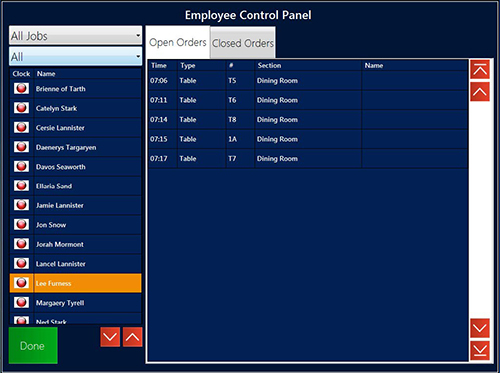
Drop Down menu1 Allows you to filter the results by Job Titles
Drop Down Menu2 Allows you to filter the results by either Clocked In, Clocked out or All
Clock Red or Green. Red is Not clocked it Green is clocked in
Name Employee Name
Open Orders
Time Time the order was opened
Type The Order Type. Table, For Here etc
# Table number or Order ID
Section Which Section the table is in
Name The name of the customer for takeout and delivery orders
Closed Orders
Time Time the order was closed
Type The Order Type. Table, For Here etc
# Table Number or Order ID
Section Which section the table is in
Name The name of the customer for takeout and delivery orders
Invoice ID Now the order has been paid it is assigned an invoice ID
If you click on one of the orders another windows will open with the order information

Items
QTY How many of that item there are
Name The name of the Menu Item
Price This is the sale price
Employee Employee Name
Time Added The Time the Item was added to the order
Comps
Employee The name of the employee who initiated the comp
Manager The name of the employee who authorized the override
Item Name Menu Item Name
Amount The amount that was comped
Time Time the comp happened
Reason Reason chosen by the employee
Removed Items
Removed items include both pre and post submit removals
Item_id** This related to the Item_id in the menu_items table in the OrderCounter database
Employee Name of the employee who removed the item
Manager Name of the employee who authorized the override Amount The sale price of the item that was removed
Time Time the item was removed
Reason Reason chosen when removing the item.
Receipts / Tickets
?? OC has a ticket logged
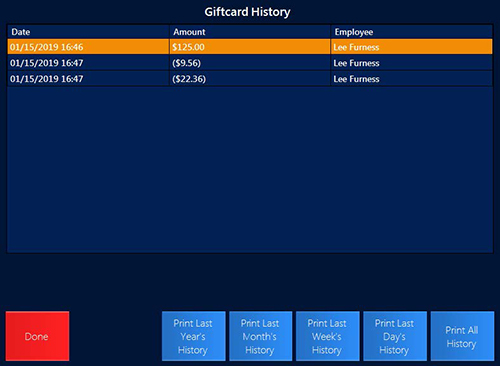
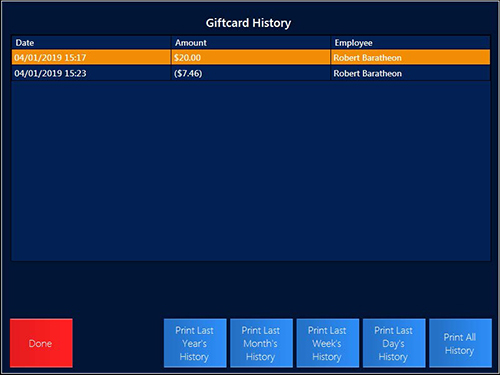
Gift cards allows you to see 2 reports
Balance Inquiry will show you the current balance
History Inquiry Shows you the cards spending history and allows you to print that history

The employee privilege to enable access to this report is called Sales Reports Today’s Sales Total sales made today (Not Including Tax)
Last Year’s Sales The sales on this day last year
Difference from Last Year The difference between last years sales and this years sales () around the figure means down from last year
Percentage Difference from last year expressed as a percentage
Comps The number of comps and the sum of all comps applied
Voids The number of Voids and the sum of all Voids applied
Discounts The number of Voids and the sum of all Voids applied
Number On Clock The number of people who are clocked in
Employees On Clock A list of all employees who are clocked in with the Job Title they are clocked in with
Hourly Sales Any hours that have sales will be listed here with the number of sales and the total amount for the hour (Not Including Tax)
Gift Cards Internal to OrderCounter NOT managed by a CC processor Gift cards prepaid cards for customers to redeem at a later date. They are not linked to an account of any type.
The payment has now been processed
This will allow you to check the balance or history. For both of these, you can swipe or manually enter the gift cards number
The 'Balance Inquiry' option will display the remaining balance of the gift card

The 'History Inquiry' option will display all the transactions made using this Gift Card, You can also print the history of some predefined time periods
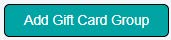
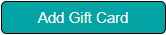
On the Back Office, you can create predefined gift cards with a set value. The value of the giftcard can be more than the cost. You could use these groups if you have a run of cards printed with pre-defined balances. This way you can control what the cards are sold for. You can also report on how many have been assigned
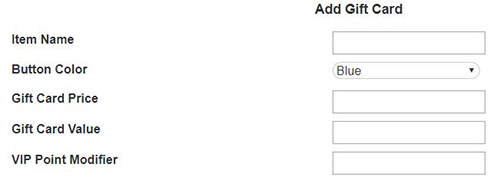
Activating a gift card allows you to sell a Gift Card that is a member of a Gift Card Group
You can have a Menu Item be a button that sells a Custom Gift card.
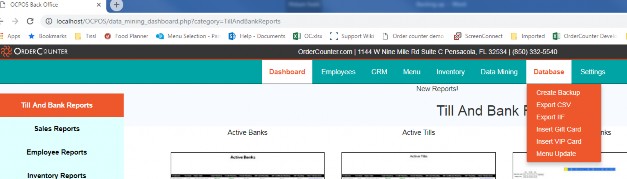
Back Office > Database > Insert Gift Card
Here you can see the Gift Card Groups and information on how many active and inactive cards there are
Go to Back Office > Data Mining > Sales Reports > Gift Card Report
This will show the number, activation date, starting amount and remaining balance. You can also see the transaction history similar to the function within the control panel. This, however, allows you to see the specific transaction by running the transaction detail report.

Clicking on View History will show you the individual transactions

You now have the ability to install any version of OrderCounter released after Jan 2019. This can be Beta or Release
You are told you are already on the latest version
"client.wyc" contains information about the version currently installed. If the version you have installed is newer than the version you are trying to install, then you will need to follow these steps.
The update code is accepted but nothing happens This can happen if c:\ocpos\Rollback.wyc is MISSING. Follow these steps to solve the issue
Inventory will allow you to keep track of your physical inventory, suggest orders and if you set up recipes will automatically deplete inventory items.
As a very basic overview we have the following
Sale items The buttons on the till which allow you to sell your products
Inventory Items These are the items which you purchase, such as eggs, buns, meat, boxes etc
Recipes link sale items to inventory items. You set up a recipe to say that one burger contains the inventory items of 1 patty and 1 bun. Each time a burger is sold 1 patty and 1 bun will be removed from inventory.
Orders Allow you to place orders for delivery
Deliveries Allow you to receive Products into the business
Processing The inventory Count
You have to start from the bottom up. When you create inventory items you are going to be asked some questions about sizes and suppliers, so we need to set those up first.

Go to the Back Office > Inventory > Setup > Setup Units
This is where the units of measure are set. Milliliter, gallon etc. Most units will be in here already but if you need to you can set up additional units of measure.
There are 3 sections. Liquid Volume, Dry Volume and Quantity.
The image here is an example of the liquid Volume.
Unit name is what the unit is called. You will see this when you choose the amount when setting up the inventory items.
The Abbreviation is used in reports and areas where we have less space to display the full name.
Amount (fluid Ounces). This is very important.
The number here is how many times 1 fluid ounce fits into the unit. The system will allow you to purchase in one measurement and sell in another, as long as the measurements are in the same group. This means that the system needs to know how to convert one measurement into another. It does this by using the Amount (Fluid Ounces) number. Fluid ounces is the default unit. There is one fluid ounce in a fluid ounce. Where as there are 16 fluid ounces in in a pint.
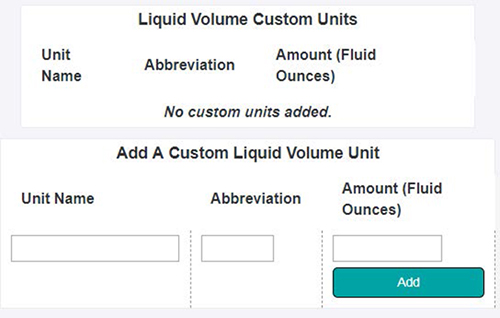
Adding a Custom Unit
The new unit will now show in the “Liquid Volume Custom Units” list.
Adding a Dry volume is done in the same way.
When adding a quantity, it is even easier. Quantities are "eaches". Multiples of 1. We have chosen package of 1 for the name but you can think of them in any way you like, individuals, eaches, packets. The important thing is that they are multiples of ONE. Here you may here want to add something like “Box of 500” where the amount would be 500
After the units are complete suppliers is the next step
Go to Back Office > Inventory > Setup > Setup Suppliers Any suppliers already added will be listed here
Click on Add new > Enter the Details and select “Add Supplier” at the bottom of the page which
will save the entry.
Go to Back Office > Inventory > Setup > Departments/Types
Next you need to add “Product Departments” and “Product Types”
These are likely to be Dry Wet and Other or Retail. They relate to how you count your stock. You count the stock by Product Departments
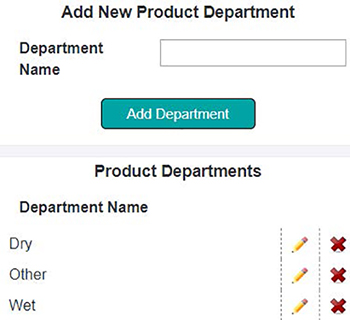
 The Department will now be added to the list
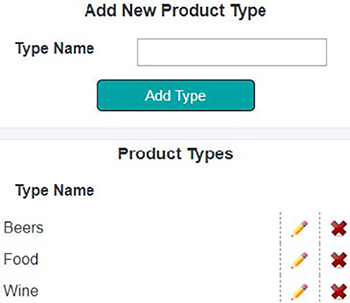
These can be seen in the same area. They are how you group your individual items such as wine, beer, chicken, frozen food. If you have lots of wine it might be red wine, white wine etc. These are for reporting purposes.

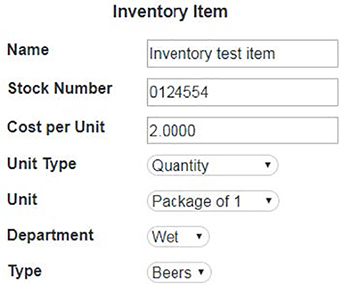
Product name The name of the product
Product Receiving Unit How you will purchase / deliver the product
Product Count Unit What you will count the product in
Product Report Unit What you want to see on your reports. Normally will be the same as the count unit
Product Recipe Unit What unit you will use for taking the item out of inventory. (Normally the smallest unit. If you purchase a barrel you would recipe in ounces or pints)
Product cost > The cost of each “Product Receiving Unit”
Product Department > Inventory is counted by Department. If you add this to a department of “Dry” then when you count your “Dry” inventory this product will be included in that inventory
Product Type used for reporting
Product stock number Optional. This is an internal reference for this product. Products can have multiple suppliers and each supplier may have their own stock number. This one is unique to the product
Sales Item If “Yes” is selected then the system will allow you to sell the item by searching or scanning without you creating a Sales Item. But it will not create a button
Less Than() Remaining The reorder point. If product gets below this point it will show in the ordering section in red

 to save your selection.
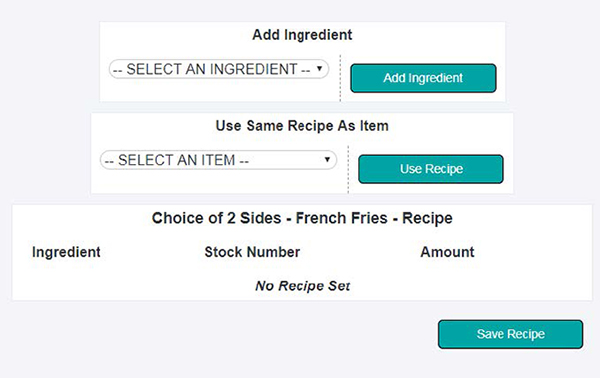
To take Products or a part of that Product out of Inventory the Product needs to be part of a Recipe. Inside of recipes products are referred to as “Ingredients”
Scroll through the list or Press Ctr + F to find the menu item you want to add the ingredients to
The number is how many Ingredients are in the recipe for that Menu Item


Options are another name for Modifiers.
Some Menu Items have Modifiers. If you sell a burger it may come with a choice of sides. These choices could be in a Modifier Group which are attached to the Menu Item. You know what is in the burger and can add a recipe for it. But you do not know what Modifier the customer will choose as a side so there is no way to add it to the Recipe for the Menu Item. This is where OPTION RECEPES come in.
If you edit the recipe for any Menu Item that has Modifiers you will see the modifiers already listed in the Recipe.

After the Option Recipe is entered, this area will be populated automatically in any Menu Item that uses this Modifier Group This saves you from editing the Recipe of every Menu Item.
Inventory will only be affected when that Modifier is chosen.
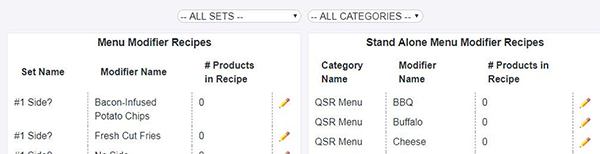
Set Name The name of the Modifier Group
Category Name The name of the Category the Menu Item that uses the Modifier belongs to
Modifier Name The name of the Modifier
# Products in Recipe Is the number of Ingredients contained in the Recipe for that Modifier
You can also choose to use the Same Recipe as another item
Back office > Inventory > Setup > Simple Item Recipe
Simple Item Recipes Lists are suitable if, you order in the lowest quantity you would use to sell it in, AND, there is only ONE item in the recipe.
You choose the INVENTORY ITEM which is already LINKED to the QUANTITY that, that Product is Purchases / Delivered in.
Then, you choose an amount, which is a multiplication of the inventory item size.
For example: if you have a type of beer which you purchase as individuals you could then set the amount in the Simple Item Recipes to ONE. If they come in a package (CASE) of TWENTY FOUR, you could then set the Product Receiving UNIT to be a package of ONE, AND, when you do your purchase order, you choose the package of TWENTY FOUR from the list.
Although the default will be a package of ONE. This way you can use the amount of ONE in the Simple Item Recipes.
As a side note, you can also use a decimal value in the amount field instead but, this means doing a calculation for each product.

From Back Office > Inventory > Setup > Add/Edit Products you can delete a product by clicking on the 
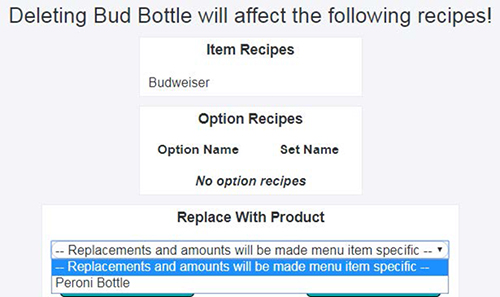
When you do this, the system will check to see if the Product is in any Recipes.
In this example the product of “Bud Bottle” is in the Recipe of “Budweiser.” I am able to replace the Product in EVERY RECIPE it's in by selecting a new Product from the drop-down list.
This will list ALL other Products that use the same Unit. If you DELETE a Product that uses Quantity then you can replace it with any other Product THAT also uses Quantity. However, products that use Liquid Volume or Dry Volume will not appear.
If you choose NOT to replace the Product, then the Product will be DELETED but, the Ingredient will still exist in the Recipe, which is a problem.
To check to see if you have any orphaned products in recipes you can go to Back Office > Inventory > Setup > Recipes & Del. Products

Here you can see a list of all Item and Option Recipes that have deleted Products.
If you click on the Pencil icon you are taken to the edit page for that Recipe where you can change the Ingredients.
If for example you have a particular vodka in all of you cocktails and you are changing the vodka that you use you would do the following.
Now all recipes that used the old vodka will use the new one.
Retail items are also known as Inventory Items. These are Menu Items that you set up from Menu Management. You can choose Inventory Items as the Menu Item Type.

When you choose to make the Menu item an Inventory Item you get a few extra options
These options relate to the Product. A new product will be created for each Inventory Item. The Unit chosen here will become the Delivery Unit.
When you save the new Item, a Recipe will be created linking the Inventory Item to the Product and one will be input as the amount to be taken out of inventory.
Inventory Items are intended for retail and save you time when creating Items as you can create the Product and recipe at the same time. Normally inventory items are sold as a package of 1. Such as a drink, some gum, packet of chips etc.
It does not add everything about the product. It assumes the other unit amounts are package of 1 and it does not add the supplier or reorder amount for you.
If you have any Retail Items you will see them in this section. You are able to change the price of the item the Barcode and the Tax Code without having to go into each Item Individually

At this point you have all of your Items, Products and Recipes entered. You need perform an inventory Count known as “Processing”
Go to Back Office > Inventory > Processing >
Choose a Department and click on  “Show Calculations” will show you the inventory adjustments
Enter a count of Zero and click on 
The following process will allow you to create a purchase order for your suppliers
Back Office > Inventory > Ordering
You may get a warning if you haven’t performed a calculate on hand recently. You are given the option of proceeding without calculating or to calculate now.
I recommend you always choose Calculate Now
This process calculates what inventory levels you should have based on previous input and sales movements.
Any items that the system calculates are below your order point will show in red. If you want to see all of the products then untick the “Only return items with quantity below reorder point” box. Click the orange arrow next to the product to add it to the purchase order.
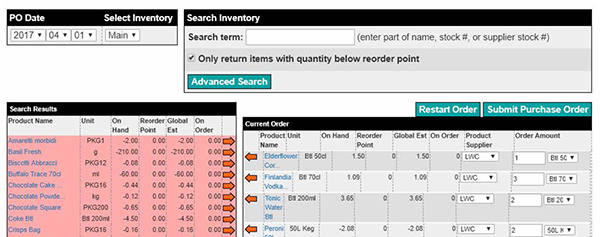
Click “Submit Purchase order”
Back Office > Inventory > Receiving
This is where you would go to deliver in your stock. Click on Receive PO for the PO in question Enter the invoice amount in the invoice total field. The delivery and tax amounts will be deducted from the invoice total.
What is left, should match what the invoice was initially raised for. The products when entering an amount do not include tax. Enter the amount of each product in the Amount Received field Confirm and receive items.
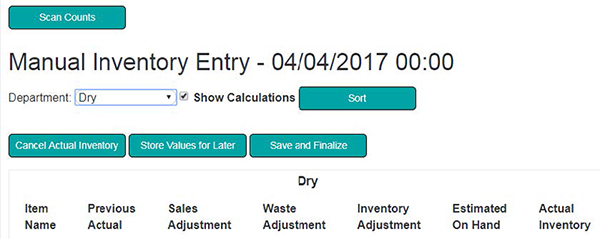
Back Office > Inventory > Processing
1. Choose a Date and time you wish the Inventory count to start and press 
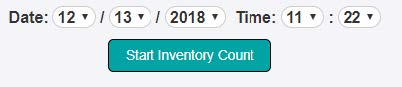
The default will be today’s date and time
The calculations will take into account any stock movement up until the point in time you choose. This is useful for example if you have counted the stock in the morning but not entered it until the afternoon. It also means you can perform more than one inventory count in a day.
Scan Counts Allows you to use a barcode scanner to search for the item you wish to enter a count for
2. Choose a Department and click on

The Products in the department you chose will now be listed. You can print this page as your count sheet by pressing Ctr + P from a windows computer
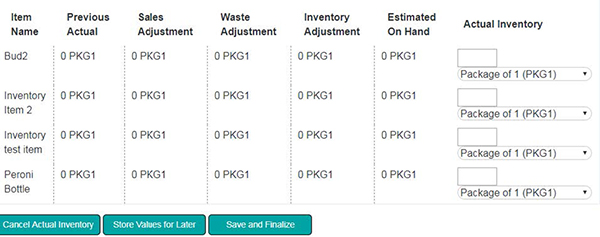
3. Enter the Inventory Count for that Product in the “Actual Inventory” box
At this stage you can Cancel the Inventory, Store the Values for later or Save and Finalize
4. Assuming you have finished your Inventory Count click on If you do not enter a count for an item the system will enter the “Estimated on Hand” value for you which will carry that reading to the next Inventory Count.
After you save the Count you will be redirected to the “Actual Inventory Report” This report has all Inventory Counts for the given date range chosen.
You are able to do 2 things from this report.
View Items Will show a report of all products, the inventory movement and the counts entered
Adjust Entry Allows you to change the count for that inventory. Simply choose the department, update the count and click on 
If I sell a burger and that burger has a recipe of one patty and one Bun then when do those products get removed from Inventory?
The answer is When the Item is sold!
The Item has to be on the ticket when the check is paid or it will not come out of inventory.
If an Item is sent to the kitchen and removed from the check because the food was dropped then the products that were in the recipe for that item will not come out of inventory. To take care of this problem we have Wastage
As mentioned above, if you remove an item from the check then it will not come out of inventory, PRIOR TO THE CHECK BEING PAID FOR. If there is a reason to remove food from a check, that has already been made/prepaird/cooked for a guest then you need to use Wastage
 >
> 
The Item will stay on the ticket but have the value reduced to ZERO. This way the products still comes out of Inventory correctly and reports as Wastage.
There is a second reason that you would enter wastage. That is if you have wastage (also known as breakage) of Products that have not been used yet. For example, your freezer breaks and spoils the food. The food is past its sell by date or you have breakages. In this case you can use wastage in the back office to account for the loss.


 next to it
Back Office > Data Mining > Inventory Reports
Cost Report
Item
On Hand
Market Value - Start Date The amount on hand x the most recent value
# Purchased – Start Date
$ Purchased
Avg Cost Per Unit
On Hand Tomorrow
Market Value End Date
Market Value End Date
Current Market Value Report Shows the current market Value of your inventory products
You are able to choose a time frame and filter by Department
Inventory Item The name of the Product
Department Which Department the Product belongs to
Units How many or how much of the inventory you are currently holding
Current market Value per Unit How much each unit costs based on the most recent purchase
Current Market Value = Units x current Market Value Per Unit
Inventory Item
Department
Units
Current market Value per Unit
Current Market Value
Gain and Loss Report
Item –
Department –
Beginning Actual –
Sales Adjustment –
Front End Waste Adjustment –
OrderCounter INVENTORY
Back End Waste Adjustment –
Inventory Adjustment –
Expected On Hand –
Ending Actual –
Gain / Loss Units
Gain / Loss %
Gain / Loss Est $
KDS stands for Kitchen Display Screens. They are screens which are used to display order tickets. When the chef is finished making the ticket it can be bumped off the screen. You can have a maximum of 6 screens. The screens run off a windows pc. Each PC can support 2 screens. They are suited very well to fast service restaurants, however they work well with many different types of kitchens as well.
To enable the KDS feature you need to complete a few steps
<setting name="monitor1_station" serializeAs="String">
<value>1</value>
</setting>
<setting name="monitor2_station" serializeAs="String">
<value>0</value>
Here is an example. Change the value for monitor1 or monitor2 to the station you require.
"1" would be Station 1 found in Back Office > Printers > KDS Station Names
If you have 2 screens, enable the screen by changing the value for monitor2_tickets from False to True
If KDS Station #3 is the expo station (it will show everything that is seen on KDS 1 and KDS 2) run the following SQL command:
UPDATE settings_pos SET kds_expo = 3
The following settings will enable or disable a particular view by setting their value to True or False.
Below is a list of how they appear in the XML file vs what the view is called in the KDS screen.
| XML | KDS Screen |
|---|---|
| View all enabled | View all |
| View dt enabled | Drive Thru Only |
| View fc enabled | Front Counter Only |
| View split enabled | Shows a split of Drive Thru on one line and Front Counter on the other |
Top open the KDS software open c:\OCPOS\OCPOS-KDS-Screen.exe
It connects to the database using the connection information that is setup on the OCPOS software. If this will be a dedicated KDS terminal, you'll want to remove the OCPOS software from startup and add OCPOS - KDS Screen to the startup instead.
Each item can be set to go to 2 different KDS screens ONLY. This is set by editing the item.
Modifiers will follow the item they are attached to.
Currently you can only see 8 tickets at 1 time and you cannot scroll to the next screen.
If you add another item to the same ticket it will not show as being different.
To bump then just press the bump button
To recall a ticket press the recall button
Development to KDS has been requested.
Loyalty is a reward program for VIP customers. You can either assign points per $ spent or by orders placed, allowing you to reward spending or visits.
Customers are assigned VIP cards which you swipe before making a sale. This accrues points which qualify them for promotions. These promotions could for example be a free cup of coffee or 50% off their purchase.

Rewards are promotions. They are what you will be allowed to give to the customer depending on how many points they have or had previously.

Coupon Name This is a Friendly Description shown here only
Coupon Description Will show as the name of the button on the front end
Coupon Code (For Online Use) This can be used for a discount when ordering onlineS
Max Value The maximum amount of money that can be discounted off the bill. For example, if you set this to 10 and had the discount be 50%. The most it would remove off the bill is $10. If you leave this blank then it does not apply Can be used with other specials? Whether or not this promotion can be used with other promotioins Requires manager override Will the use of this promotion require a manager approval or not Start Date The date the Promotion will work from End Date The last date you will be allowed to apply this promotion. If you tick Does not expire then the promotion will work forever
Condition that must be met
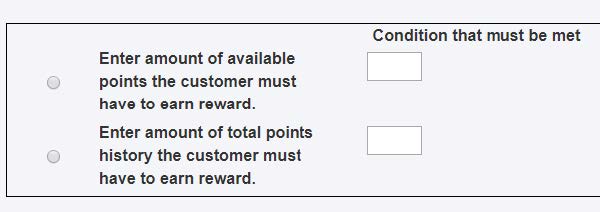
Here is where you enter the amount of points needed to qualify for a reward.
You can either assign a promotion based on the points currently available or the total of all the points they have ever received. This is so you can reward loyalty over a longer period of time.
For example, you could give a free coffee for every 20 points earned. Each time that reward is used the amount of available points will be reduced by 20, but the historical points will remain. You could have another reward that says once you get to 1000 points you get 15% off every coffee.
Keep in mind that legacy or historical points do not get reduced. If a customer needs 1000 points to get that 15% off then once they get to 1000 points they will always be eligible for that reward.
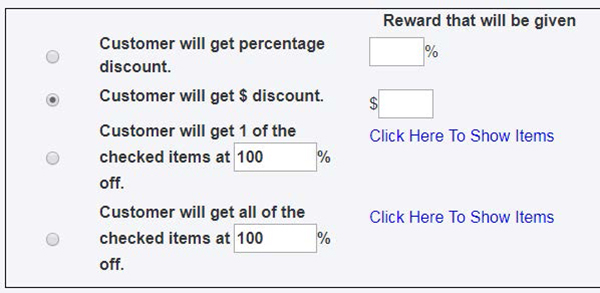
This is the section where we set the actual reward itself. The customer can either receive % discount off the whole bill or an amount of money removed from the bill. Here I checked item for a definable $ off all checked items for a definable amount off.
On the last 2 you can choose the menu items that the promotion appies to. Allowing you to give away just a coffee but not a tea if you wanted. If you click on the blue link you will be able to choose 1 or more items.
To use loyalty, you need to create a VIP card.
A VIP card must be assigned to a customer. You can create a new customer by entering new details. Or you can search for an existing customer by clicking on the box below “Select a customer” and type the name or phone number of the customer.

Swipe the card or click on Manual Entry to enter the card number using the keypad After you swipe or enter the number click on “Add VIP Card”

You will see the following screen:
The button is the reward we set up earlier. This will be red when unavailable due to lack of points and blue when it is available. This allows you to tell a customer which rewards they can use.
Total Points The total number of points ever earned
Points Used The number of points that have been redeemed against rewards Points Available How many points are available right now Percentage Off You can set VIP members to get a % discount of all of their purchases. If you set this then the amount will show here Edit Percent Off This button allows you to set the % amount that this customer will receive off all purchases. An override is required for this and the employee permission is called “VIP Percentage” Add Points Allows you to add points to the VIP member as a manual function. An override will be required. The employee privilege for this is called “Add VIP Points” Done Will exit the screen
Press “Done”
The customer will now be attached to the order. This works both ways. If you add the VIP member, the customer will be assigned and if you assign the customer to the check then the VIP member will also be assigned.When the customer has enough points, they can use a reward. You can apply the reward before or after ringing through the items.
If you apply the promotion by mistake or the customer does not wish to use that promotion then go to Order Functions > VIP / loyalty and untick the applied promotion.
This section of the system allows you to add, edit or delete categories straight from the POS without having to go to the back office. There are security settings that allow you to restrict access to this area
To restrict access to the Menu, edit or you need to turn on the override for that area and then set the employee or the job that the employee is using to deny them access to get past the override.


“Menu Categories” are groups that contain “Menu Items”, the buttons used to actually sell an item. You can display up to sixteen categories at one time and you can switch between three sets using the “Menu categories” button on the front end.
The orange button at the bottom of the screen allows you to move a category.
To restrict access to the Menu, edit or you need to turn on the override for that area and then set the employee or the job that the employee is using to deny them access to get past the override.
On the left-hand side of the screen you will have the different menu categories (screens) and on the right a grid 7×8 for the menu items. To navigate to a different set of categories use the menu categories button
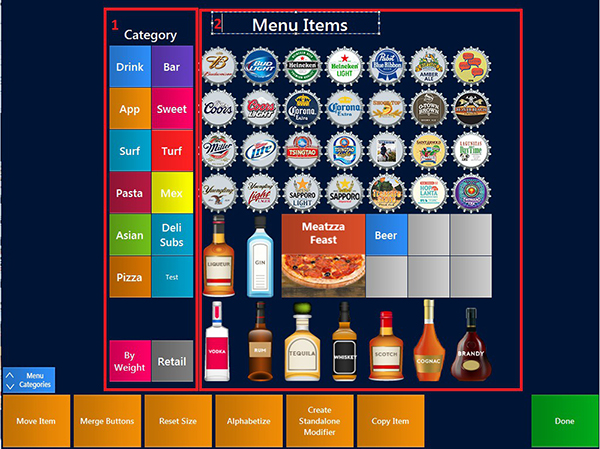
Sets the size of a Menu Item back to 1 square
Places all the buttons currently on the screen in alphabetical order. There is no undo so be sure you want to do this when confirming the change
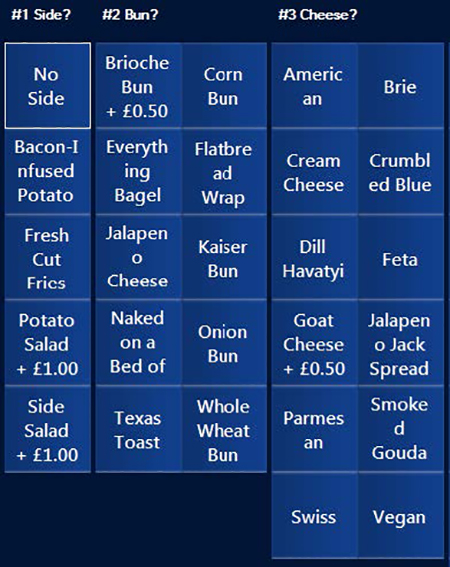
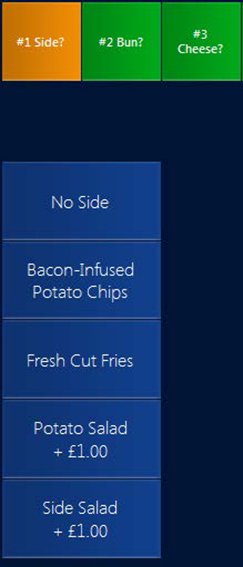
“Standalone modifiers” Modifiers which appear on the same screen as menu items. They allow you to modify the menu item after it has been rung though. There are multiple options:
“Modifier Name” what the modifier is. This will appear on the button itself and print on both the customer receipt and the order printers.
“Modifier Price” the default selling price for the modifier


“Multiples” How many times the modifier can be chosen. The user can select up to 10. As the button is presses a number will appear on it to keep count 
“Request Quantity” Ignores any multiples that have been selected. Opens a keypad for the server to enter the quantity for the modifier
“Print Priority” The order the modifiers will print in. The lowest numbered modifier will print first
“Button Color” The Color of the button graphic for the POS
“Printer 1” printer location for the modifier
“Printer 2” printer location for the modifier
“Printer 3” printer location for the modifier
“Modifier Image” an image for the modifier. If used this will overwrite the modifier name
Allows you to duplicate the selected item
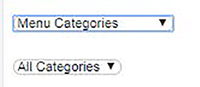
To the left of the screen above 'Move Item', there is a button called “Menu categories”. This allows you to navigate through the 3 different templates of categories. If less than 3 are in use it will not display the blank ones

“Item name” receipt/button description
“Alternate name” Will be shown on the order printer “Item description” This will show on the button when using the order function “Show Item Information” This is a very useful feature and is not to be overlooked. It can be used for allergy information, recipes, a general description of the item or anything else you can think of “Ticket order” The order the modifiers will print in. The lowest numbered modifier will print first “Website position” No longer used “Button Color” The Color of the button graphic for the POS “Report category” Reporting categories are groups used for reports. These need to be created prior to the item being created and cannot be done from the POS. Go to Backoffice > Menu > Report Categories “Font size” size of the text on the button “Text position” location of the text on the button OrderCounter MENU ITEMS | 8 “Timeset” Timesets are objects that represent groups of time. They are created from Backoffice > Menu > Timesets Once created they can be applied to multiple areas of the system. When applied to a “Menu Item” it will only available during the times defined in the “Timeset” “Item Price” Default selling price of the item “Taxcode 1” From the drop-down list the user can select from any tax codes which have been set“Appetizer” When this is checked and the item is sold the server will be presented with two options – appetizer or entrée. The item will then show under either "Appetizer" or "Entree" on the order ticket. All other items rang through after this point will print under entrée unless they are also marked appetizer at which point you will be asked the same question
“Drink” Used in conjunction with settings > POS > Table Service > Drinks Per Guest. This will prompt when number of drinks is not equal to the same number of guests “Don’t allow Modifiers” Will not allow modifiers to be used with this Menu Item “Doesn’t Print" Zero priced items will not print on the receipt “Open Item” When sold with this option enabled you will be presented with the following screen
“Speed Mods” Affect Menu items that are linked to Modifier groups. This box decided how they are displayed. On the left below shows the Modifiers with “Speed Mods” ticked. This is a list of all the mods on the screen at the same time. On the Right below shows the Modifiers with “Speed Mods” Unticked. This restricts you to only see the Modifiers in 1 group at a time. When you have selected the required number of Modifiers it will automatically move to the next group.
|
|
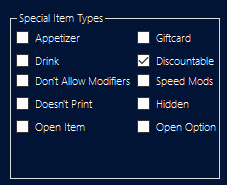
“Giftcard” If ticked then the button will sell a gift card and not an item
“Discountable” Determines if a discount is allowed to be applied to an item
“Speed Mods” Affect Menu items that are linked to Modifier groups
“Hidden” Removes the button from the Pos. it will show as a blank square
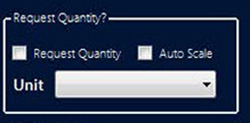
“Request Quantity” is a scalable item. You select a unit of measure from the list and when you sell the item you will be asked for the total weight

“Item Has Sub-Items” When selected it turns the menu item into another category that can store up to 5 pages of additional items. For example you can have a category of drink then have Menu Items which are set to have sub items for wine, brandy beers etc…
“Item Is A Special” A way to sell items like modifiers. You make groups of items and when you sell the special you get to choose from the list of items just like you do with modifiers. The difference being that they will report to items not modifiers and you can charge a different price for them. Allowing you to have say burger and a drink for 5.00 and being able to dictate how much money gets allocated to each item.
“Print Label” Is used to be able to print to a label printer
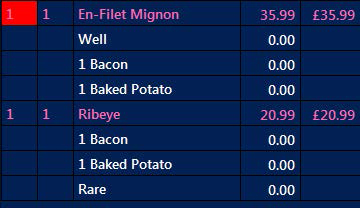
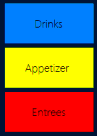
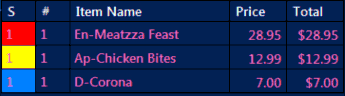
“Course / Label” Sets the course or label for this item by changing the color indicator in the “Current Ticket” box. It is also possible to prefix the item description. If you look at this example the Ribeye does not have a course attached where as the Filet Mignon does. See Coursing Documentation for more info
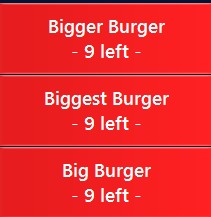
Coursing and Advanced Statuses - Here“Counter” This is a feature that keeps track of how many of something you have left to sell 
Perfect for specials etc. To use this, you tick the box and enter an amount.
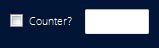 Each time one is sold the counter decreases by 1. Note that this feature uses the bottom line. So if a button has a name that is already using the second line the counter will not show.
Also, on the login screen there is a button I.A.N  “Item Availability Notice” This is where you can see all of the items that have counters set. You can adjust the amount and disable the counter from this screen.
If the I.A.N button is not displayed then enable it in Back Office > Settings > POS > Show I.A.N
"Inventory Item" When selected you will be asked for details to Crete an Inventory Product. See Inventory Instuctions for more information
Inventory - Here
Modifier Mods are the buttons at the bottom of each order screen

Modifier Mods allow you to make changes to stand alone modifiers.
“2X” is double Modifier Mods allow you to make changes to stand alone modifiers.For example, here we can see the pizza screen of our demo data set.
The area highlighted in red contains “Stand Alone Modifers”
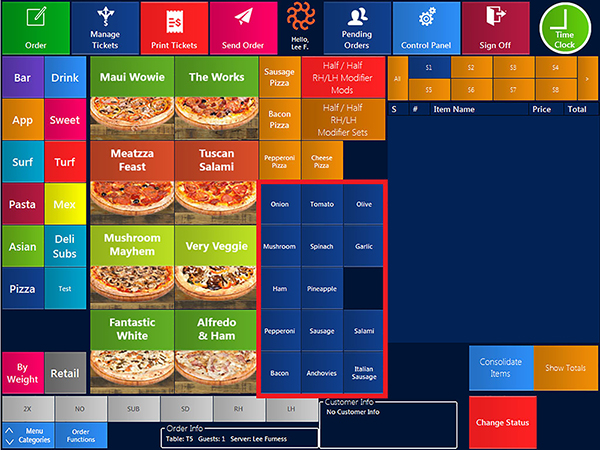
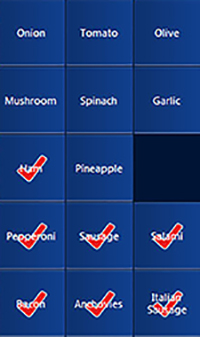
The way you would use the modifier mods would be to Select a Pizza > Select a Modifier mod > Select a Modifier
“Stand Alone Modifiers” can be set to be added automatically. So, if you select a Metzza Feast the following “Stand Alone Modifiers” will be selected automatically This lets you know what exactly comes with that pizza. If you decide that you do not want Sausage then after you have pressed the Metzza Feast button you >
> 
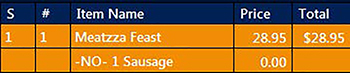
That changes the current ticket box and will print on the kitchen ticket
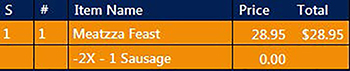
If you want double Sausage then you choose  >
>
You can decide if you want the modifier mods to be available for use when you set up the stand alone modifier. That is also where you set the price
To change the name of the “Modifier Mods”


You can also use the front end by going to  >
>  >
> 
The same setting are available here.
You can have up to 12 Modifier Mods. If you enter the details on a new line then a new button will appear.Modifiers allow you to make adjustments to Menu Items after they are rung through. For example, you could sell a burger and have a modifier for no cheese, or sauce on the site. Modifiers are extremely useful and there a few different types in OrderCounter which make them very versatile. You even have Modifier Mods which allow you to modify the modifiers. See modifier mods documentation for further information
Modifier Sets are groups of modifiers. The modifiers themselves are created in the group and only exist in the group.
To Manage these, go to Front end > Control Panel > Menu management > Modifier sets (Create / Edit)
The fist thing to do is to create a modifier set by selecting "New Set"
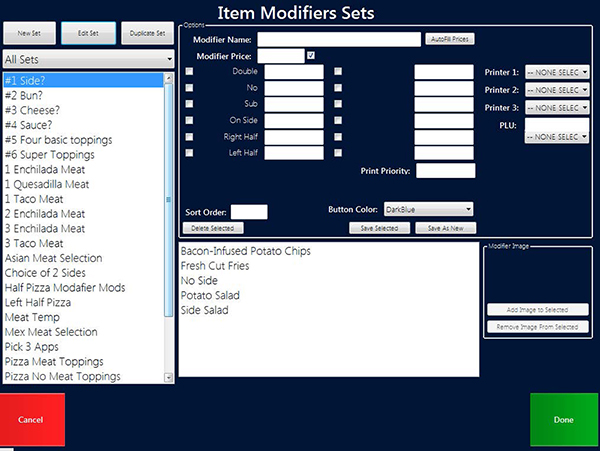

Optionsets allow you to choose as many options as you like. This is used for example for pizza toppings where each topping has a price. Alternatively, it can be used to allow any toppings you like but they are all free.
"Sort order" This will set the modifiers print order. Lower numbers print first "Font Size" Will determine the size of the font on the modifier buttons "Text position" Determines where the text will show on the modifier buttons "Button Layout" Will determine the size of the modifier buttons when they display "Required" Does not apply to Optionsets "Print on customer receipt" If enabled will print on the customer receipt. If not then it won't. It will print to the kitchen either way "Allow multiples. Max =" When using Optionsets the number set here is the amount of each option you can sell. So if you set up cherry and chocolate as options and set this number to 4 you could sell up to 4 of each option but there is no overall maximum "Auto Add All Options" will automatically add one of each modifier In this group to the item when it is sold "Availability" Sets which order types can sell this modifierTypesets are what you would choose if you wanted to limit the number of items the end user can choose. For example: 3 scoops of ice cream with different flavor options.
"Sort order" This will set the modifiers print order. Lower numbers print first
"Font Size" Will determine the size of the font on the modifier buttons "Text position" Determines where the text will show on the modifier buttons "Button Layout" Will determine the size of the modifier buttons when they display "Required" With Typesets, if set to required and the maximum is set to 4 then you have to choose 4. If you uncheck this box then you do not have to choose any options at all and if you do then you can only choose a maximum of 4 "Print on customer receipt" If enabled will print on the customer receipt. If not then it won't. It will print to the kitchen either way "Allow multiples Max =" The maximum total items you can put through. Unlike optionset if you set the max to 4 then you can only choose 4 options total "Auto Add All Options" will automatically add one of each modifier In this group to the item when it is sold "Availability" Sets which order types can sell this modifierIn this mode when you choose a modifier it will prompt for how many of that modifier you want to apply. For instance you could have a deal to sell 20 hot wings with your choice of sauce; with this mode you could set modifiers of hot, BBQ sauce, no sauce, etc. When you choose the bbq sauce modifier it will ask how many of the 20 wings you want with BBQ sauce. This number is removed from the total and you can only enter what is remaining.
"Quantity" The amount of modifiers it wants you to choose. If you have 20 wings with a choice of sauces you would put 20 in here. "Sort order" This will set the modifiers print order. Lower numbers print first "Font Size" Will determine the size of the font on the modifier buttons "Text Position" Determines where the text will show on the modifier buttons "Button Layout" Will determine the size of the modifier buttons when they display "Required" In this mode if set to required and the Quantity is set to 20 then you will have to make a choice for all 20 items. If not set to required then you don't have to choose any modifiers or you can choose any number up to the amount set in the Quantity field "Print on customer receipt" If enabled will print on the customer receipt. If not then it won't. It will print to the kitchen either way "Auto Add All Options" Will add 1 of each modifier In this group Availability: Sets which order types can sell this modifier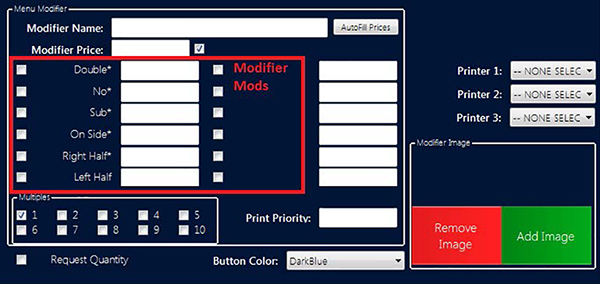
"Modifier Price" If you are charging for the item or not you will want to tick this box. Just enter 0 in there if the item is free. If you do not set a price then you will not be able to sell the modifier on its own. You will only be able to use it with a modifier mod. Which are the grey options at the bottom of the screen.
"Modifier Mods" This section is highlighted in red in the adjacent image. To use them tick the box and enter a price. If the box is not ticked then you will not be able to use that modifier mod "Printers" You can set the modifiers to go to 3 different printers. If no printers are selected then the modifier will print to wherever the item is set to print. "PLU" Used with Forth inventory. This a location to store a unique identifier for each modifier. It is used as part of the export that goes to fourth. "Print Priority" Determines what order the modifiers will print in. Lower numbers appear first on the print out "Sort Order" The order in which the modifiers will show in the list when selecting them. Lower numbers appear at the top of the list "Delete Selected" Will delete the selected modifier in this group "Save Selected" Will save changes to this modifier "Save As New" Will save this modifier as a new modifier. This is the way you would add a new modifier. Make changes to an existing one and save it as new. "Modifier Image" You can add or remove an image for the modifier from hereThese are created from the Front End > Control Panel > Menu Management > Menu Items > Create Standalone Modifier
You select the "Create Standalone Modifier" button and then select a blank space (grey button) Then fill out the information below
"Standalone modifiers" Modifiers which appear on the same screen as menu items. They allow you to modify the menu item after it has been rung though
There are multiple options;
"Modifier Name" What the modifier is. This will appear on the button itself and print on both the customer receipt and the order printers
"Modifier Price" The default selling price for the modifier "Modifier Mods" These are the settings for the modifier mods, which are the buttons that always show at the bottom of the order screen
|
|
The tick boxes set if you are allowed to use that modifier mod and the box next to it is where you would enter the price. Please see the "Modifier Mods" document for more information of how they work.
"Multiples" How many times the modifier can be chosen. The user can select up to 10.
As the button is presses a number will appear on it to keep count 
"Request Quantity" Ignores any multiples that have been selected. Opens a keypad for the server to enter the quantity for the modifier
"Print Priority" The order the modifiers will print in. The lowest numbered modifier will print first "Button Color" The Color of the button graphic for the POS "Printer 1" printer location for the modifier "Printer 2" printer location for the modifier "Printer 3" printer location for the modifier "Modifier Image" An image for the modifier. If used this will overwrite the modifier nameOnce you have created a set of modifiers it can be linked to one or more "Menu Item". This saves time as you can create a "Mixers" set and link it to every spirit. Or a "Meat Temp" set and link it to every steak.
To do so follow these steps:
You can also do this from the Back Office > Menu > Menu Sets
http://localhost/OCPOS/menu_sets.php
You may have many "Menu Items" which you need to assign to "Menu Sets". To do this you can use "Multi Item Edit"
See Multi Item Edit documentation for further informationAs well as being able to add sets of modifiers to a Menu item you can also apply them to the modifiers themselves. For example if you have a Modifier Set called "Side" and one of the modifiers is Fresh Cut Fries you could have another Modifier Set with options for those fries, such as toppers like cheese, chili, spicy salt etc…
To add a Modifer Set to a Menu Option follow these steps:
You can automatically add a modifier to an item when it is sold. You can choose from a list of every Stand Slone Modifier, or any modifier that belongs to a "Modifier Set" currently assigned to that Menu Item.

Multi Item Edit allows you to select multiple items and assign various attributes to them all at the same time. This can save you a huge amount of time.


An example is printing. Typically, we will set up one item that will print to each order printer. Once you know it is working and all of the items have been created you can use the speed editor to assign the printers.
next to each oneThis way you know that the items aren't being sent to additional printers by mistake
Go to the Back Office > Menu > Multi Item Edit
The back office has a few more options then are available on the front end. So if you can't find what you're looking for on the front end make sure to check out the back office.
 Box
BoxMake sure to Uncheck all items before making a new selection.
Online ordering consists of a website that is hosted by OrderCounter and enables you to have customers place orders online for takeout and delivery.
If you wish you can restrict your online menu to offer less choice. It can however be exactly the same as your in house offering. The orders will come through to the point of sale automatically and either print straight away or at a time you choose depending of the collection time cost of the order. The site is hosted on OrderCounter's servers which you can link to from your own website.There are 2 websites. The site where the customer will go to place the items and the site you will access to decide how that looks and what it contains.
OrderCounter will provide you with the URL and logon details for the setup site. Once you have those, go ahead and log in.This Tab shows you all of your sites. Sites can have multiple locations. If you have a pizza chain and a burger chain then you would have 1 site for the burger chain and 1 site for the pizza chain. You would then have multiple locations for each site.
The sites will be set up for you. Clicking on each site will take you to the location settings for that siteFull site list and site settings are only available for the dealers. Users will not be able to access these pages.
If you have more than one site then you need to select the site from the list in the Full site list tab. When you do this, it will take you to the Locations settings. If you then click on Site settings it will select the correct site.Site Owner This is how you give people access to the Location Settings. You can give additional people access to location settings by selecting them under Additional Owners. This list is populated from the list of users
Additional Owners If you need more than one person to have access to Location Settings you can select them here. This list is populated by the list of users.
Site Wide / Per location Determines if the settings for Authorize.net are applied for every location at a site or by each location
Allow Tips On / Off Will enable or disable the ability to add tips when paying with credit
Authorize.net On / Off Allows you to turn the service on or off
Vantive Hosted Checkout On / Off Allows you to turn off hosted checkout. Speak to Order Counter before you do this
Merchant ID The merchant ID provided by Vantive for Hosted Checkout
Password The password provided by Vantive for Hosted Checkout
Select a date format to use Allows you to choose a date format to use for online ordering
Select a time format to use Allows you to use either 12 or 24 hour time format for any online ordering timestamps Select a currency code to use This determines the currency symbol that will appear on the website Select a regionalization Chose between US or UK. This will affect the Address Phone and Receipt formatsStarter Site A starter site is a site that will be presented before you get to the ordering page. This is used if the customer does not have their own website. If you go to http://pizzazia.comhttp://pizzazia.com you will see an example of a Starter Site
Online Ordering Allows you to turn the service on or off for all locations using this site. This is a great way for dealers to disable online ordering if the client has left or has not paid Test Mode Password protects online ordering. If set to "Yes" then when a customer goes to the online ordering site they will be presented with the following page. A password if needed to proceed. Useful to check everything is working in a live environment before you allow access to the public
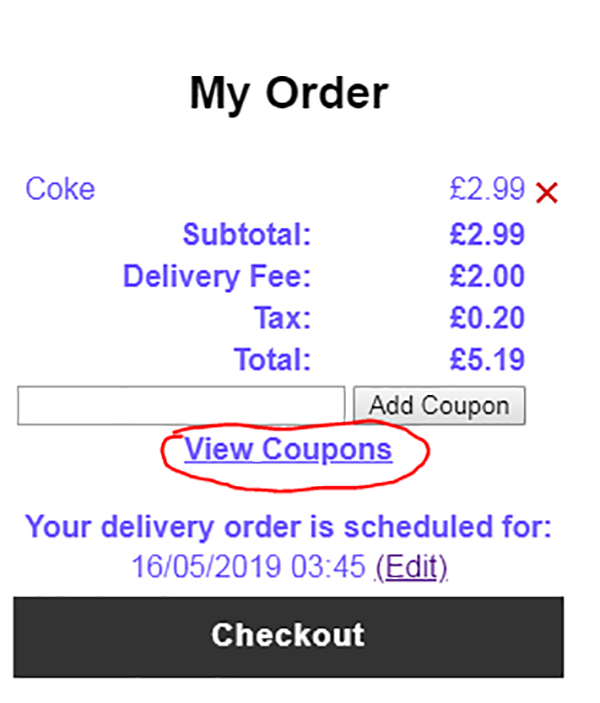
Sync Menu Syncs your menu between the restaurant and the website which allows you to choose which products you want to make available online. Currently a static Ip is required for this to function properly.
Edit Online Menu
This is where you decide which items will be available on the online menu

Pos Name The name of the category on the restaurant POS
Display Name How you want the name to display on the website. If left blank then the Pos Name will be used Description This will be displayed underneath the category description on the website For example. I set the display name for the Drink menu to "Drink Online" and set the descriptions to be "Description of Drink Online"
Display Online Decided if this category will be displayed on the online ordering site. If you click the actual words "Display online" then it will tick all boxes to save you clicking each one individually
Image Allows you to upload an image for the category.
Edit Items Edit items exists inside of edit online Menu. It is how you enable individual items See the edit items section further down for more details
Timeset You can apply a timeset so the category is only available at certain times. The timesets are synced from the POS. to create one you must do this on the POS then do a menu syncDisplaying a category online will only display the category. You have to specify which items within that category you want to be available online. The same goes with modifiers.
Inside of Edit Items you have the same options as you do in Edit Online menu. See above for details
Allows you to change the online description for the modifier sets and decide if they will be available online. Applying to all items will apply the changes for all items that have that modifier set.
For Example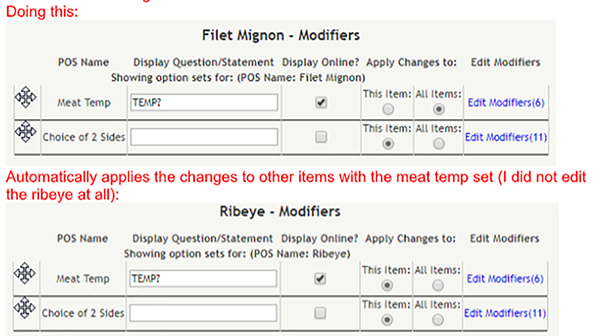
Here are the options for the modifiers sets. You also get so decide if they are displayed online and what the display name will be. Applying to all items will apply the changes for any item that uses the modifier set that this modifier is a part of. So, if you want to enable the modifier for every item that uses it you would apply it to all items

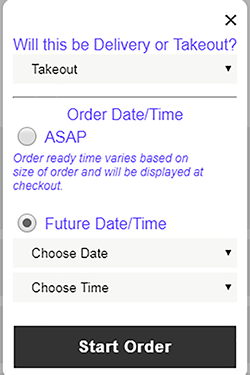
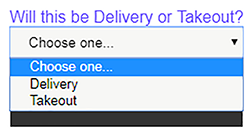
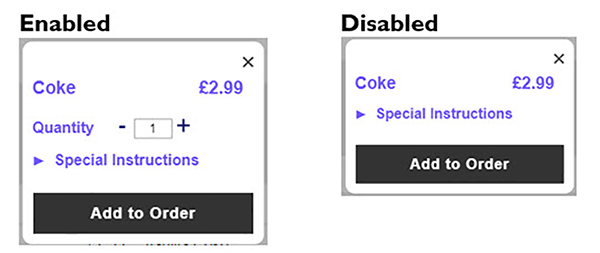
Accept Cash Orders Enables or disables the cash payment option on the checkout screen
Test mode (Multi-Location only) Password protects online ordering. If set to "Yes" then when a customer goes to the online ordering site they will be presented with the following page. A password if needed to proceed. Useful to check everything is working in a live environment before you allow access to the public
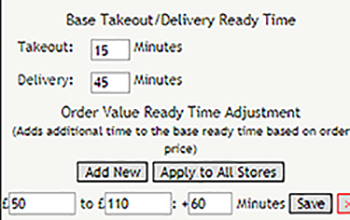


Location Image This image will only appear if you have more than 1location. If you do have more than 1 location then you will be asked to choose which location you want to order from. At that point you can have an image to represent each site
Timezone The time zone that will be used for the location Store Name The store name will be referenced if it if offline so it should be something you are happy for the customers to see Address The address of the store location. If you have more than 1 location then the customer will be asked to choose a location. If you have the address filled out here then it will show when making that choice. It is also used to calculate the distance on the same page Store Info Notes about the location. The notes only exist on this page Store Email This is the "From" email that confirmations are sent from. An email is sent to both the store email and all additional emails Additional Emails You can add additional emails here. Separate them with a comma. The order confirmations will be sent to the store email and all additional emails Store Phone# Exists on this page only Store Fax Exists on this page onlyStore Hours This is a legacy setting and does not need to be used
Dates Closed Any dates that the site is closed. You will not be able to schedule orders within these times Delivery Hours Hours for each day that the business will provide a delivery service Takeout Hours Hours for each day that the business will provide a delivery service Set Pos Settings This is a tool used by OrderCounter when initially setting up the online site. This tool should not be used.This is how to control what the website looks like. The following settings control the starter site
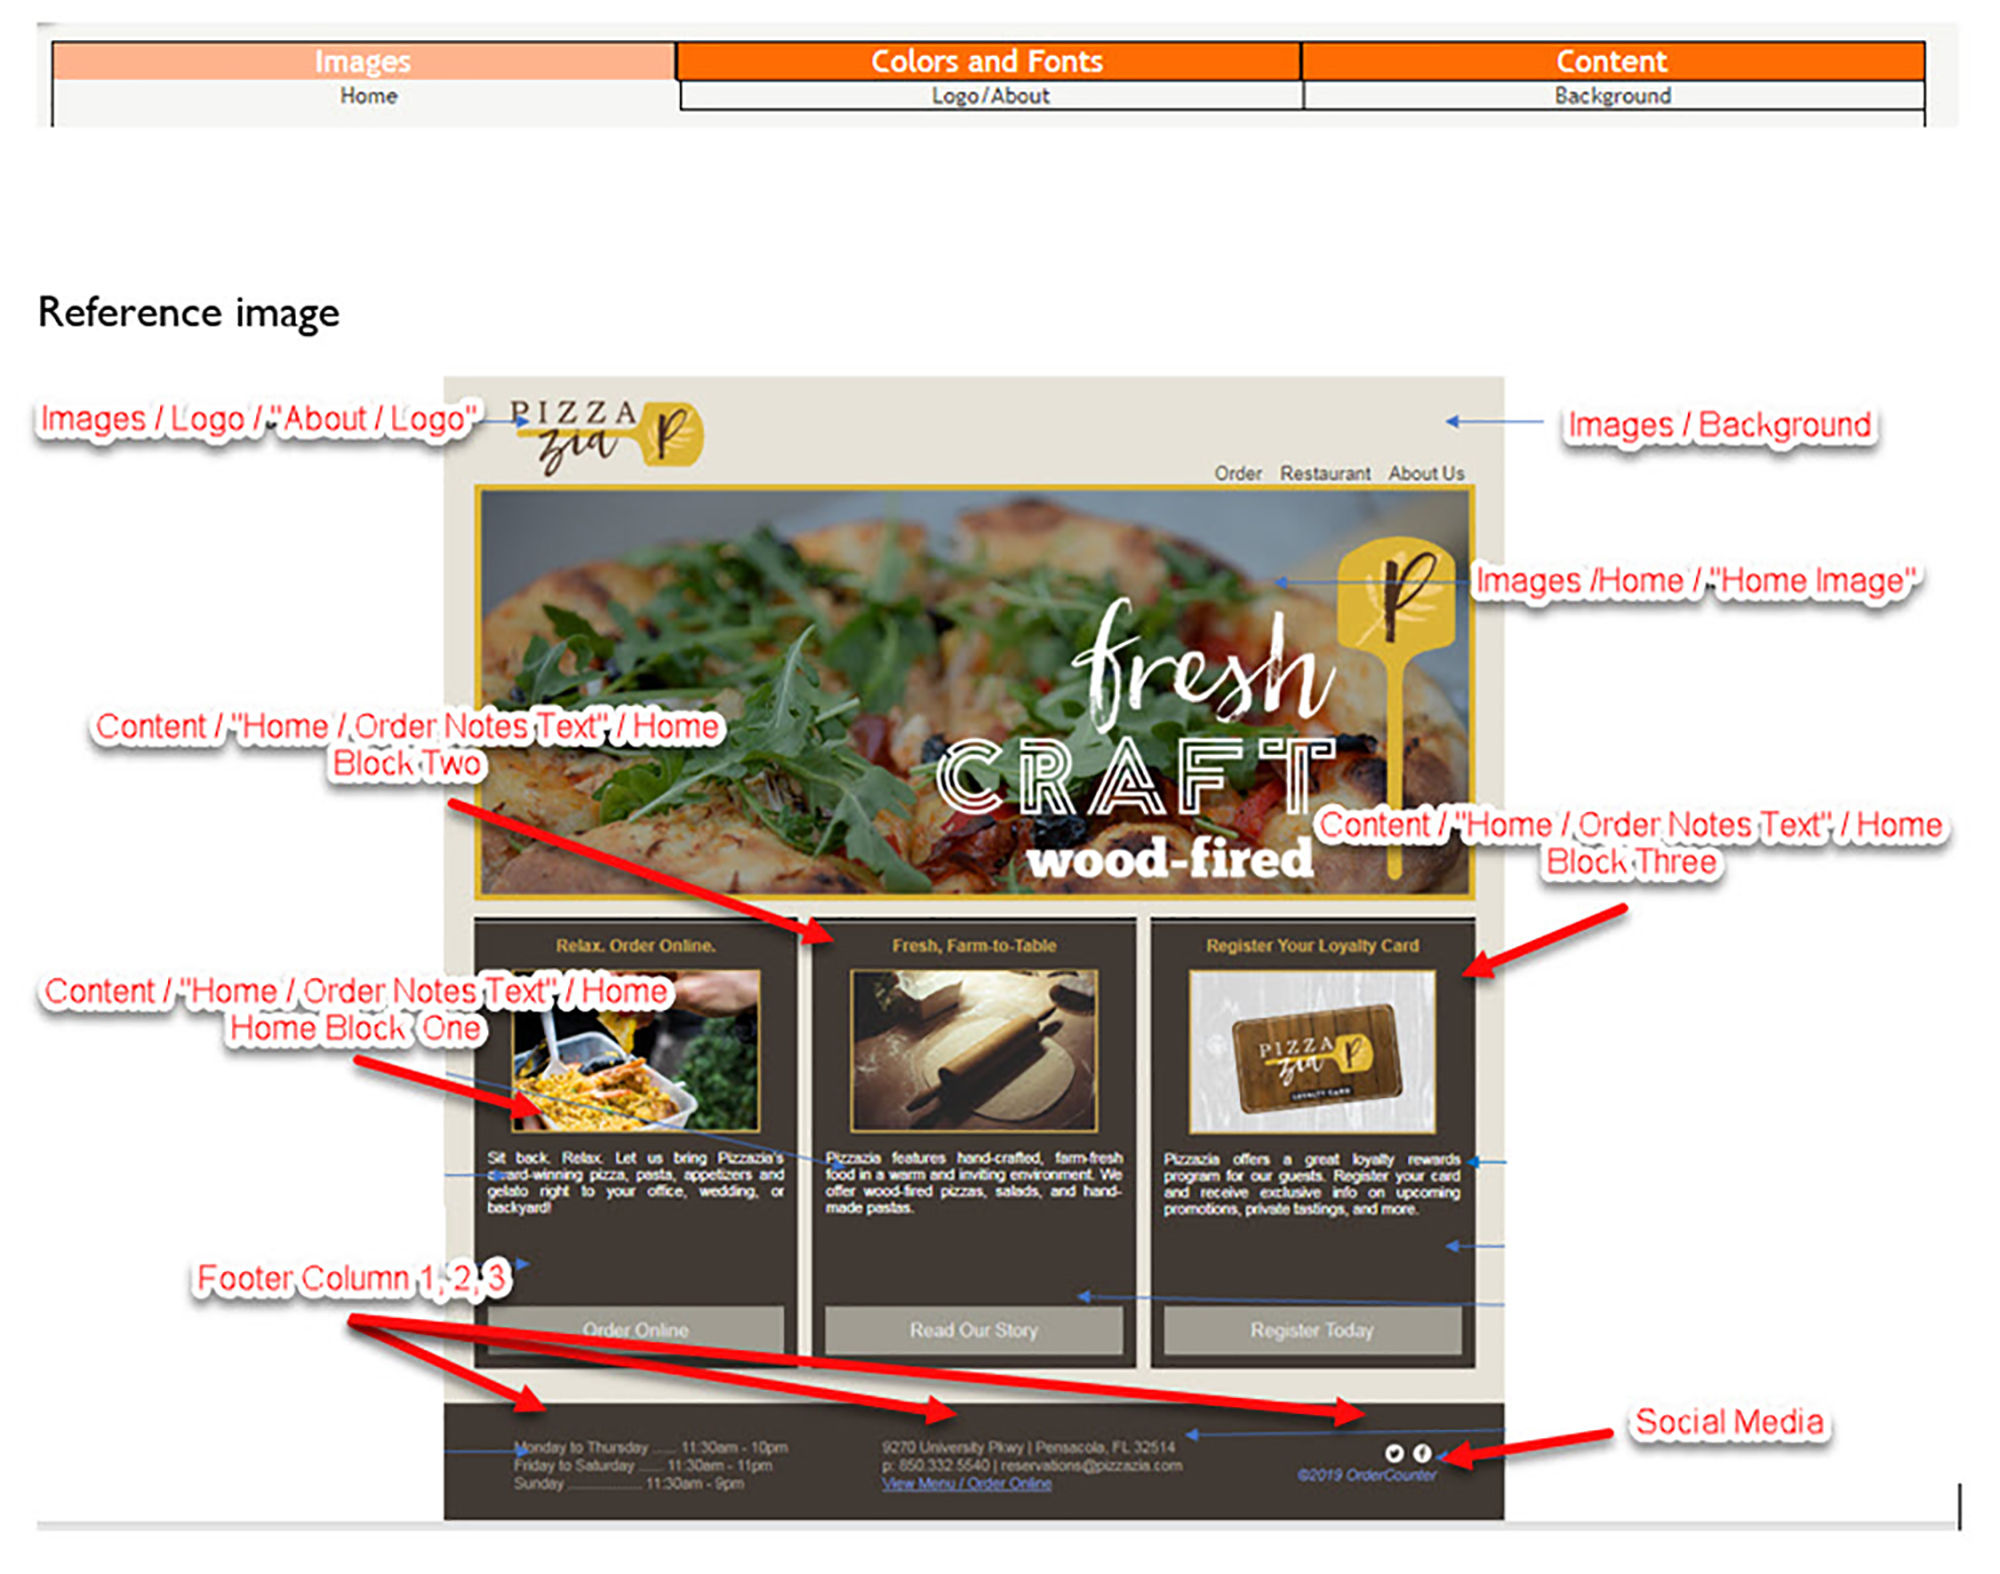
There are 3 tabs under Images
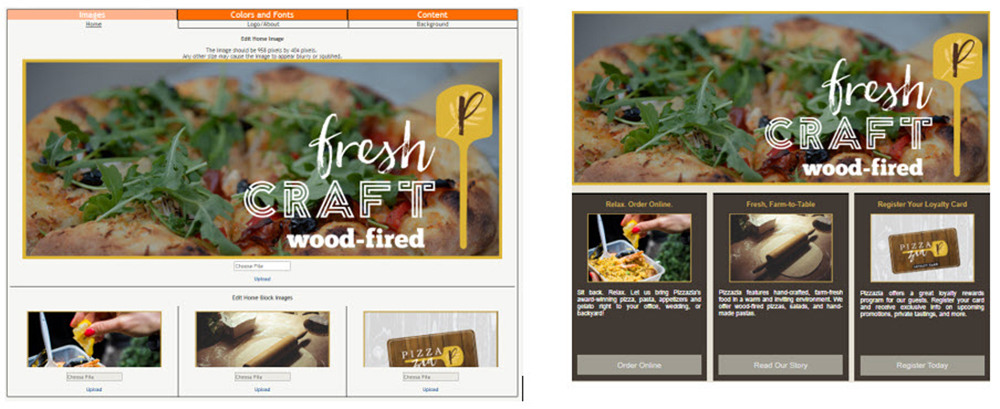

The logo picture here is what is shows at the top of the starter site, the first page that loads
The "About Page Image" at the bottom will appear on the about us page of the siteHere is a side by side image so you can see where the content is reflected on the website. The Home / Order Notes tab affects the first screen you see when you have the starter site enabled. *
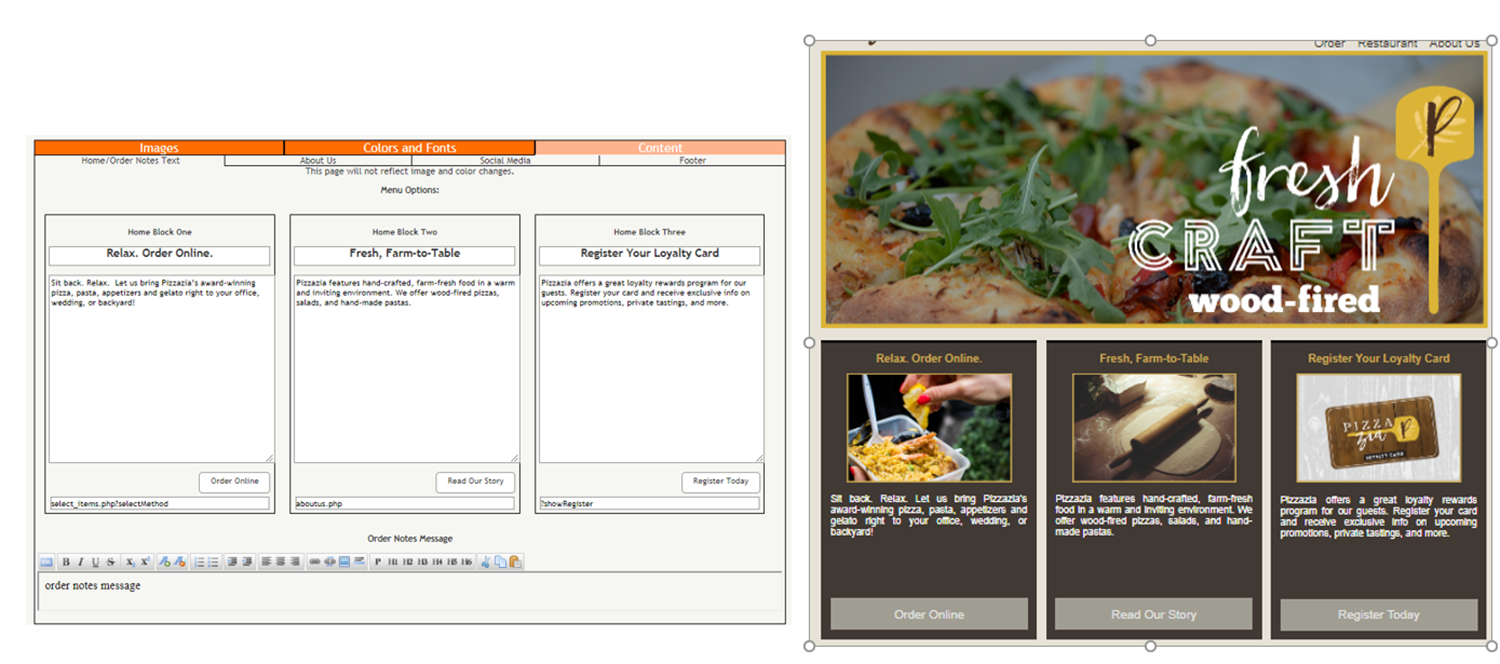


*The Order notes Message section affects the screen that appears when you click on a menu item. The picture here shows the order notes message text at the bottom
The about us page tab affects the text on the about us page on the site
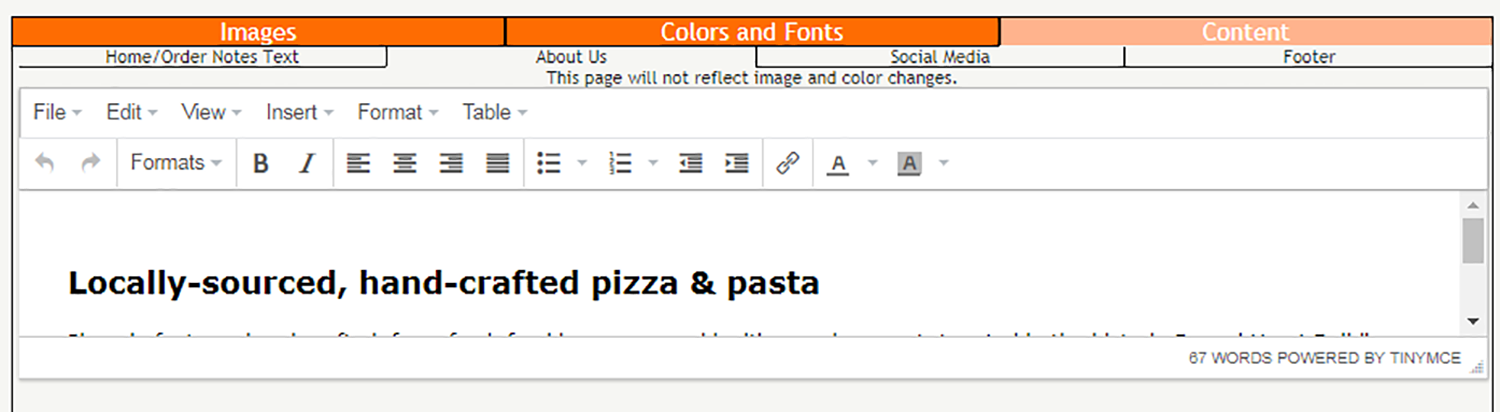

This social media tab creates links to twitter and Facebook in the 3rd column of the website's footer. When you click on the icon it will take you to the URL specified
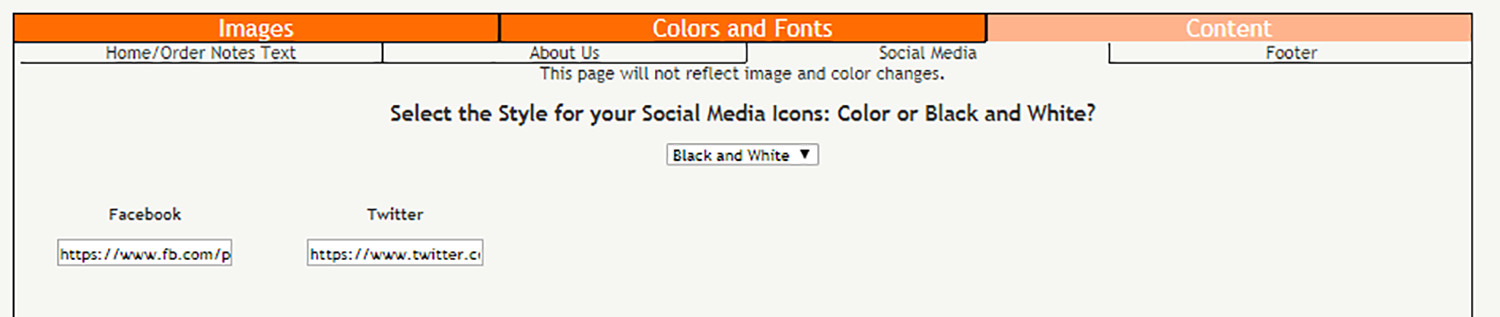
This is where you control the content of column 1 and 2 of the website's footer
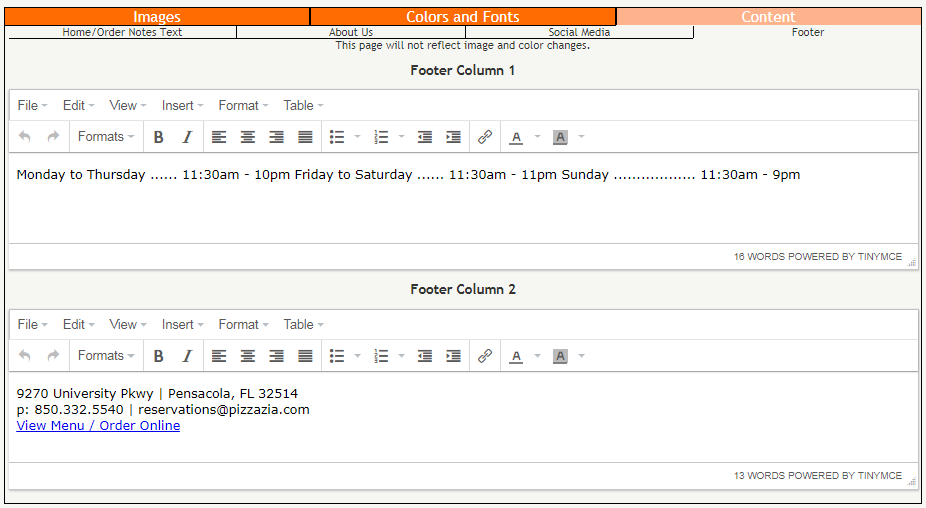

You can set up users here which will be allowed to access the online ordering management site.
To create a new user, do the following:When a user logs in they will only get access to the location settings
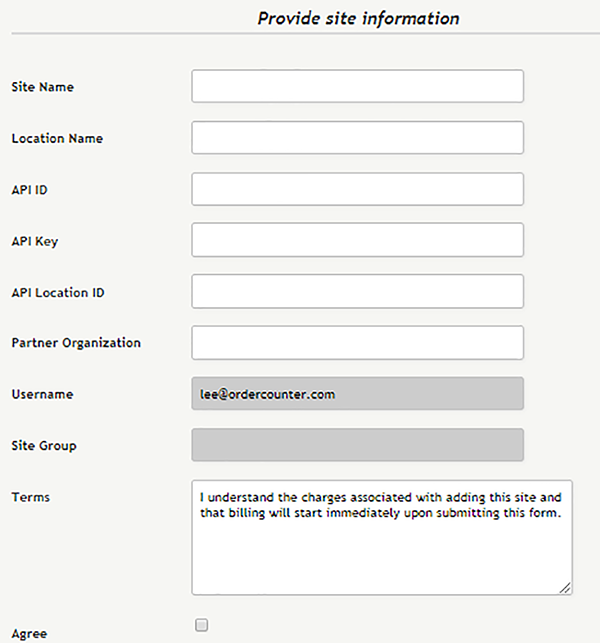
Adding a site will also Add a location as your first site becomes your first location.
Site name The name for the site Location Name What you want to call the location API ID This should be in your license email. Contact Order Counter if you do not know it API Key This should be in your license email. Contact Order Counter if you do not know it API Location ID This should be in your license email. Contact Order Counter if you do not know it Partner Organization This is the name of the dealer Username Will already be filled out Site Group This is used to allow the dealers to have access to only their sites. Terms Please read this Agree Tick to agree to the terms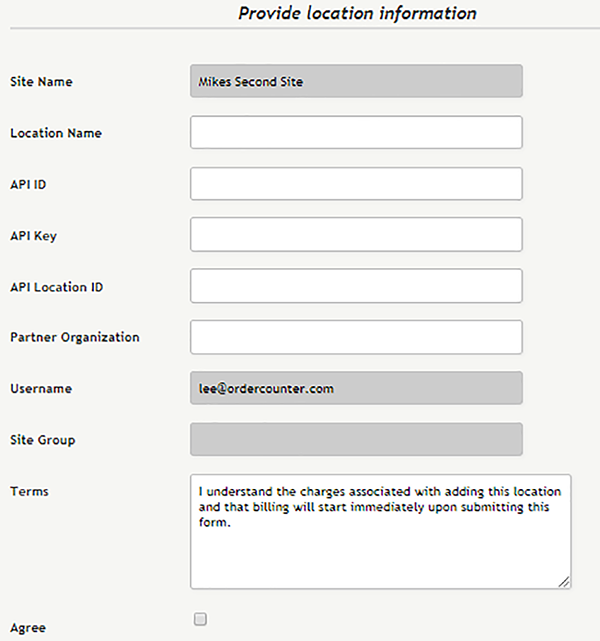
The Site name will already be filled out as you cant have a location without already having a site
Site name The name for the site Location Name What you want to call the location API ID This should be in your license email. Contact Order Counter if you do not know it API Key This should be in your license email. Contact Order Counter if you do not know it API Location ID This should be in your license email. Contact Order Counter if you do not know it Partner Organization This is the name of the dealer Username Will already be filled out Site Group This is used to allow the dealers to have access to only their sites. Terms Please read this Agree Tick to agree to the termsOrder types change how the system behaves. If you choose "Takeout" for example the first screen will ask you to choose a customer.
If you choose "Table order" it will ask you to choose a table. This is not something to be overlooked and is a very important part of the system. Order types are set per terminal. You can have multiple order types per terminal or you could restrict one terminal to one order type.
The Table order type is intended for use with table service.
When you first log on you will be presented with a table plan. If you click on a table you will be able to add Menu Items to the check and send items to the kitchen without paying for them. To pick up the table, when you log on just select the same table. To Pay you will need to go to manage tickets which is where you can pay or split the check. To make a sale with this order type do the followin
There are some settings that are specific to this order type
Back Office > Settings > POS > Table Service Assign Sections Determens whether a table section is assigned to a server upon clocking in. Sections must be set up in Settings > Table Sections Advanced Table Statuses This will turn Advanced Table Statuses On or Off. Please see Coursing and Advanced Statuses document for more information Auto Table Reset If set to "Yes" then the table status will be set back to Open when all tickets are cashed out. If set to No, then you will have to go into that table and hit "Reset Table" to put the status back to Open. This is used if you want to clean the table before allowing it to be used on the system Table Check If turned on then servers cannot clock out with open tables Open Gratuity Determines if the Gratuity amount can be entered when gratuity is added. If set to Off then the gratuity button will toggle the gratuity to zero or what is set in the "Gratuity Amount" box Gratuity Determines if the Gratuity is added before or after tax| Before Tax | After Tax |
|---|---|
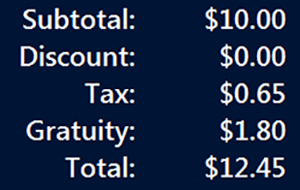 |
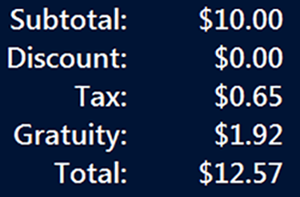 |
Gratuity included Discounts Determines if Gratuity is calculated including or excluding discounts
| Excluded Discounts | Includes Discounts |
|---|---|
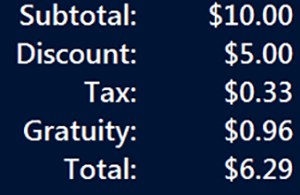 |
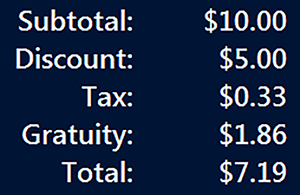 |
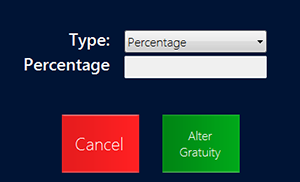 Gratuity Amount The Percentage of Gratuity to be added to tickets
 there will be an option called
  Number Of Guests Prompts for a number of guests when a table is opened
Drinks Per Guest If set to "On" then a prompt will appear when the number of drinks is not equal to the number of Guests. You need to set the drinks attribute on the drinks to get this to work.
Server Accepts Cash Self explanitory
Server Accepts Credit Self explanitory
Server Accepts Check Self explanitory
Server Accepts Gift Card Server Accepts * is used for Personal Banks. Personal Banks or just Banks are money belts. They are when the server is responsible for the money alone. This is normally just for table service
You have to use this in conjunction with Back Office > Settings > Tills > Personal Bank Settings. Each order type is listed here an you have to enable personal banks for the order type in question. Again, this is normally just Table Orders
If personal banks are allowed then the Server Accepts settings will determine what type of payment method the server is able to use to close out an order. If the Payment Method is not allowed then in will not show in the list to choose
Action After Send Determines what will happen after the send order button is pressed.
Options are:
Number Of Guests Prompts for a number of guests when a table is opened
Drinks Per Guest If set to "On" then a prompt will appear when the number of drinks is not equal to the number of Guests. You need to set the drinks attribute on the drinks to get this to work.
Server Accepts Cash Self explanitory
Server Accepts Credit Self explanitory
Server Accepts Check Self explanitory
Server Accepts Gift Card Server Accepts * is used for Personal Banks. Personal Banks or just Banks are money belts. They are when the server is responsible for the money alone. This is normally just for table service
You have to use this in conjunction with Back Office > Settings > Tills > Personal Bank Settings. Each order type is listed here an you have to enable personal banks for the order type in question. Again, this is normally just Table Orders
If personal banks are allowed then the Server Accepts settings will determine what type of payment method the server is able to use to close out an order. If the Payment Method is not allowed then in will not show in the list to choose
Action After Send Determines what will happen after the send order button is pressed.
Options are:
 will appear at the top of the screen allowing you to print all tickets
Table Service Checkout Button When set to yes changes the
will appear at the top of the screen allowing you to print all tickets
Table Service Checkout Button When set to yes changes the  button to a
  button when you ring through an item. This means you do not have to click on manage tickets then Pay.
This is a quick service order type and will not allow you to suspend a sale. It is used mostly in quick service restaurants where the order will generally be to go
There is no Send order button as the order will be sent automatically when the "Checkout" button is pressed. If you do not complete the payment process then a void ticket will be sent to the kitchen so they don't make the order In the Receipt Template you should make sure to have a line for Order method so you can see that the order is "To Go" You can have the system prompt for a name which will print on the Ticket so you can call out the name when the order is ready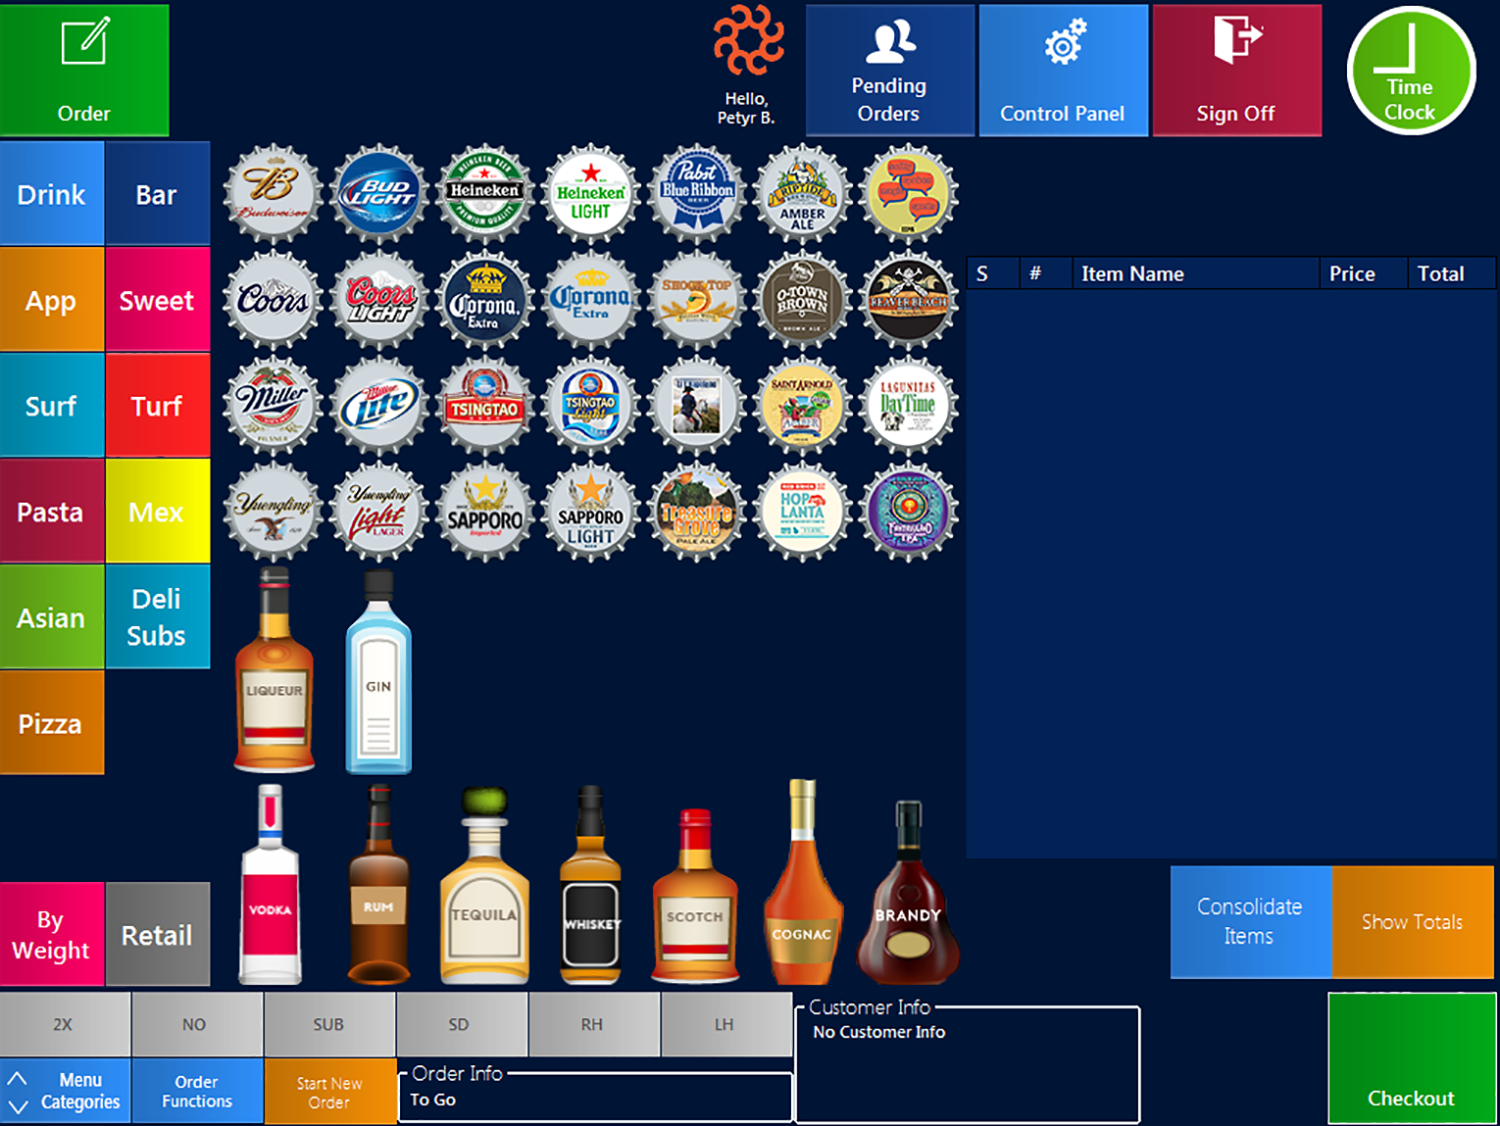
For Here is Almost exactly the same as To Go. It is used mostly in quick service restaurants where the order will generally be For Hear.
The order method of "For Here" instead of "To Go" will print on the ticket so the kitchen knows not to put the food in take away containers. Print stations are mapped to terminals by order type, which means that you can have "For Here" orders print to a different printer than "To Go" orders for the same items. There are also other areas of the system that are linked to the order type Quick Service will give you the option to choose from either "For Here" or "To Go" and is used where a mixture of the 2 options is common like a MacDonald's
You can choose either "For Here" or "To Go" from the bottom of the screen before you hit the Checkout button. If you do not make a choice then you will be presented with a screen and forced to choose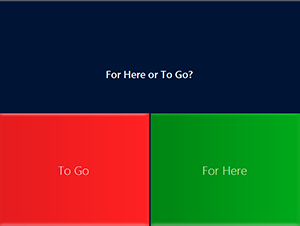
Retail is intended for a retail environment. It is similar to quick service but it will allow you to save and send before the item is paid for. It will however warn that you are submitting the order without payment and ask you if you want to continue.
When you save and send it will print out a slip which is the request for payment The intended purpose for this function is so that if a customer forgets their wallet or purse you can send the order, serve another customer and then pull up the order again without having to re-ring all the items. In order to retrieve a saved order go to >
>  You can Edit, Cancel or Close out these orders.
Edit takes you back to the order screen,
Close takes you to the Manage Ticket screen and
Cancel removes the order from the system
You can Edit, Cancel or Close out these orders.
Edit takes you back to the order screen,
Close takes you to the Manage Ticket screen and
Cancel removes the order from the system
Deliveries are typically for a restaurants with delivery drivers. It will manage the orders and inform you what order is where.
The first thing you will be asked is for customer details If you type in the first box it will look up existing customers. You can enter either a Name or a Phone Number, Wildcards such as * are not required. To add new customers, enter the details in the boxes below it. The minimum information can be set in Back Office > Settings > Customers and Addresses When you complete an order for a customer who's details you have just entered it will save them for next time. If you select an existing customer their previous orders will be shown in the "Previous orders window"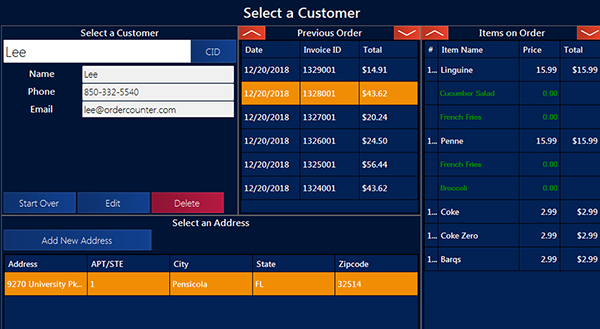
From here you can select a previous order from the list (if any) and then click continue to add the previous order. This will add ALL items from the previous order to the new order. OR you Just press continue to create a new blank order.
Customers can have multiple addresses. Make sure you choose one or you will be prompted to do so. When you have added the Menu Items to the order you can then save and send the order or you can pay for the order using the checkout button. If you save and send it will ask if you want to submit the order without payment. When confirmed it will print the order as well as a receipt as a request for payment. This can be presented to the customer upon Delivery.Next go to > 
All of the delivery orders will show in a list on this screen.
You can filter the list by Pending Delivery Orders or Out Delivery Orders The next step is to sign the order "Out For Delivery" by selecting the orders and pressing Choose a driver from the list (If Dirver is on the job title assigned to that employee then they will be in the list) and choose "Out for Delivery"
When you select the
Choose a driver from the list (If Dirver is on the job title assigned to that employee then they will be in the list) and choose "Out for Delivery"
When you select the  button you will see this screen.
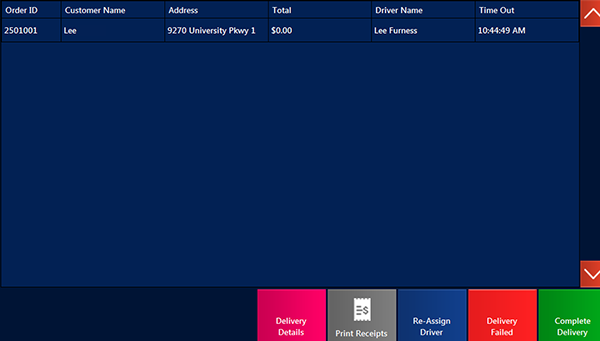
Back on the delivery pending orders screen you have the following options
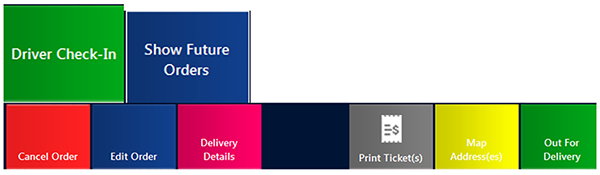
Driver Check-In Will mark all of the tickets assigned to that driver as complete. It does this if the deliveries have been paid for or not.
Cancel Order Removes the order from the list and a cancelled order is sent to the kitchen Edit Order takes you to the order screen Delivery Details shows you information about the order including the items and the full address Print Tickets will print tickets for all of the orders selected Map Address will bring up a google map of the address for the order Out For Delivery allows you to assign a driver to the order and mark it as Out for delivery Show Future Orders will show orders that are scheduled for 12 or more hours into the future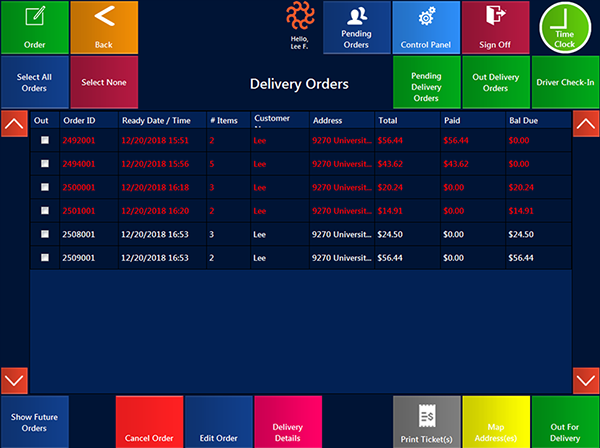
There is a To Go Order Type already but Takeout takes it further. It is specifically for people taking out food and will let you manage orders placed over the phone or at the counter
The first screen for this order type is the same as Delivery but will only require a Name and a phone number, not an address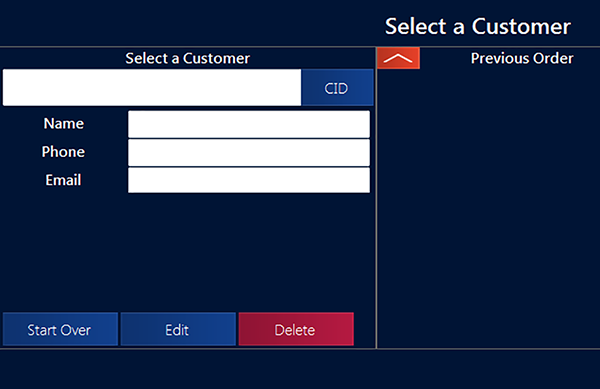
You can also search for an existing customer by typing either the customer name or the phone number in the "Select a Customer" box
If you do select an existing customer their previous orders will be shown in the "Previous orders window" From here you have 3 options Cancel Order Will cancel the order Continue With Default Clicking on Continue with Default will allow you to create a takeout order without entering any customer info Continue And Add Order You get this option if you have selected a previous order from an existing customer. The items in the order you selected will be added to the check. Continue Will take you to the order screen without adding any items from a previous order When you have entered all of the menu items to the order you can save and send the order or you can pay for the order using the checkout button. If you save and send it will ask if you want to submit the order without payment. When confirmed it will print the order as well as a receipt as a request for payment. This can be presented to the customer upon collection. If you use the checkout option it will ask if you want to mark the order as picked up. This is because they could be ordering over the phone or they could be in the store. If marked as picked up it will not show in pending orders.When the customer comes to collect you would go to "Pending Orders" > Takeout and select the customer's order.

From here you can
Print Receipts Will print duplicate receipts for orders Edit Order Will take you to the order screen so you can add or remove items Cancel Order Will remove the order (But only if it has not been paid) Close Ticket Takes you to the Manage Ticket screen so you can take payment. If it has been paid previously it will be marked as paid already. In this case you can press "Mark as complete" Which will take it off the pending orders screen Orders are assumed ready to collect 15 mins after order. They will be WHITE before this and RED after. There is a Caller ID option which requires a piece of hardware and will allow you to look up customers automatically Caller ID Equipment can be purchased from These guys Caller ID - CallerID.com
Back Office > Settings > Pos > Order Wait Time Settings
Display Takeout Wait Time Displays or hides the takeout wait time on the logon screen Default Takeout Time What the display will show as default with no orders Auto Time Reset If turned on, the default takeout and delivery wait times will be reset each day at a specific time Auto Time Reset Time This is the time the default wait times for takeout and delivery will be reset if Auto Time Reset is set to "On"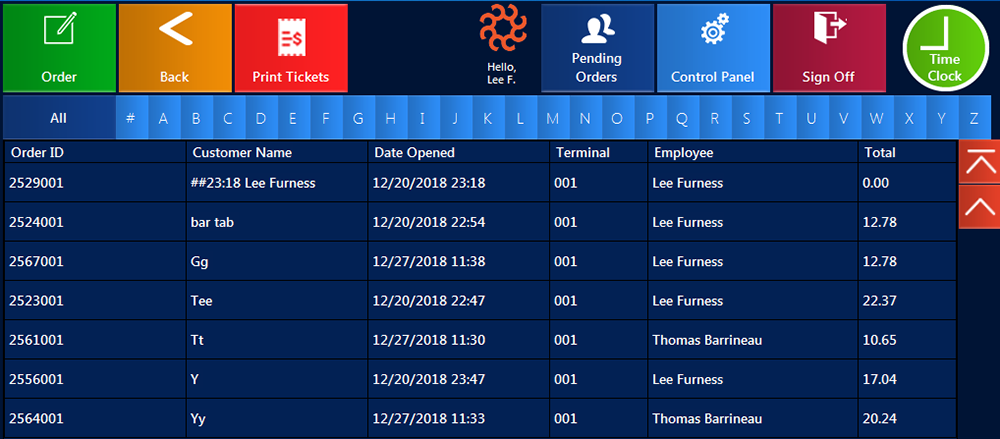
If you sign off after entering items then it will save the Bar Tab with a Customer Name as the time it was entered and the employee name. The Time of Order will be the Customer Name i.e. ##23:18 Lee Furness
Transfer Tab Allows you to transfer to a different employee Page Up Or Down Will navigate the tabs on the screen if you have tabs which take up more than one screen Change View Shows you either a list of tabs with details or icons with the name of the tab and the cost Change Font Will only affect the icons. It will make the font bigger or smaller so that you can see the price if it is off the screen Print Tab Prints the bill for that tab Spit tickets Will take you to a screen where you can put some items onto a different ticket inside the tab Combine Allows you to Combine 2 Tabs. Click on Combine > in the pop up window Tick the Tabs you want to Combine > click Combine Tabs > Enter the new Name and press Enter Rename Tab Will allow you to change the name of the Tab Edit Tab Takes you back to the order screen to make changes or additions to the tab Close Tab Takes you to the payment screenIs used for Drive Thru orders where you can have multiple windows
Continue will send through the items currently on the order. This is so that if there is a long order the staff can be preparing it whilst you continue to take the order
End Will send through any other items that were rang through since pressing Continue along with a notification to say that this is the end of the order Fast Cash / Fast Credit when pressed will settle the check for exact cash or exact credit.
Under Back Office > Settings > POS There are options to confirm Fast Credit and Confirm Fast Cash. These will prompt to confirm that you do want to settle
Pressing save and send will allow you to send the order to the kitchen
Pending Orders > Drive Thru This is how you pick up the pending drive through orders
Edit Order takes you to the order screen
Cancel Order will remove the order and send a ***Cancelled Order**** ticket to the kitchen
Print Receipt will print a request for payment
Next Window will move the transaction to the next window. This means it will no longer show in your pending orders screen
If, in terminal settings, you have dual drive thru enabled and multi screen disabled, then any other terminals that have drive thru order type will receive the next window.
when pressed will settle the check for exact cash or exact credit.
Under Back Office > Settings > POS There are options to confirm Fast Credit and Confirm Fast Cash. These will prompt to confirm that you do want to settle
Pressing save and send will allow you to send the order to the kitchen
Pending Orders > Drive Thru This is how you pick up the pending drive through orders
Edit Order takes you to the order screen
Cancel Order will remove the order and send a ***Cancelled Order**** ticket to the kitchen
Print Receipt will print a request for payment
Next Window will move the transaction to the next window. This means it will no longer show in your pending orders screen
If, in terminal settings, you have dual drive thru enabled and multi screen disabled, then any other terminals that have drive thru order type will receive the next window.
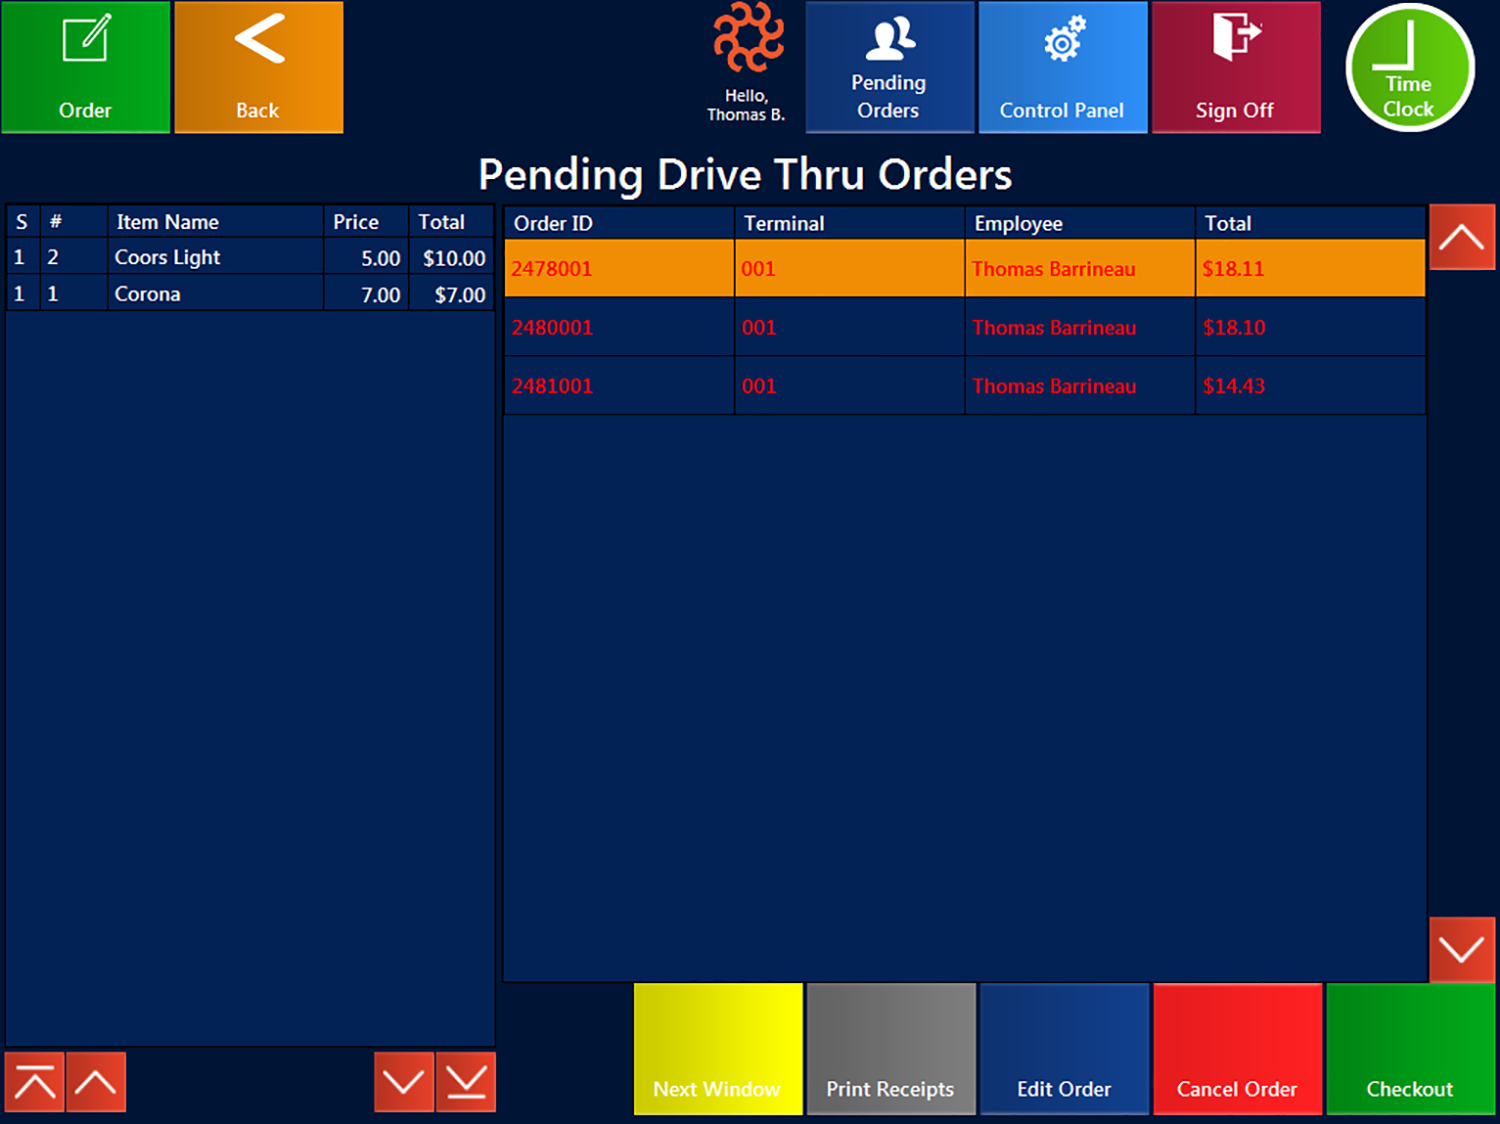
Price levels allow you to set up to 10 different prices for a Menu Item that you can use to be the price of that item from various parts of the system. For example you can create a happy hour promotion that charges a particular price level from 7-8PM every day. Or you can discount a menu item to change it to a particular price level
Price levels can also be used when you have multiple sites. You can set the store to charge a specific price level for each of its items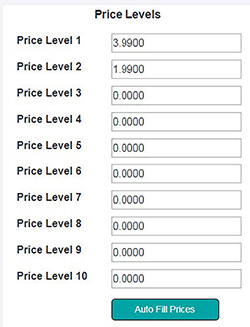
Price levels are set up in the Menu Item
If you press this button from the front end or the back office it will automatically fill out the price levels for you based on the options set in the back office.
The above instructions will work fine when you want to edit 1 Menu Item at a time, but what if you want to update more than 1 Item?
That's where multi Item Edit comes in
First you need to choose where you want to serve the printers from. If you are using serial or USB printers then this will have to be the machine physically connected to the printer. If you are using IP Printers it would normally be the machine running the back office. If this machine is off or disconnected from the network, then the printers set up on that machine will not work
Next thing is to set up the printers in the back office. There are 10 stations which you can call kitchen, Desserts or Bar etc. When you set an item to print you will be choosing one of these 10 stations At this point you have a name for your printer (The station) and we have a friendly name for the printer (from theOPOS driver install) We need to join one to the other. This is done with terminal printers from the back office where you assign a Printer to each stationExample
MV
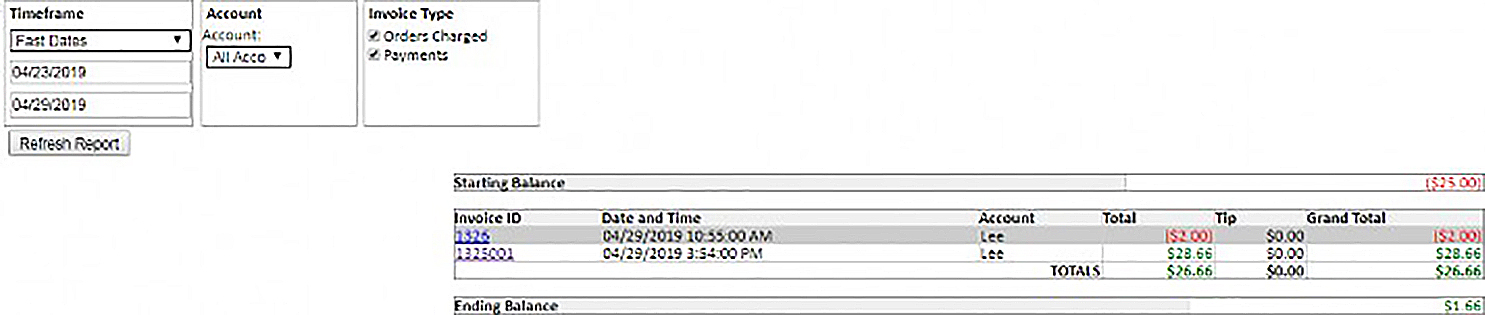
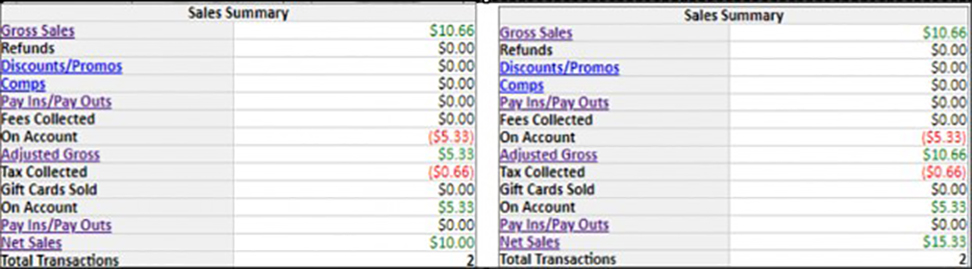
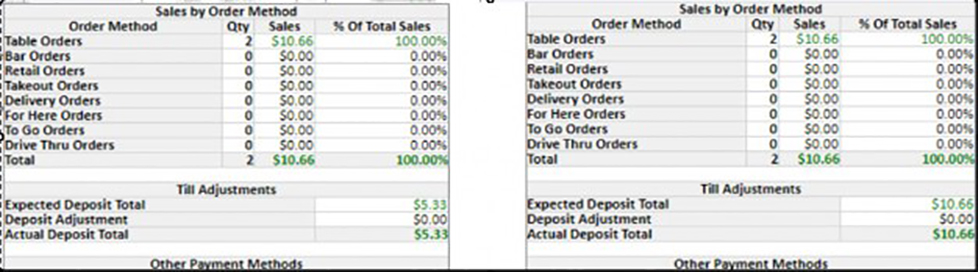
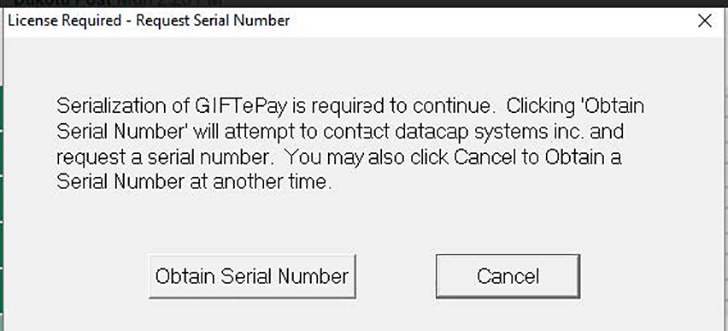
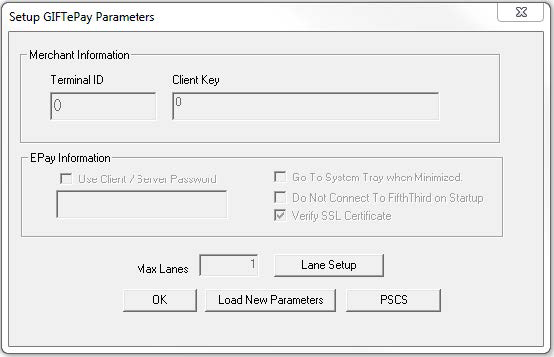
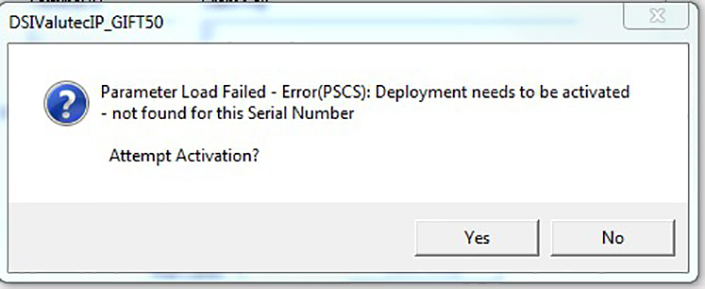
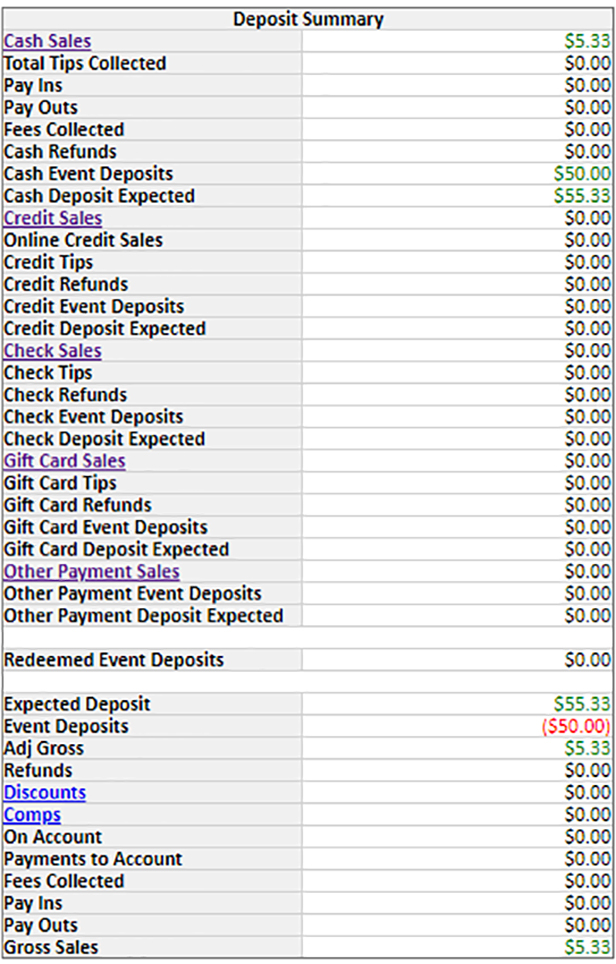
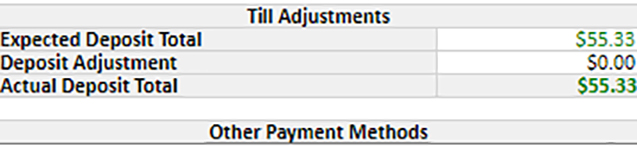
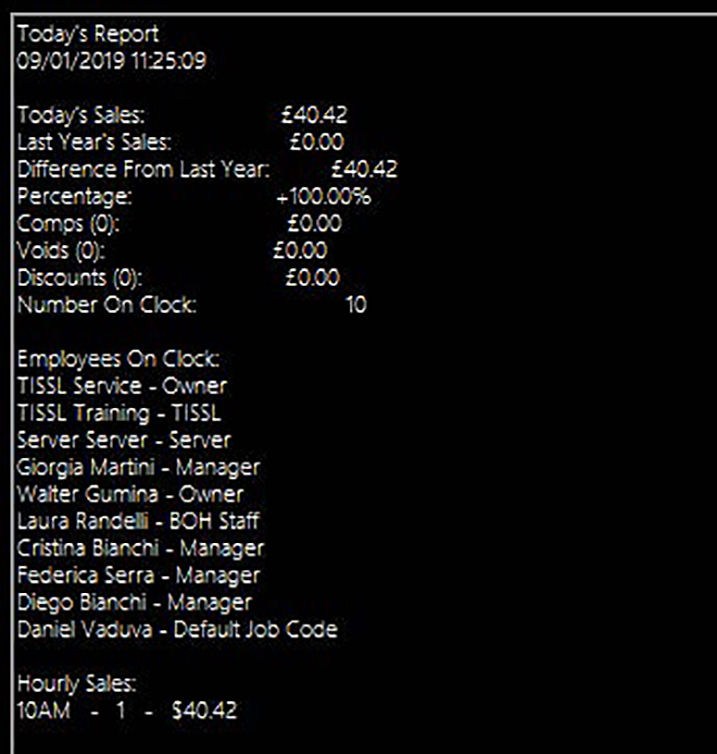
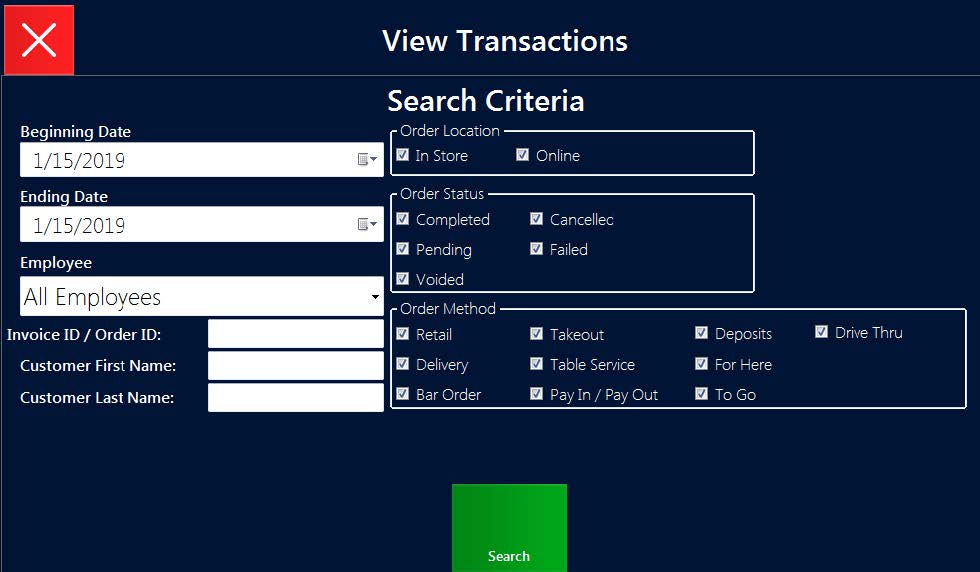
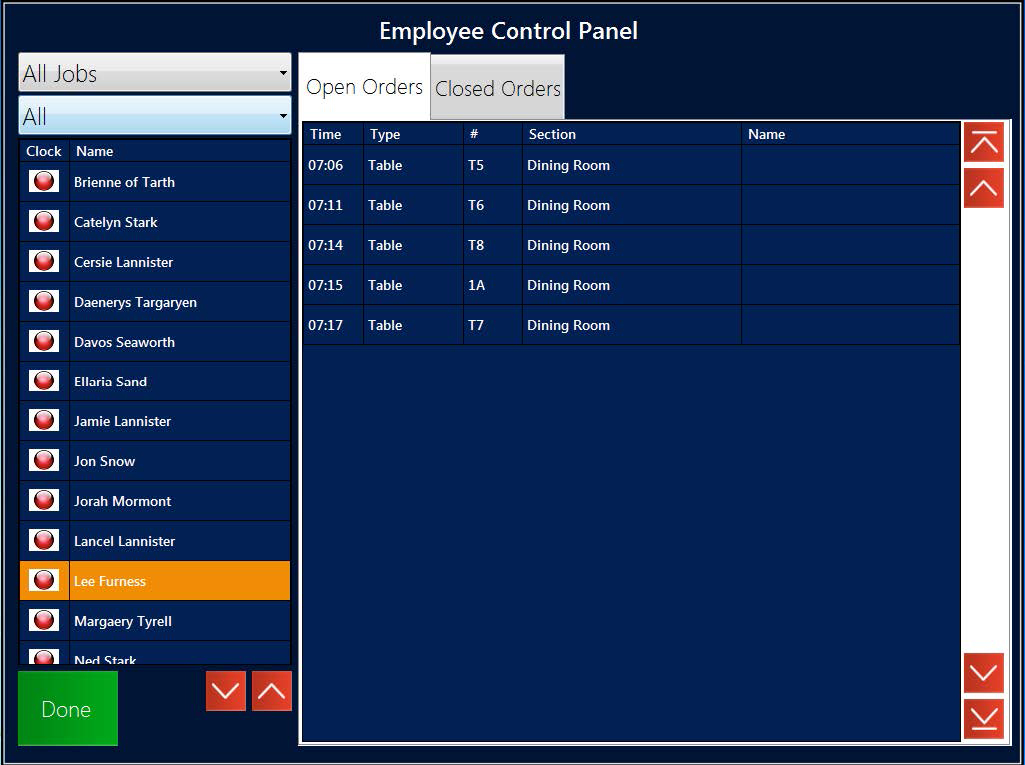
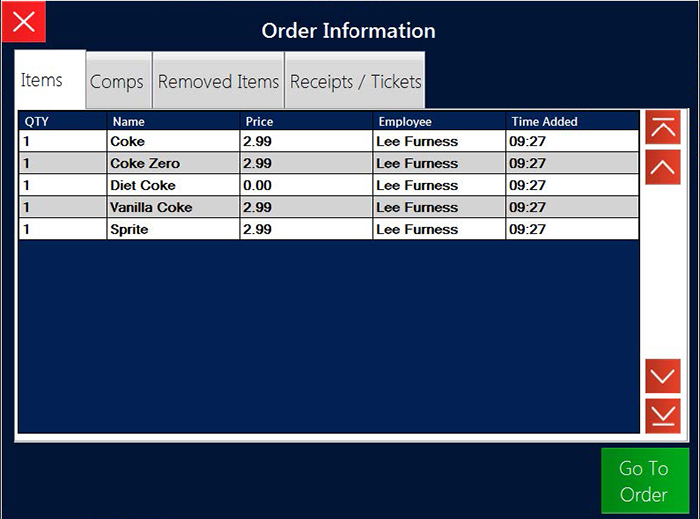
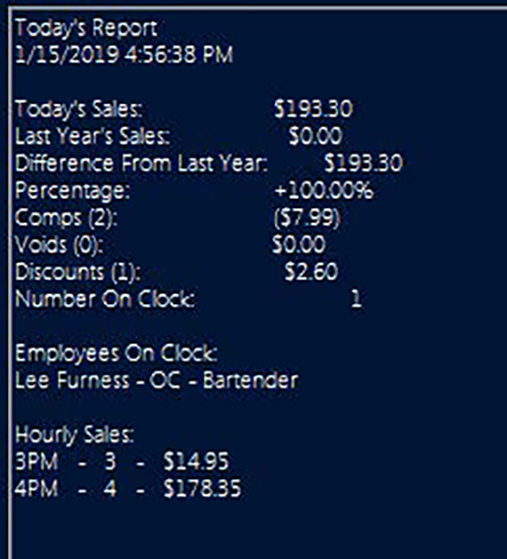
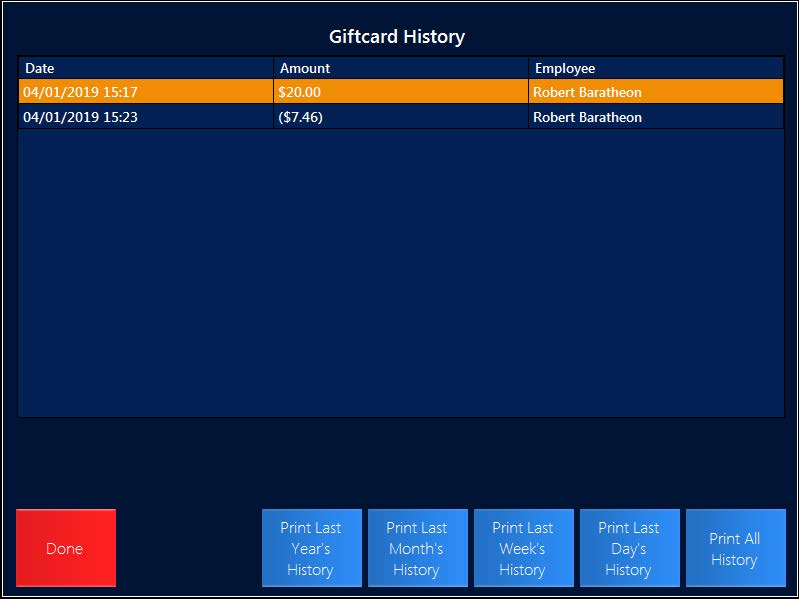
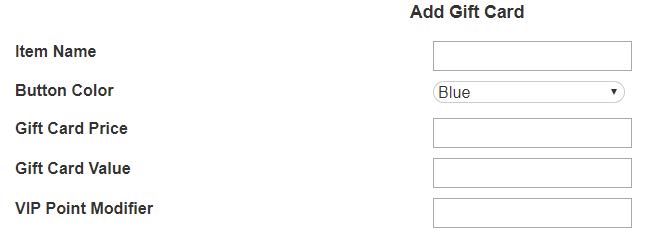
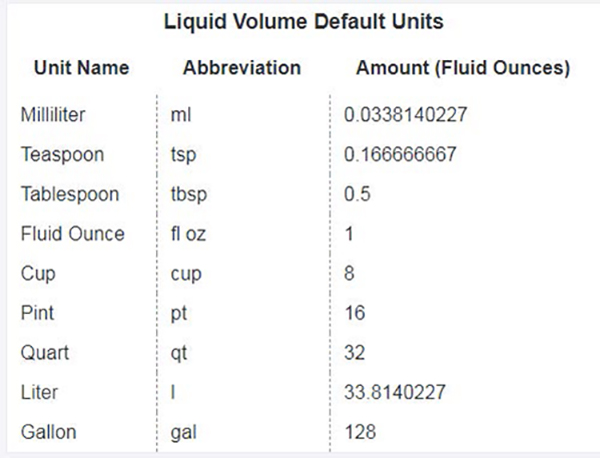
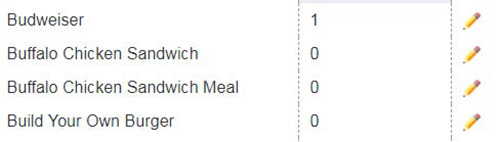
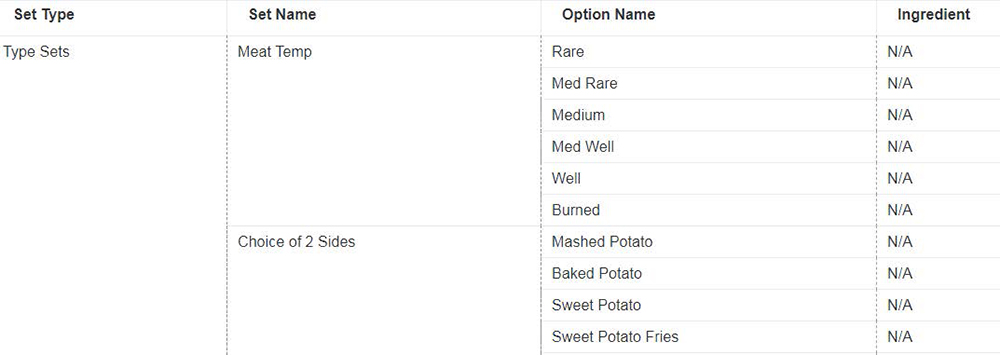
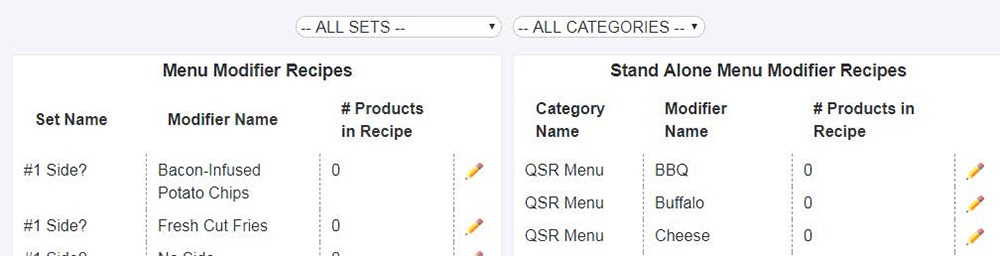
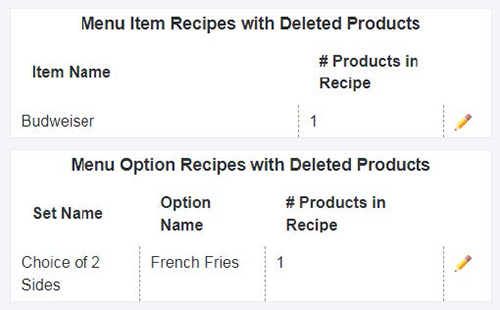
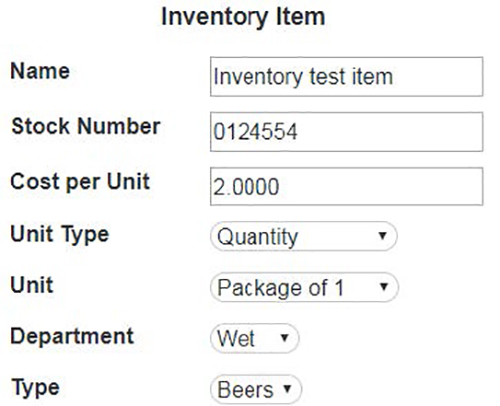
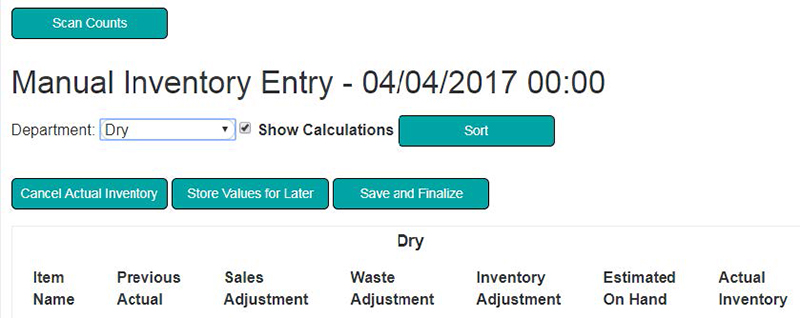
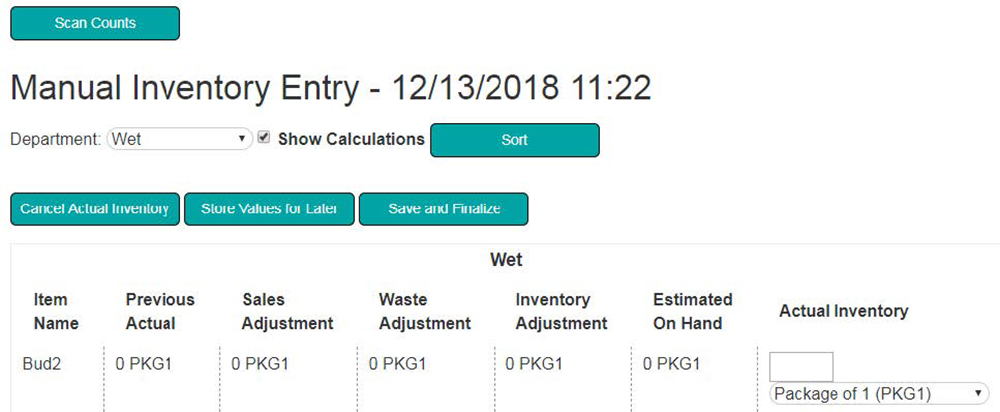
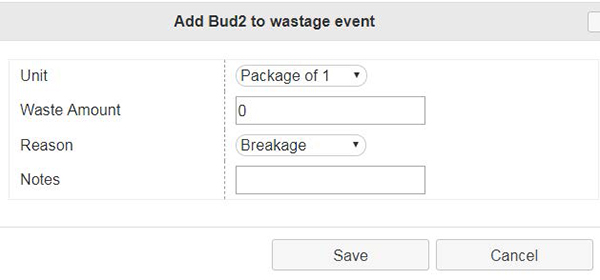
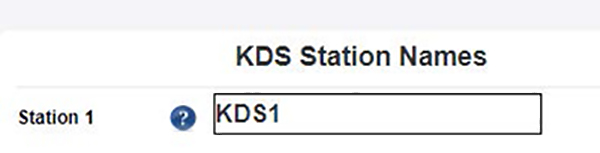
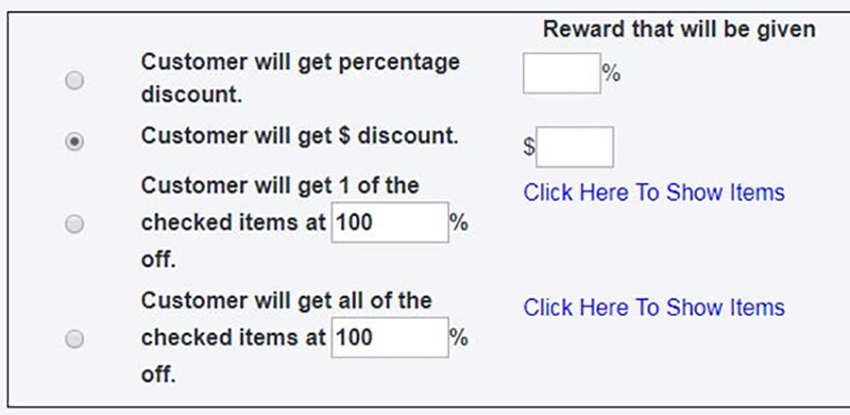
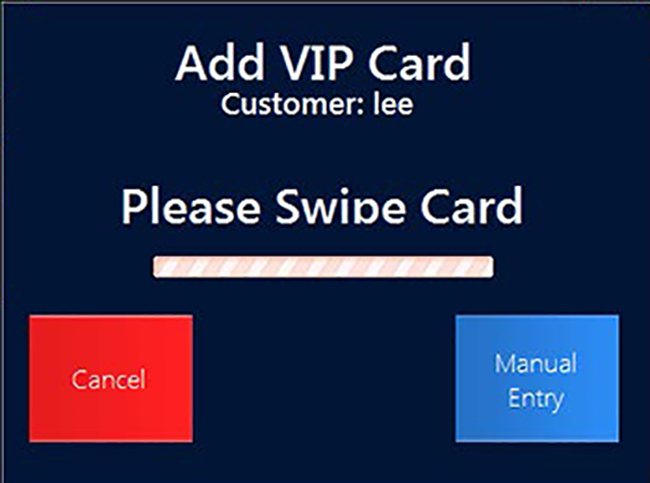
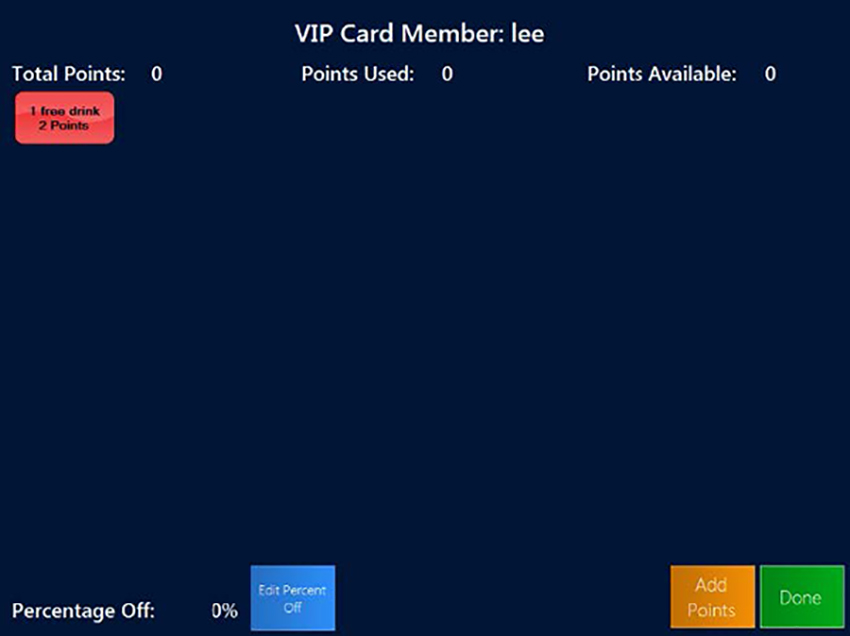
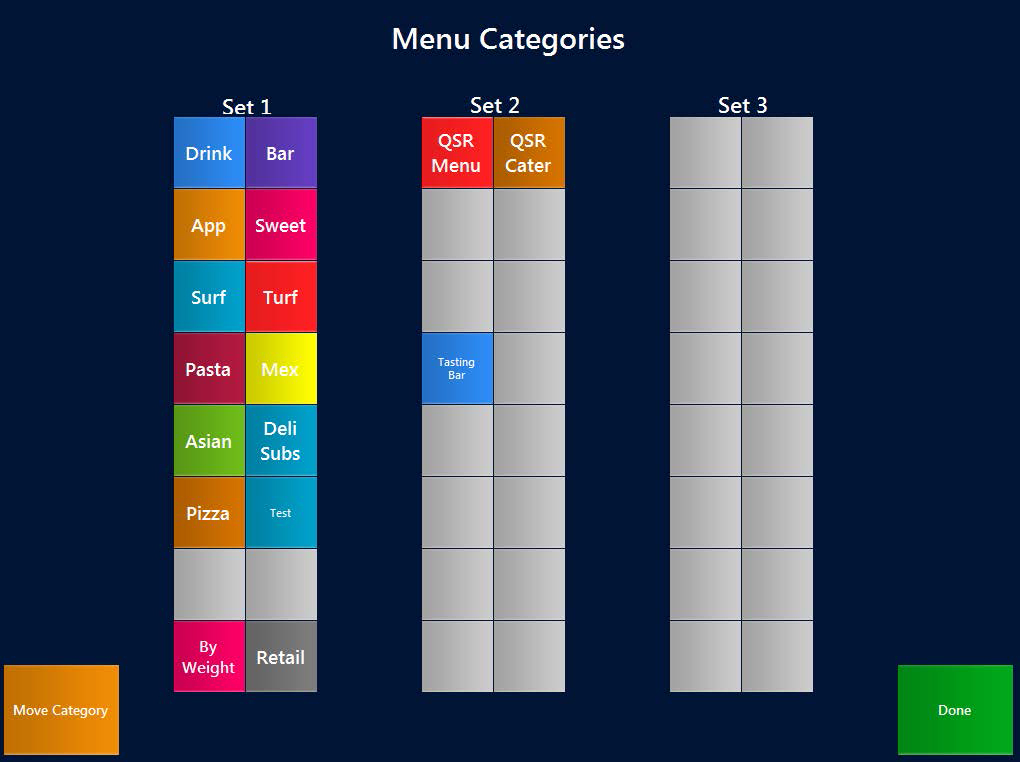
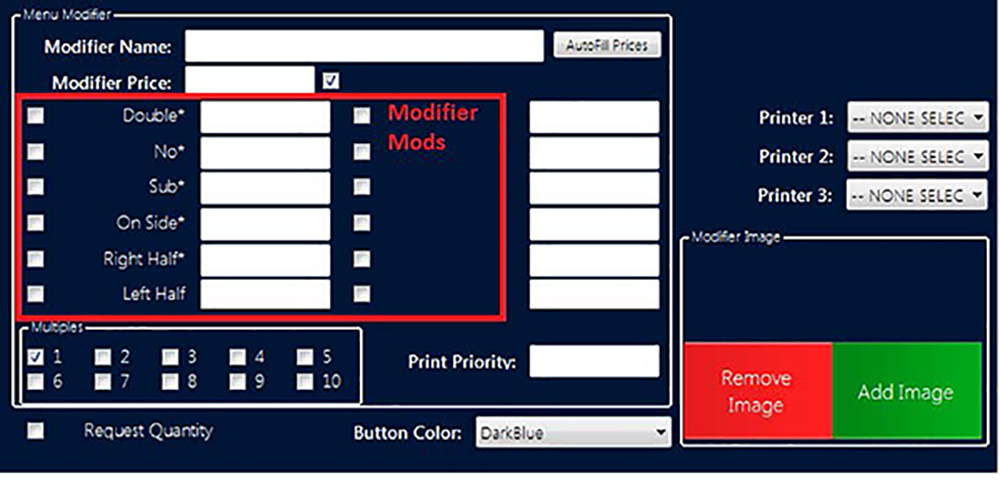
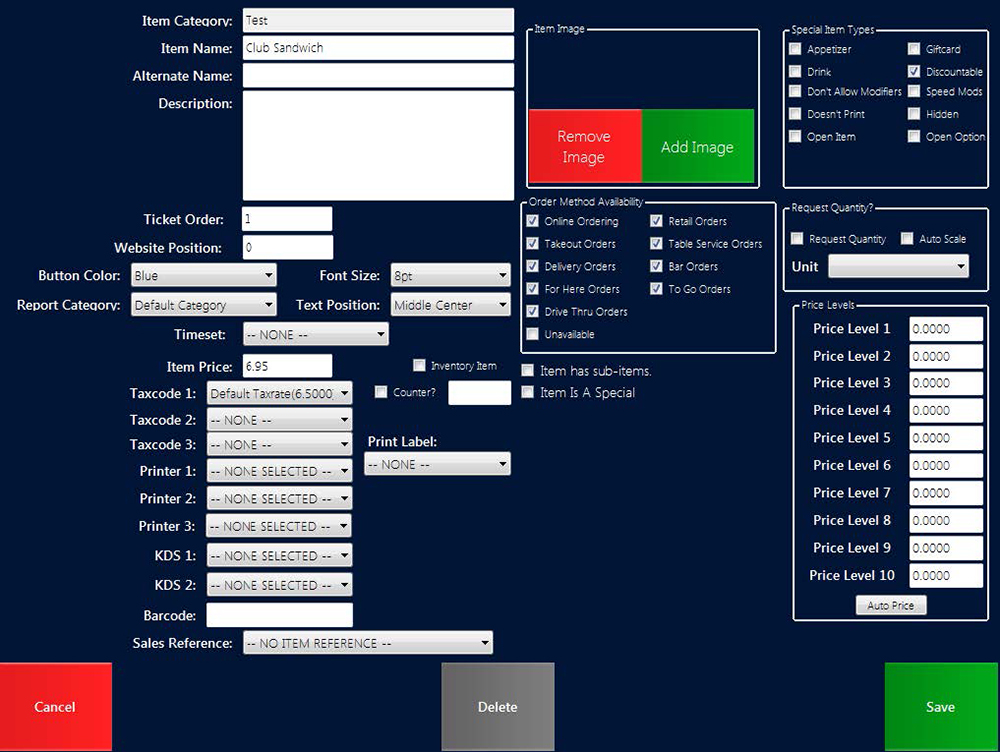
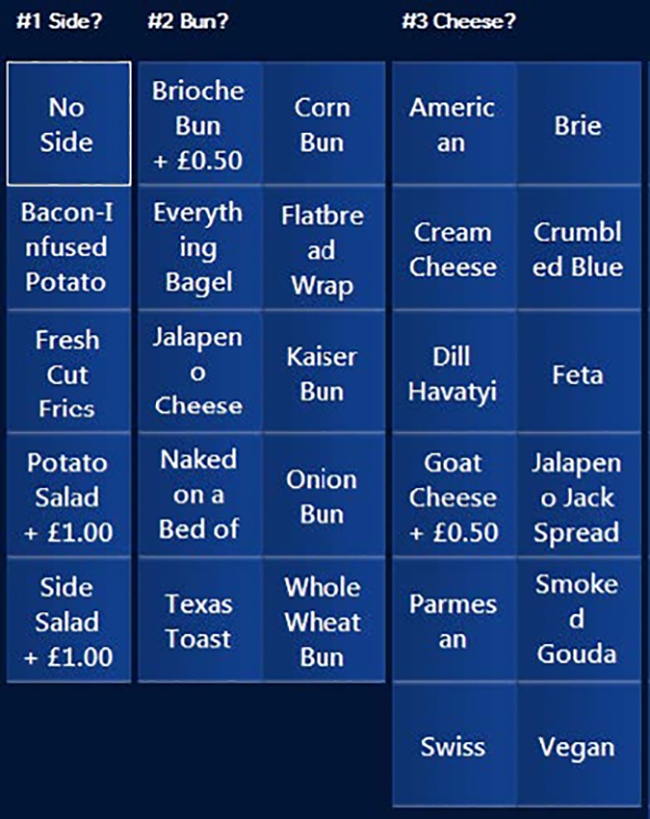
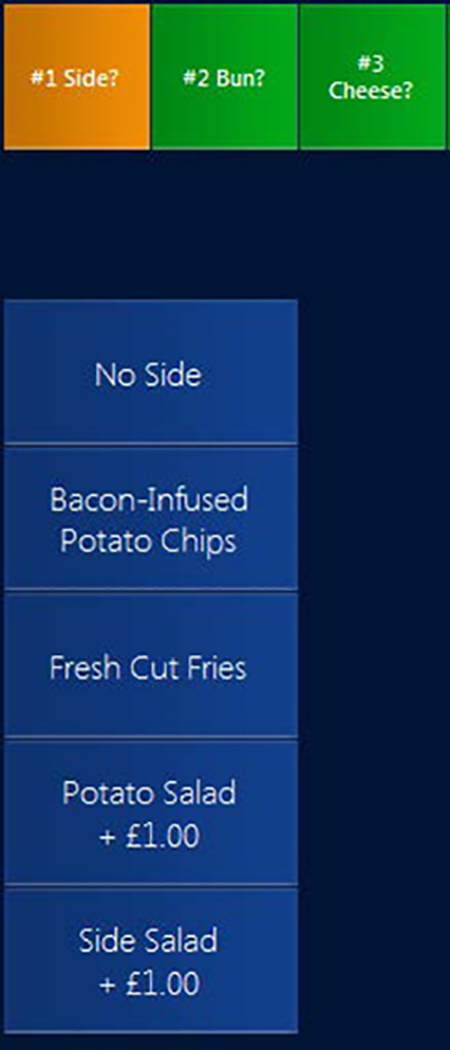
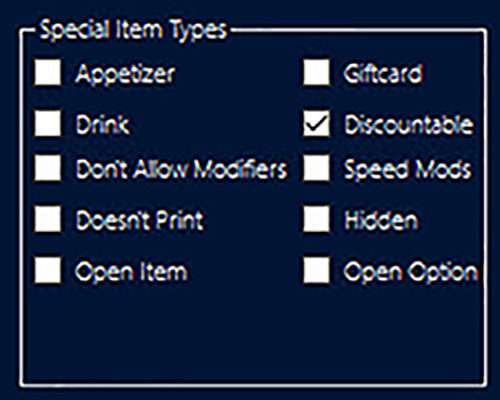
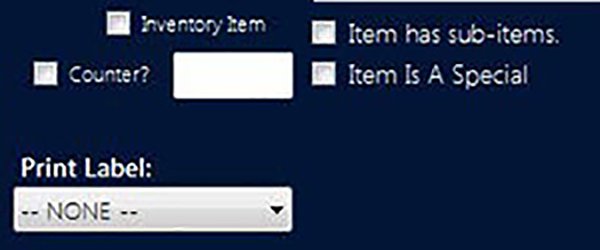
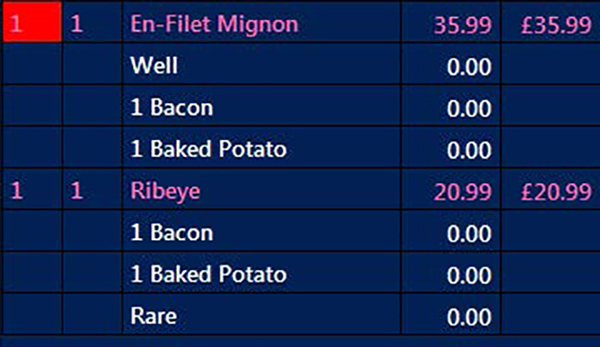
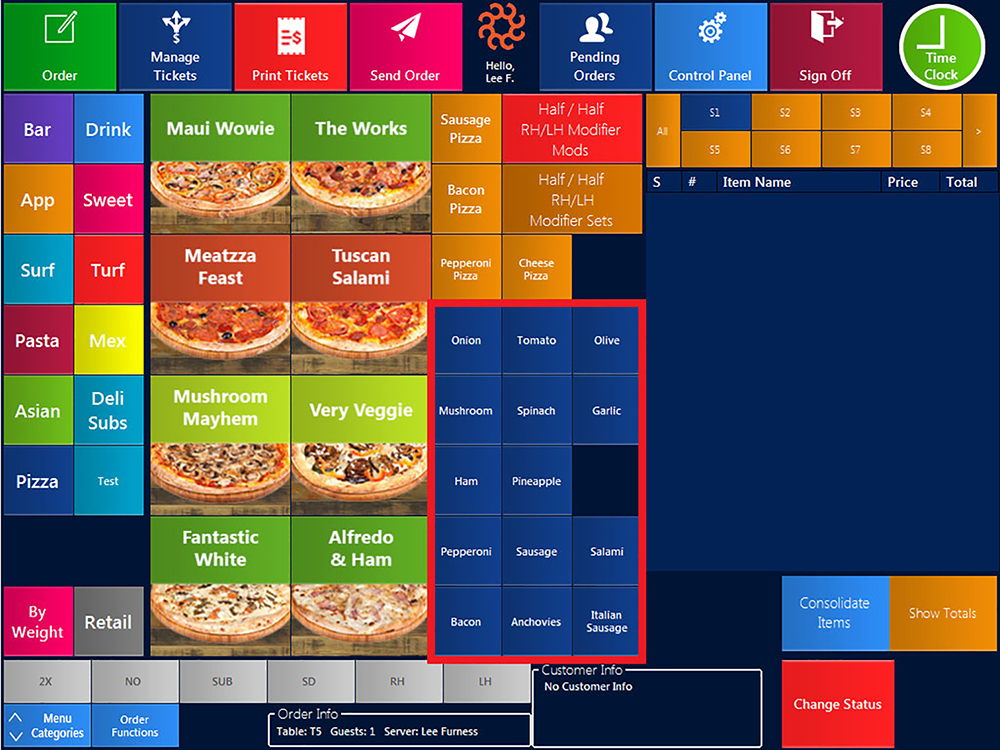
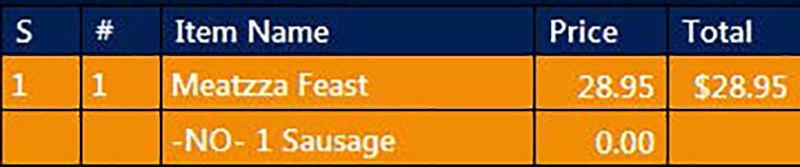
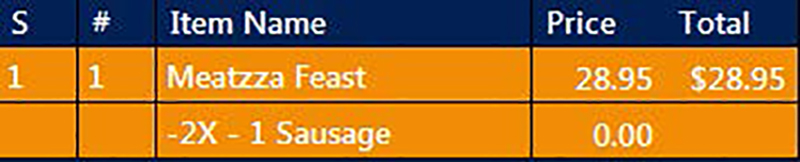
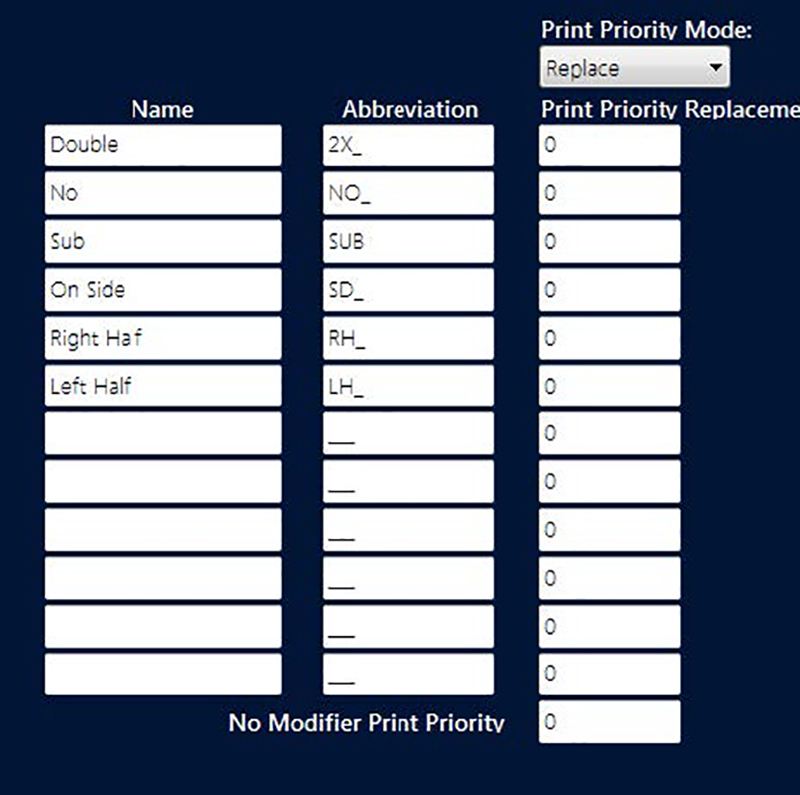
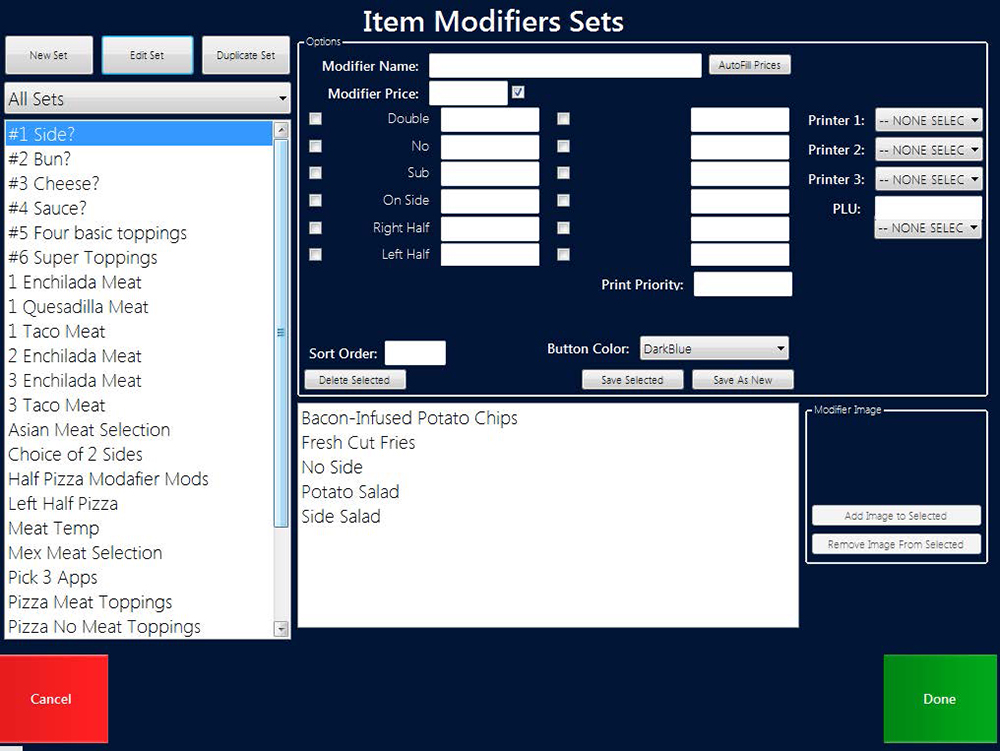
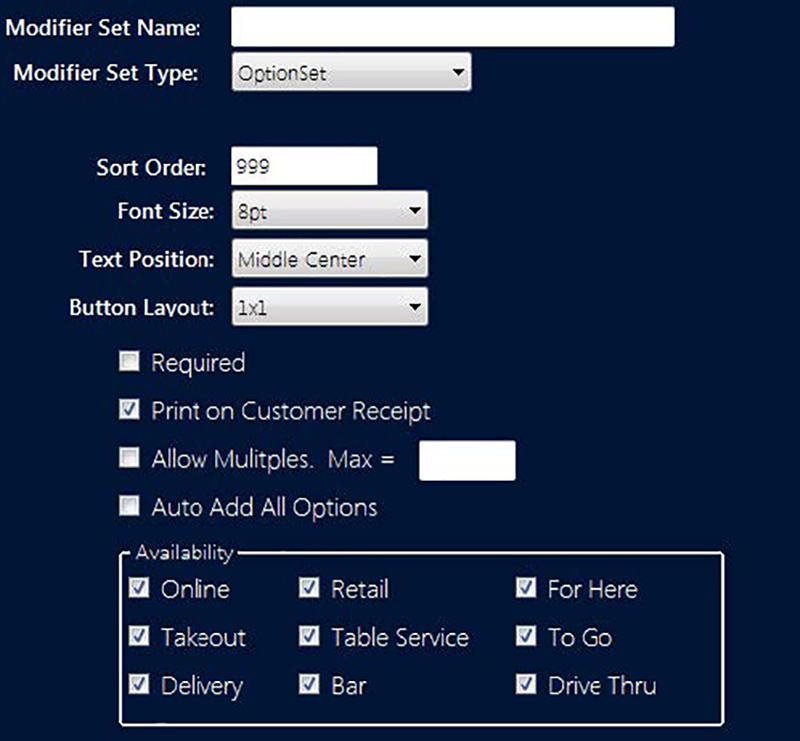
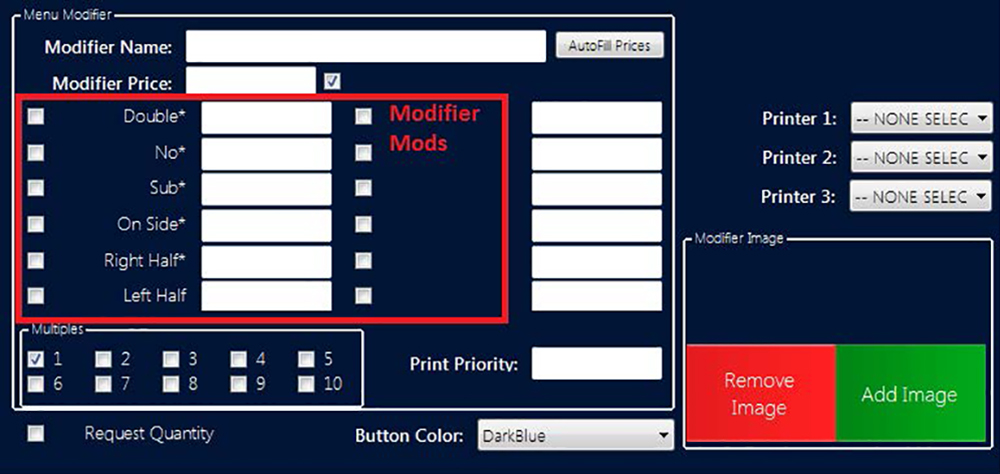
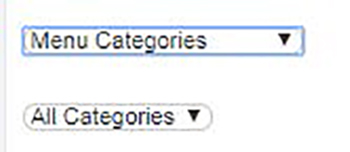
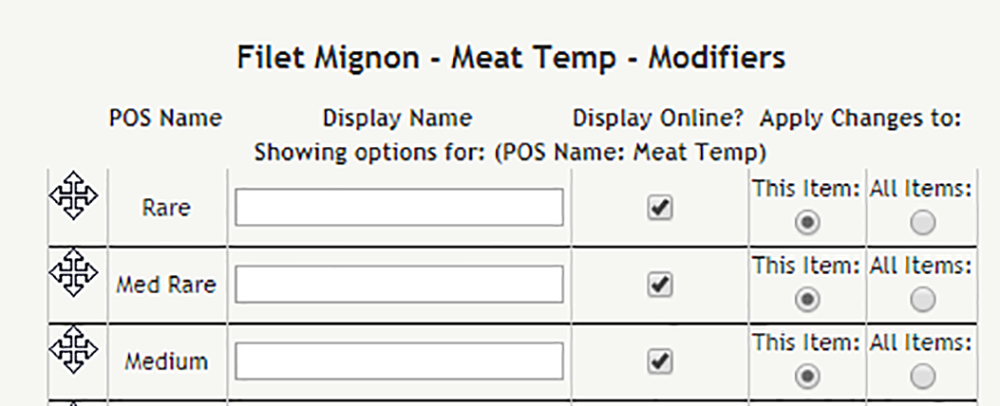
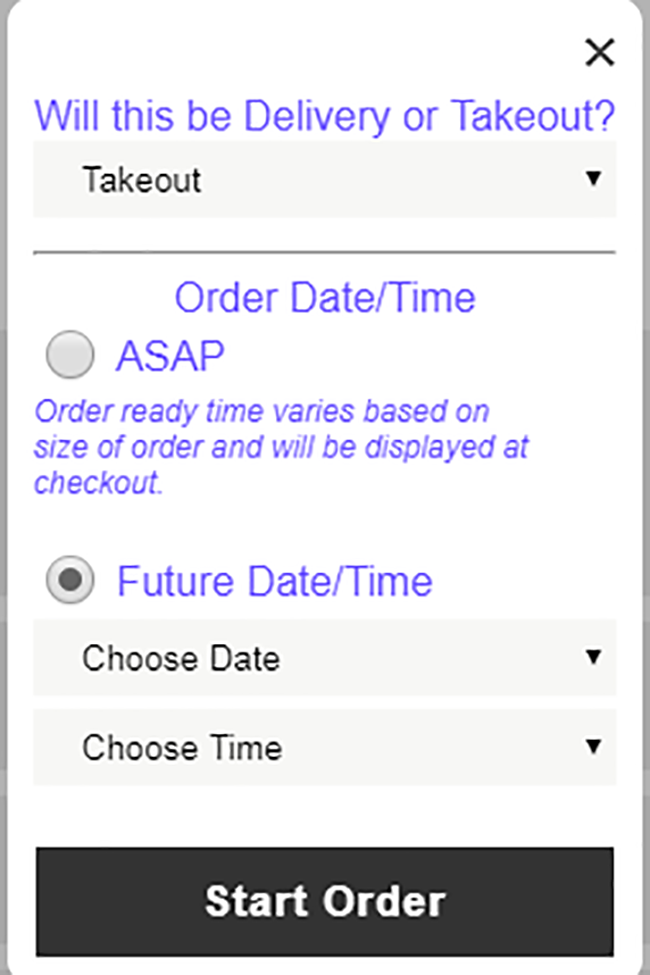
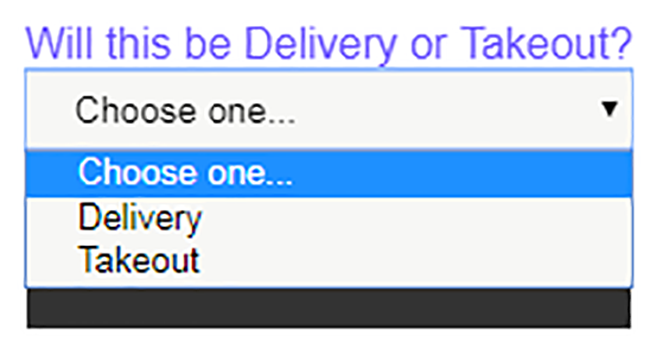
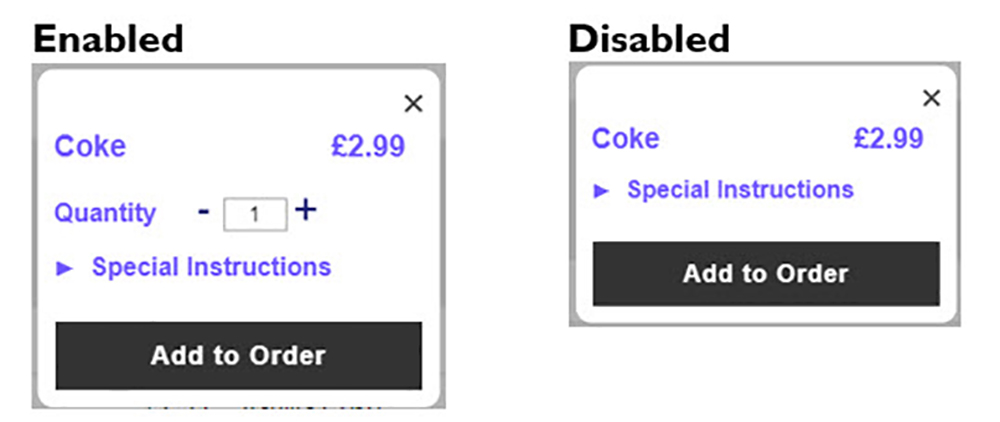
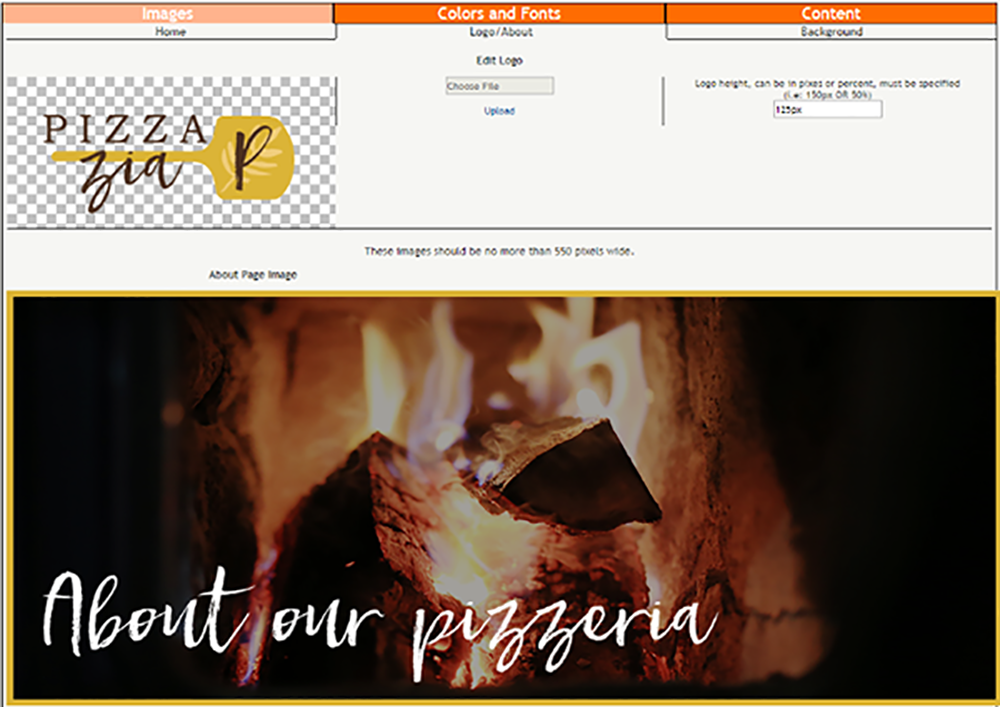
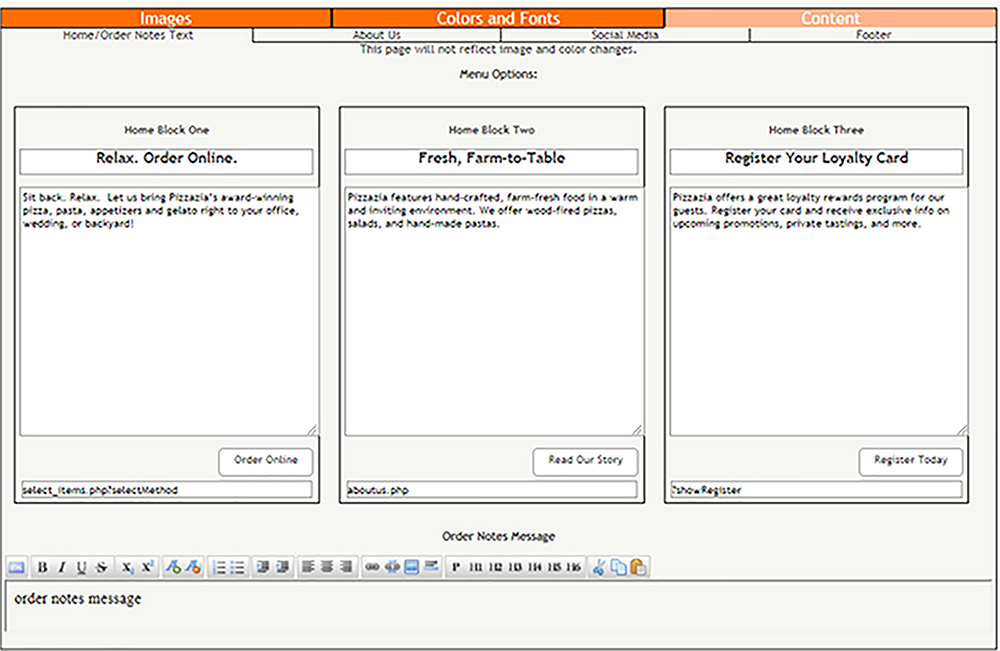
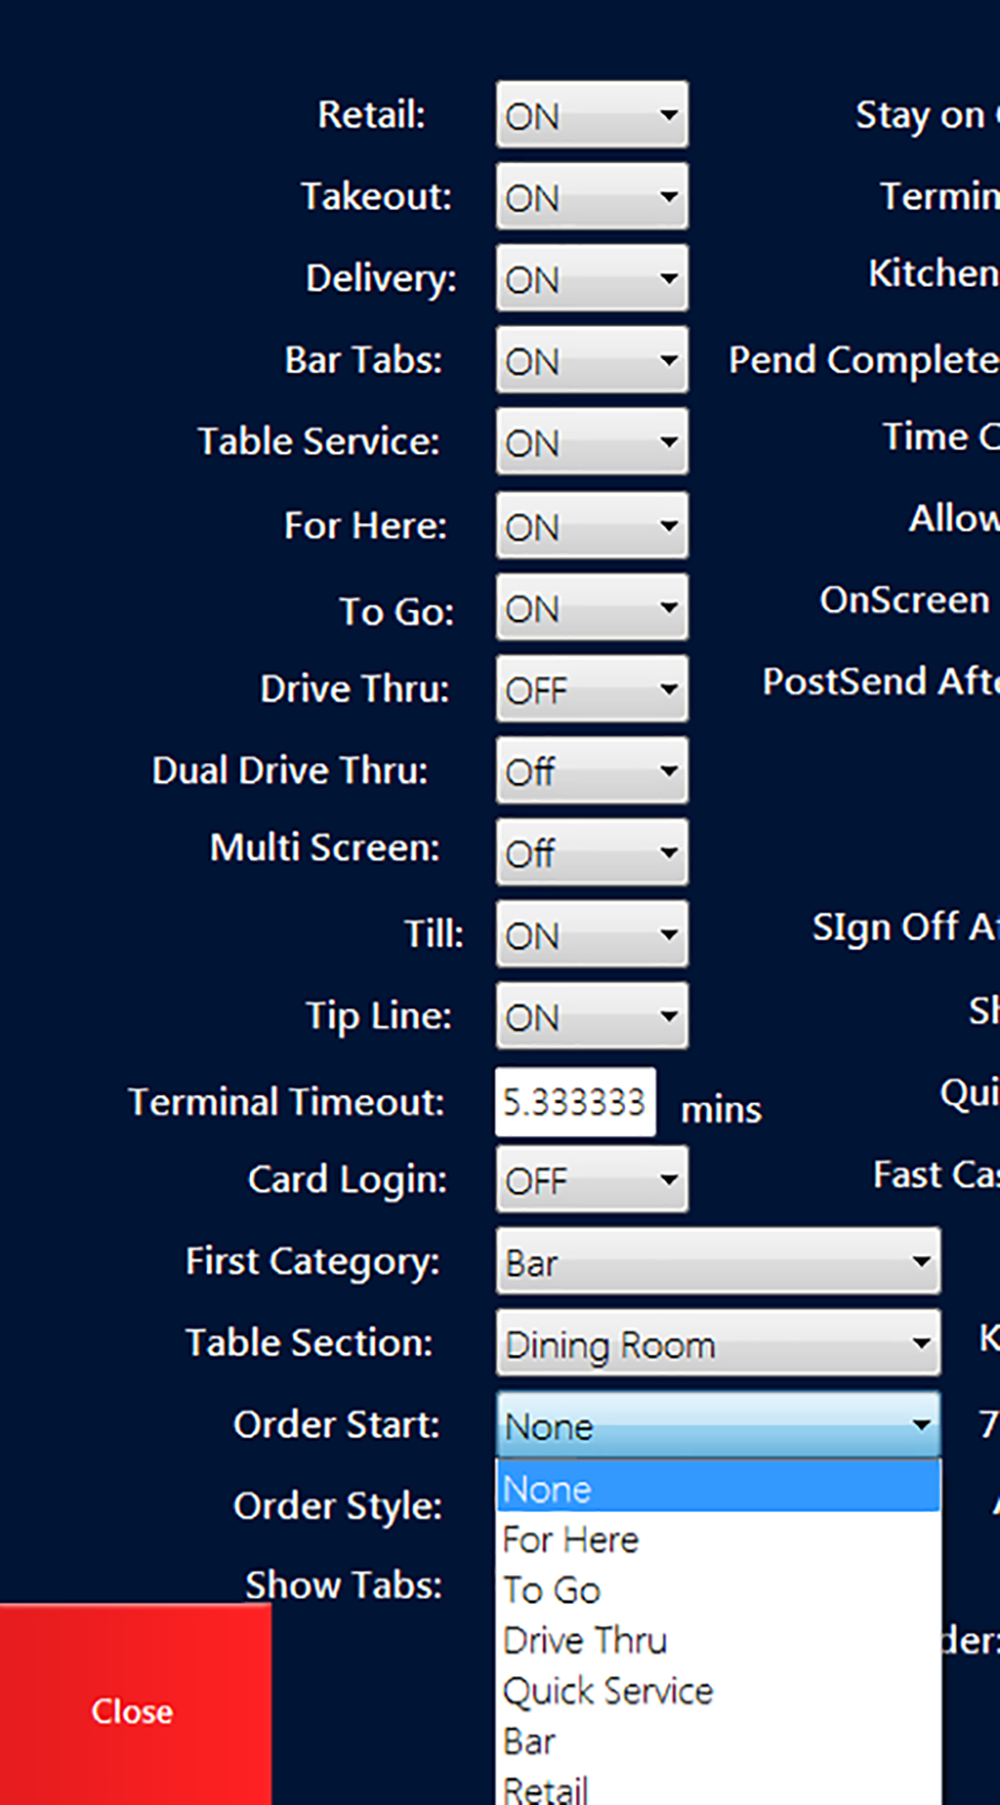
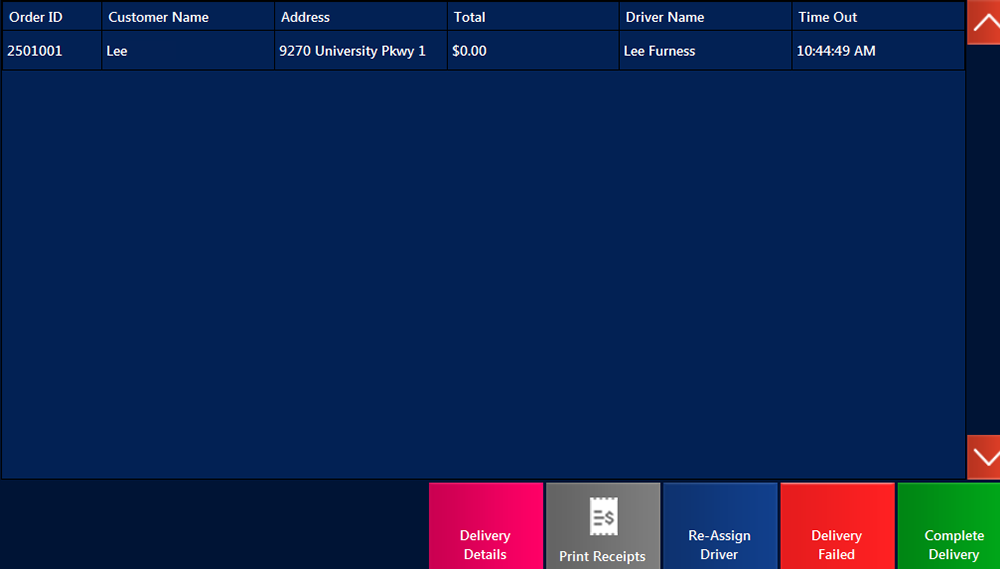
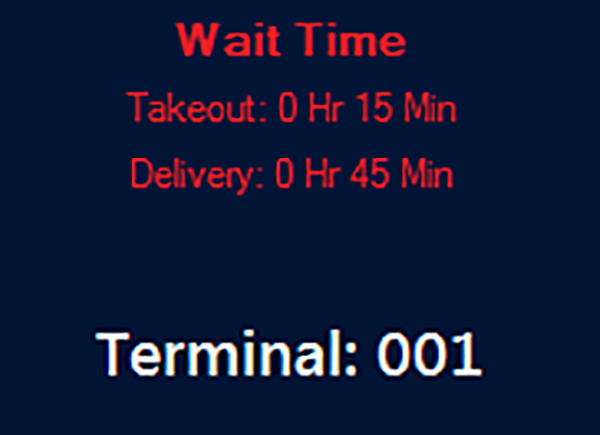
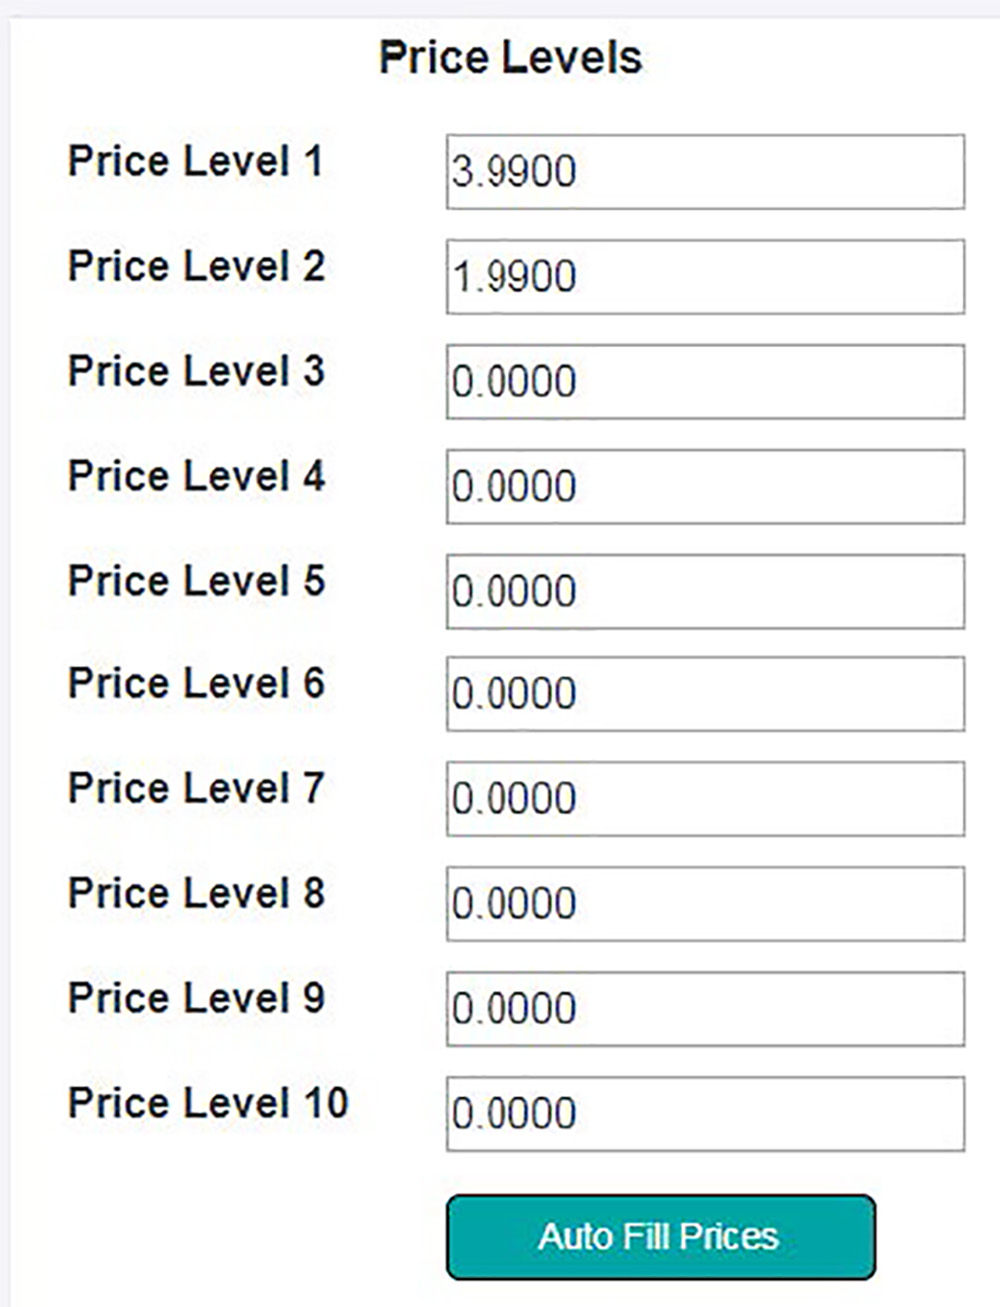
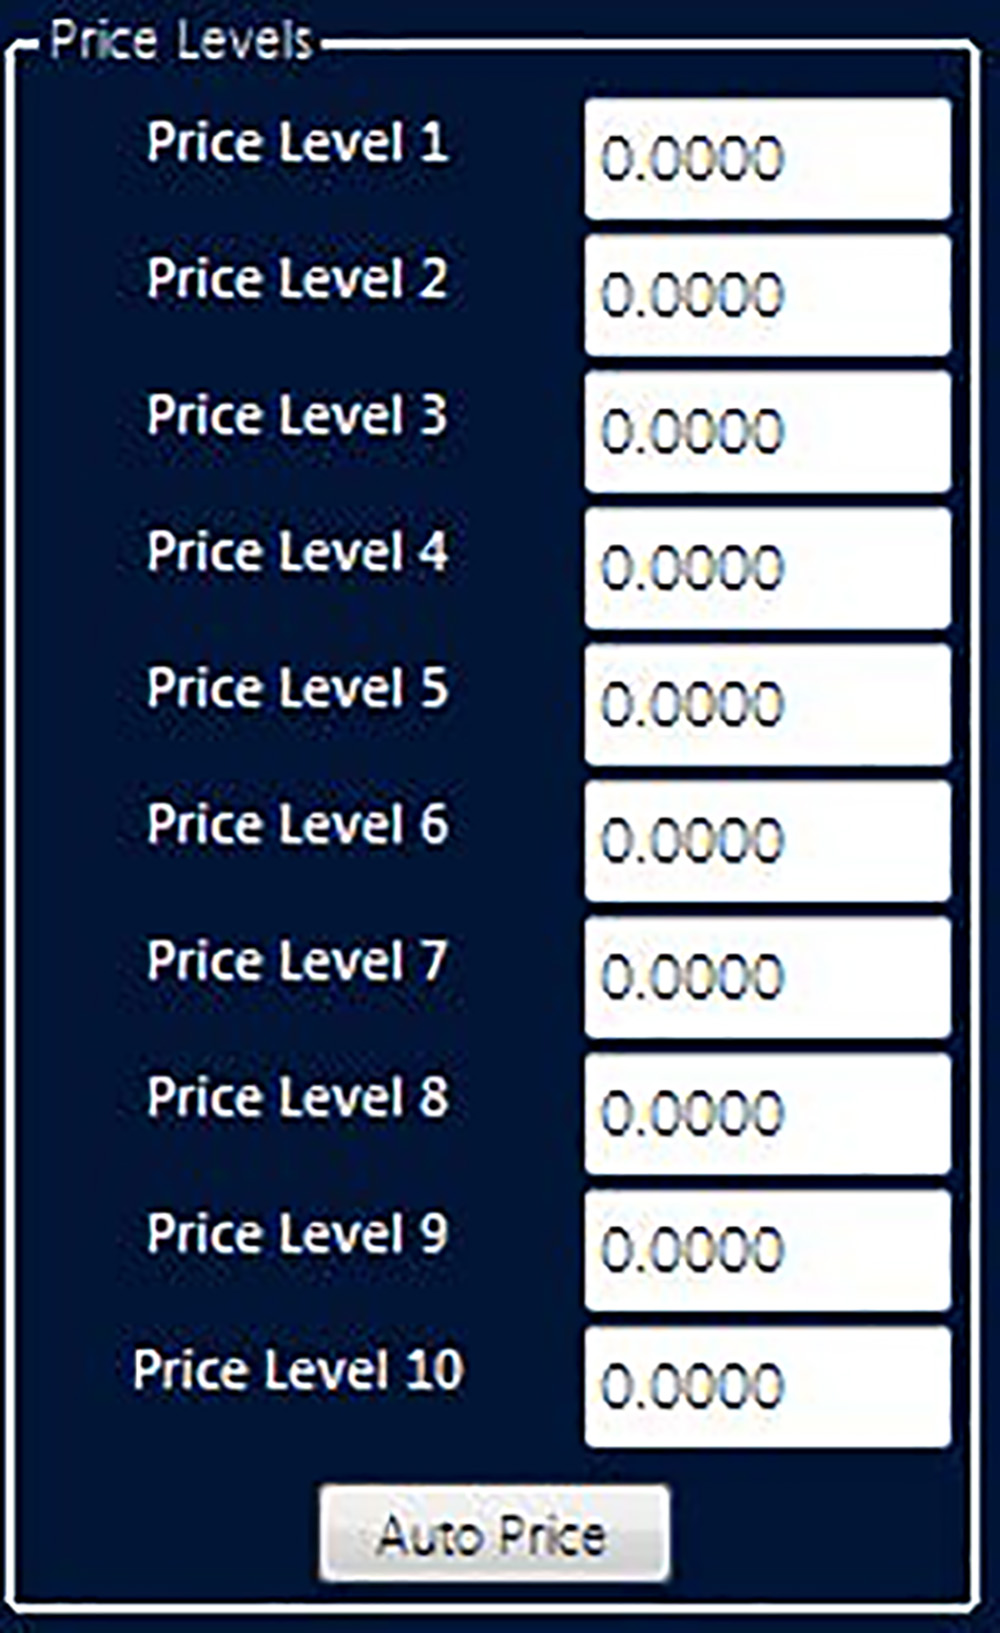
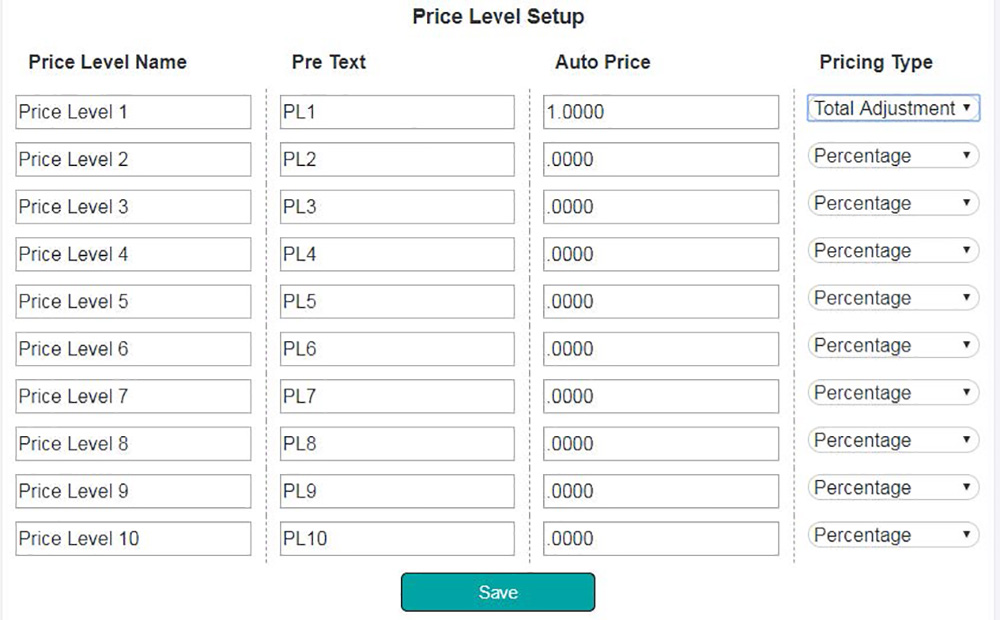